| Construction Rating: | starstarstarstarstar_border |
| Flight Rating: | starstarstarstarstar_border |
| Overall Rating: | starstarstarstarstar_border |
| Diameter: | 0.28 inches |
| Length: | 10.23 inches |
| Manufacturer: | FlisKits  |
| Skill Level: | 3 |
| Style: | Futuristic/Exotic, MicroMaxx |
Brief:
This is a very cool looking futuristic mini-roc based upon the FlisKits Herc-5 and features many of the same design features such as scalloped/nested tubes, sci-fi command ship styling, and fantastic graphics/decals.
Construction:
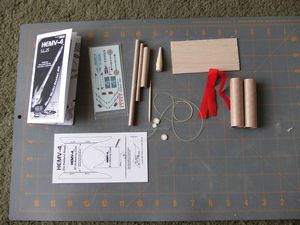
As is typical of the Micro-to-the-Maxx line, the kit comes packed up in a small plastic bag. Parts were very good quality although the balsa nose cone was a tad rougher than is the norm from FlisKits. Parts list includes:
- Balsa nose cone
- BT-3 tube (forward compartment)
- BT-2 tube (forward tube)
- BT-2.5 tube (main/aft tube)
- BT-20s (tube fins)
- Balsa fin stock
- Toothpick (trim)
- Centering rings/motor block
- Kevlar thread shock cord
- Plastic streamer
- Waterslide decals
- Pattern sheet
The instructions are written mostly on one side of a letter sized sheet of paper with helpful illustrations. The back side of the sheet includes a couple finishing steps as well as tips/techniques for launch preparation for those not familiar with the unique challenges of working with 6mm motors. The kit is rated as a skill level 2.5, which strikes me as about right, given the intricate tube shapes involved. I'd estimate my total build time was about 4 hours plus finishing, but that involved some issues unique to being among the first to build this product.
I strongly advise a careful reading of the directions before the build and even more closely reading them during the build. It's not that this is that complex, but it is a far enough departure from typical 3FNC construction that you'll be on unfamiliar ground, and very little about this construction falls under the instinct/that-looks-about-right approach.
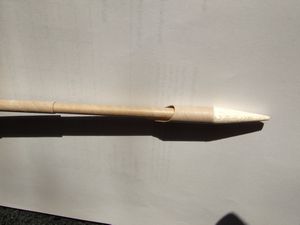
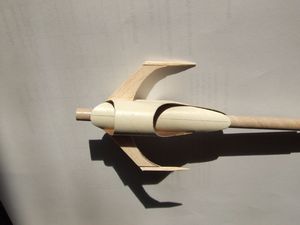
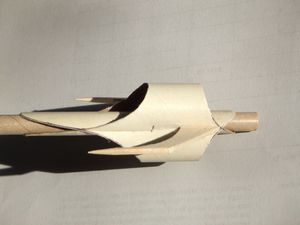
A BT-2.5 tube serves as the motor tube and main body tube. There are a pair of BT-20s that get scalloped (tapered) on each end and slotted. The two BT-20s then slide together through the slots, and the assembly slides over the BT-2.5. This process is one of those phases where it's critical to pay attention to the illustrations and instructions. On my kit, the BT-20s were too short, but I understand this is being corrected.
The forward tube subassembly is a bit easier. It consists of a BT-2 tube and a pair of centering rings at the forward end, which serve as an anchor point for the Kevlar thread. A scalloped BT-3 tube then slides over the centering rings, and the subassembly slides into the forward end of the lower BT-2.5 tube.
 There are a couple of fins hand cut from balsa stock, which go in the gap between mating BT-20 tubes. These each get little toothpick guns as trim.
The nose cone is attached to the shock cord via a little brad, however, I personally prefer to just use the brad to make the hole, which I then fill with glue, and then use the brad to poke a knotted end of cord into. The glue tends to grab the cord a lot better than a metal nail.
 Finishing:
I'll admit I was a bit lazy with this one, since I was building it on the road in hotel rooms, so I skipped the usual spiral and grain filling/sanding festival. Instead, I hit it with a couple coats of black primer, sanded down a bit, then two coats of Rustoleum sparkling metallic silver. The black undercoat really helps give the silver metallic a kick.
The decals really help make this a fantastic looking model, but they are a bit of work. Each has to be carefully cut from the sheet, and they're tiny. I used tweezers to apply them, then a little Microscale setting solution to make sure they grabbed.
Construction Rating: 4 out of 5
Flight:
When dealing with the MTTM line, you aren't exactly going to have to put much thought into motor selection--it's just Quest MMXs. Just be sure you use one with an ejection charge, as they now offer an "NE" version with no ejection that looks identical to the regular motor.
In any case, I loaded up the MMX and wound up having to cut away about 6" of the streamer in order to get it loose enough that I'd trust it to deploy. I think this could tumble safely, but I was going to be flying adjacent to some dense/tall growth (18-24" tall), and really wanted to make sure the red streamer was deployed for recovery help.
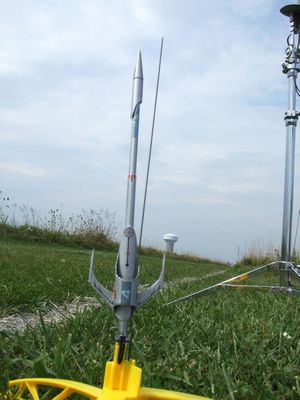
I dropped the HEMV-4 onto a standard Quest launch pad (for MMXs), hooked up my 12V leads, and fired away. It lit on first attempt and had a nice gentle flight to about 60-80 feet apogee. Most micros zip up so fast they're difficult to track, but this one was slow enough to follow the whole way.
Recovery:
The streamer deployed fine, although with the -1 delay (the only choice available), it was definitely too early. It had another good 1-2 seconds of coast left in it.
The streamer is more decorative (and supports finding it on the ground), and the mostly tumble recovery was just fine. The model was recovered with no flaws.
Flight Rating: 4 out of 5
Summary:
This is another cool addition to the Micro-To-The-Maxx line. PROs would be cool styling and slightly challenging build techniques involved. The only CONs I can offer up are the sure-to-be-corrected body tube gaffe and the oversize streamer, which is easily handled if it remains the current length.
Overall Rating: 4 out of 5
 |
 |
Flights
|
|