| Construction Rating: | starstarstarstarstar_border |
| Flight Rating: | starstarstarstarstar_border |
| Overall Rating: | starstarstarstarstar_border |
| Diameter: | 0.28 inches |
| Manufacturer: | FlisKits  |
| Style: | Futuristic/Exotic, MicroMaxx |
Brief:
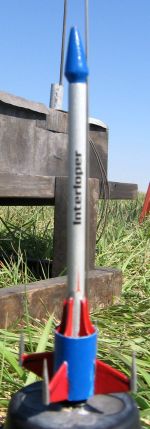
If you're ready to move beyond those RTF Micromaxx kits and step into honest to goodness kits to build, you can't go wrong with the FlisKits line of micro kits, and the Interloper is as good a place to start as any. It sports a futuristic spaceship design and flies great. Sure, it only goes up about 70 feet, but for about 1/4 the cost of an 18mm motor, you can send this one practically out of sight just the same...
Construction:
This is a real kit not a plastic toy, and comes with the type of parts you'd expect in a kit, albeit itty bitty sized, including:
- Balsa nose cone
- BT-2.5 body tube/motor tube
- Centering ring motor block
- Balsa fins (hand cut)
- Laser cut fiber ramjet fins (6)
- BT-20 ramjet tube
- Kevlar shock cord
- Mylar streamer
- Toothpick trim details
- Waterslide decals
- 1/16" launch lug
Parts are excellent quality, typical for Fliskits.
The instructions are micro-sized as well, compressed to one side of an 8.5" x 11" sheet and covering 14 steps. There are also instructions for how to modify the plastic plug-in style igniters for flight prep, as this won't fit the standard Quest launch system very well. The build is pretty straightforward, though working in this small scale can be slightly more challenging than regular model rocketry and your eyes will age quickly once you head down this path.
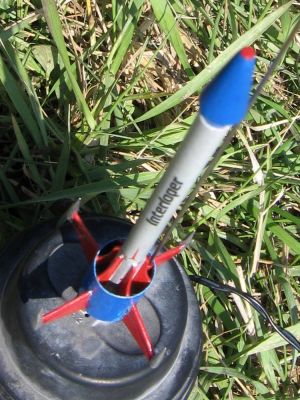 You start out by gluing in a centering ring motor block just like a regular 18mm kit. Next, mark the body tube for 6 ramjet fin lines using a template printed on the instructions. Tube marking such small scale is tricky, especially using a template, and I'd suggest making your own wrap using one of the free utility programs such as the template widget available in the tools section of this site. Next, tack the 6 ramjet fins around the body tube. Once they are securely in place, you slide a BT-20 piece over them and mark it for 4 fins.
The fins are cut by hand using a pattern printed on the instructions. Once cut, taper the leading and trailing edges by sanding. Finally, cut the ends off a pair of toothpicks and tack to the tip edges of the fins as decorative trim.
The shock cord is mounted externally, bonded to one of the ramjet fin fillet joints. While this tends to ding the appearance slightly more than an internal mount, I have found that this really thin Kevlar thread does not hold up well to multiple flights when internally mounted even if using wadding. I've learned to go back to the recommended external mount method now... The forward end is glued to the base of the nose cone (use the provided wire brad to poke a hole).
All told, you should be ready to prep this for paint within an hour or so from the time you started building depending on what kind of glue you use.
Finishing:
It's kind of hard to be finicky about the finish on a kit like this, but if you're really anal about craftsmanship, you can fill the spirals on the BT-2.5 and BT-20 plus dust the balsa cone and fins with a little sealer or Elmer's Fill 'n' Finish.
After a couple quick coats of primer, I painted everything a base of silver metallic then hit the BT-20 and nose with a gloss blue. I wound up cheating a bit and painted the ramjets red before bonding them to the pre-painted silver body tube and hand painted the fins and tip of the nose cone gloss red. Toothpick details got hand painted chrome silver.
The kit comes with some decent waterslide decals, though doing decals this small requires some serious patience. Not nearly as hard as my Micro Interceptor, but whenever I wind up having to use tweezers to place a decal and the decal is so small it wraps itself around the tweezer tip instead of jumping onto the paint, I say a few 4-letter words to myself.
Construction Rating: 4 out of 5
Flight:
Motor choices are limited on this to either the current MMXII motors, or the older (brown) MMXIs with slightly higher impulse if you can find any.
The flight was perfectly stable, disappearing in a flash faster than you can say Pfffft (the sound of the mighty MMX thrust). With the only delay option a -1 (and that's rounding up from what is probably more like 0.5-0.7). Deployment is very early, though at this scale a zipper is not exactly likely.
Recovery:
For a rocket this small and light, tumble recovery would normally be fine, and you might be tempted to skip the streamer. Don't. The streamer's main purpose is to help you fins the rocket before you accidentally step on it (plus it conforms to the NAR safety code). My Interloper landed safely in the grass, and I recovered it for a future return to micro-outer-space.
Flight Rating: 4 out of 5
Summary:
PROs: excellent job of bringing model rocketry quality of materials and design down to MMX scale, fair value, innovative design.
CONs: none.
Overall Rating: 4 out of 5
 |
 |
Flights
|
|
|
|
DWG (July 23, 2007)