| Construction Rating: | starstarstarstarstar_border |
| Flight Rating: | starstarstarstarstar_border |
| Overall Rating: | starstarstarstarstar_border |
| Manufacturer: | FlisKits  |
 Brief:
About 20 years in the making, this futuristic 5FNC design was released by Flis to celebrate their 6th anniversary in
2008. It's a pretty cool design, with fins blending into the transition. This is a design that Jim has been doodling
with since the 1980's, originally starting out at 18mm and half the current length, eventually growing to 24mm and
30" length my popular vote at a CMASS launch.
Construction:
Having scored #07, I decided to stash that in the "collection" and wait a month or so to buy a
regular/unnumbered one. Naturally, when I pulled the trigger Jim somehow unearthed another numbered one, so I have now
sacrificed #22 to the built fleet. My kit arrived about 4 days after the order (a complex order) in fine shape.
The parts include:
- Balsa nose cone
- BT-55 main body tube
- BT-50 motor tube/lower body
- Laser-cut balsa fins
- Cardstock transition, backup fin patterns
- Motor block
- (2) 20/55 centering rings
- Kevlar®/elastic shock cord
- 16" plastic chute
- Trim toothpicks
- Waterslide decals
 As Les
mentioned in his review, the motor mount does not include a hook, being a minimum diameter design. Still, the fins are
eventually mounted 3/8" forward of the aft end, so that leaves plenty of room to wrap a strip of masking tape
across the motor and body tube, a technique that has never failed me in hundreds of flights, including competitions
where ejecting the motor is a disqualification. I don't know what I was thinking, but I putthe motor block in the BT-50
using a spent E9 casing, my default when building 24mm designs. Given the light weight of this rocket, and the fact
that I typically fly in an area with 5-10 mph winds and about a half mile of recovery range, flying this on an E would
be foolish. Oh well, I could potentially go for broke at an NSL some day.
As Les
mentioned in his review, the motor mount does not include a hook, being a minimum diameter design. Still, the fins are
eventually mounted 3/8" forward of the aft end, so that leaves plenty of room to wrap a strip of masking tape
across the motor and body tube, a technique that has never failed me in hundreds of flights, including competitions
where ejecting the motor is a disqualification. I don't know what I was thinking, but I putthe motor block in the BT-50
using a spent E9 casing, my default when building 24mm designs. Given the light weight of this rocket, and the fact
that I typically fly in an area with 5-10 mph winds and about a half mile of recovery range, flying this on an E would
be foolish. Oh well, I could potentially go for broke at an NSL some day.
Tube marking for the 5 fins is accomplished using a wrap-around guide. My guide was just a hair too tight, so I reprinted one using the handy tool on the EMRR site. The instructions call out forming the shroud and slipping it over the BT-50 before tacking on the fins, since the wide end of the transition points forward and it's too tight a fit to slide on from the front end of the body tube. I normally am extremely careful in minimizing my seams, but in this case the seam is almost completely covered by a fin, so I didn't worry about it and just used the regular overlap tab included on the pattern.
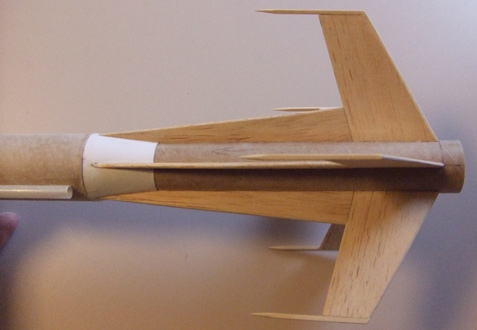
The fins are (5) 2-piece assemblies, with the larger/aft piece being forward swept. The instructions call out mounting the large fins first, then following with the strakes. Since these bond to the sloped transition surface, it's important that they all be the same length and positioned evenly. I decided to cheat a bit by tacking the fins and strakes together offline, sanding them a bit to make sure they were identical, then tacked them onto the BT-50 with CA. I then slid the shroud down inside the sloped edges of the strakes for a perfect fit.
A pair of 50/55 centering rings go at the top of the BT-50. One being positioned just inside the edge of the shroud, and the other at the edge of the BT-50. I slipped the Kevlar® cord through the forward ring and knotted it, serving as a shock cord anchor. The upper BT-55 then is glued on, sliding down over the centering rings and butting up against the shroud.
Construction wraps up with the screw eye in the nose cone, construction of the plastic chute and attaching the (5) decorative toothpicks to the tip edges of the fins.
Finishing:
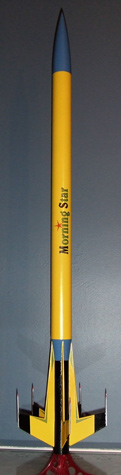
I decided to try to follow the cover art a good bit on this, so went with a yellow and black scheme, with minor
accents in blue and red. I skipped the usual balsa grain filling to get this review in before the end of the year
(trying to catch Dick Stafford as the volume leader), though I did finger smear some dilluted Fill N Finish over the
nose cone, which I sanded off a couple hours later for a mirror smooth finish. The body tubes, as noted in Les's
review, had very thin spirals, so I simply gave them a good sanding with 220 grit before painting, which cleared them
mostly away.
 I primed everything with 2 coats of white. I normally go gray,
but have had fits with Krylon yellow over anything but white--it tends to take more than 5 coats before it stops
looking dark, and the newer formula is even worse for coverage. I followed up with 3 coats of yellow, then masked off
the fins and painted the transition and nose blue and the lower body gloss black. Finally, I hit the toothpicks with a
hand-painted silver and red. or some reason, I think the newer Krylon formula is not that compatible with the old
formula, as I had some pretty nasty paint chipping/peeling that pulled the primer clean off the body tube and also got
some crazing of the gloss black (new) when it hit the yellow (new) and primer (old).
I primed everything with 2 coats of white. I normally go gray,
but have had fits with Krylon yellow over anything but white--it tends to take more than 5 coats before it stops
looking dark, and the newer formula is even worse for coverage. I followed up with 3 coats of yellow, then masked off
the fins and painted the transition and nose blue and the lower body gloss black. Finally, I hit the toothpicks with a
hand-painted silver and red. or some reason, I think the newer Krylon formula is not that compatible with the old
formula, as I had some pretty nasty paint chipping/peeling that pulled the primer clean off the body tube and also got
some crazing of the gloss black (new) when it hit the yellow (new) and primer (old).
This kit includes water slide decals, a rarity indeed for Fliskits, which I applied without much trouble though cutting out the individual decals was a bit tedious. Hint--use a decent #11 blade rather than messing with scissors.
Also, I noticed the decal colors were not printed over a white base, so tend to allow a bit of the underlying color to bleed through. Note the contrast in my photo between the blue on the decal sheet and the same blue applied over my yellow base.
Construction Rating: 4 out of 5
Flight:
For the maiden flight, I went with about as low impulse as I could since it was windy, freezing cold and I was too
lazy for a recovery walk. I opted for a C11-5. The rocket boogied up a bit more quickly than I expected, but nice and
straight and not terribly high, maybe a couple hundred feet. It had just arced over when the ejection charge fired and
naturally the shroud lines got caught up on one of the toothpicks. A -3 delay, definitely early, might have been better
to avoid the tangle.
Recovery:
The 16" plastic chute never got a chance to do its thing, caught in the toothpick(s). It did land fairly gently
on a carpet of snow, so suffered no damage.
Flight Rating: 4 out of 5
Summary:
Overall, I like the 5-fin, forward sweep of this rocket and the way the fins nest against the transition which make
for beautiful lines. The only con I'd offer is the decals being weak and they should include a white base first.
Overall Rating: 4 out of 5
Other Reviews
- FlisKits Morning Star By John Lee (July 11, 2009)
Brief: The Morning Star is a nice looking futuristic design from FlisKits that still looks like a traditional rocket. It is not trying to be an extra from a sci-fi series. It's simple but cool. Construction: Construction began by my locating a spent 24mm casing and marking off 1/4" from one end. A ring of white glue was then applied inside the BT-50 motor tube using a swab ...
- FlisKits Morning Star By Les Bradshaw (November 4, 2008)
Brief: This is a new offering from FlisKits. It is a single stage that uses parachute recovery. I got the rocket as part of their 6th anniversary celebration. It was quickly delivered in a well packaged box. Construction: There are 2 body tubes, a BT-55 that transitions down to a BT-50. There are 5 forward swept fins that blend into the transition. They provide toothpicks to ...
 |
 |
Flights
|
|