| Construction Rating: | starstarstarstarstar |
| Flight Rating: | starstarstarstarstar |
| Overall Rating: | starstarstarstarstar |
| Manufacturer: | FlisKits  |
Brief:
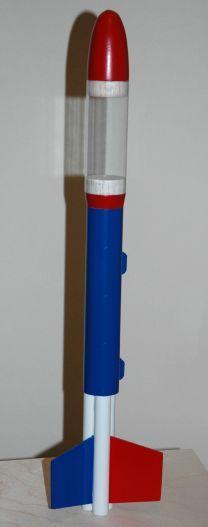
A great three motor cluster rocket with a 9.26 cubic inch payload bay that
works well as an egg lofter. This is the little brother to the Fliskits
StarLoad.
Construction:
The parts list:
- 1 balsa nose cone
- 1 balsa adapter
- 1 clear payload tube, 5"
- 1 8.5" body tube
- 3 8.62" body tubes
- 3 fiber vent plugs
- 1 1/8" thick balsa fin stock
- 1 16" parachute
- 1 launch lug
- 3 engine blocks
- 1 screw eye
- 1 shroud line
- 1 elastic shock cord
- 1 Kevlar® shock cord
- 1 set tape disks
- 1 fin pattern sheet
- 1 instruction sheet
The engine mount is a little unique on this rocket. You insert engine blocks into the three 8.62" BT-20 body tubes and then you glue the three tubes together to form a triangle pattern. I lightly sanded the tubes before gluing to give the glue a better grip. I opted not to add fillets at this time since the fins need to be glued into the joints where the tubes come together.
Instead of using a centering ring to mount the motor tubes into the upper tubes, the kit includes "vent plugs" which are half-moon shaped fiber ring material that form a ring when all three are glue to the engine tubes. It is important that you measure correctly for each of the three plugs and that they are level once attached. Once they have dried, you can glue the engine tube assembly into the main body tube.
I had to do a double take on the next step which said to sand a taper on the root edge of each fin. Usually instructions tell you not to do this. You need the taper because the fins fit into the joint of the tubes which is a "V" shaped notch. I decided to add fillets to the tube joints using white glue and then I pressed the fins into the fillets.
Another odd step was the Kevlar® shock cord. You are instructed to glue the cord under one of the fins. Personally, I am not a fan of external shock cords but I went for it and it seems to work well.
The launch lugs are mounted on standoffs and are tapered which gives them a great look. The last step is to assemble the payload bay and you are done!
Finishing:
I decided to go with the picture on the face card. Fliskits always presents
challenging paint schemes. After priming the entire rocket, I masked off the
main body tube. This was a little challenging due to the location of the lower
launch lug. I used Krylon white to paint the entire lower half of the rocket. I
then masked off the lower half and painted the main body tube Krylon blue.
The fins were fairly easy to mask due to the way they are mounted. One fin stays white, another is blue and the last is red. It looks just like the picture!
Construction Rating: 5 out of 5
Flight:
First and only flight of the day was on three B6-4 with an egg in the payload
bay. Great boost and it went higher then I expected. Rocket was recovered with
no damage and the egg was able to fly again.
Recovery:
The 16" parachute was more than ample to bring this rocket down safely,
even with an egg in the payload bay. Although it was a bit windy, there was not
that much drift and the rocket was recovered close to the pad.
Flight Rating: 5 out of 5
Summary:
This is a great cluster rocket that looks good and flies even better. The
instructions provided even included a "how to" on cluster rocketry.
This would be a perfect kit for egg lofting competitions.
Overall Rating: 5 out of 5
 |
 |
Flights
|
|