| Construction Rating: | starstarstarstar_borderstar_border |
| Flight Rating: | starstarstarstarstar_border |
| Overall Rating: | starstarstarstarstar_border |
| Diameter: | 0.74 inches |
| Length: | 20.54 inches |
| Manufacturer: | FlisKits  |
| Skill Level: | 2 |
| Style: | Contest |
Brief:
You read that right. The classic Art Rose helicopter design based upon the Rota-Roc is going to be available in kit
form. This review is of the beta version of the kit, which Jim Flis allowed me to build while at NARAM-49. I was so
impressed with this kit that I wound up flying it in the A helicopter duration event at NARAM.
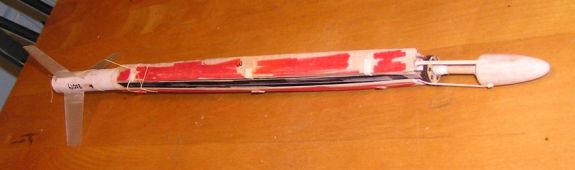
The Rose-a-Roc takes that basic design quite a bit further. First, it uses blades that fold in half along the length and they attach to a small diameter shaft. As a result, they lie in the drag shadow of the cone. Next, the wedges/blade stops are eliminated by mounting the blades to a hub underneath the nose cone. It's a much more efficient design with a higher boost, but the complexity of the hub and blade mounting has been so intimidating as to scare away many a prospective builder (including me). Fortunately, Jim Flis has taken the complexity out of the hub while still holding close to the Rose-a-Roc design, resulting in something much more builder-friendly.
Construction:
Again, this was a beta kit, and Jim managed to sneak back from NARAM with my built beta so I'm doing the parts list
from memory...
- 2 balsa nose cones, drilled for upper and lower
- 3/16" wood dowel/shaft
- 3 piece laser cut disk set (replaces the Rose hub)
- 1/16" balsa stock for blades
- 3/32" balsa fin stock
- BT-20 motor tube (roughly 5" long)
- CR520 centering rings
- assorted wire/elastic for blade deployment
As a beta kit, instead of instructions I basically got the 1983 Model Rocketeer article that introduced the Rose-Roc, along with the original plans, and a FlisKits part schematic drawing. The final product will, I'm sure, have the standard quality instructions to be expected with a FlisKit. Jim and I traded a number of tips while working on this, most of which are going to be listed as optional performance enhancing tips rather than rolled into the design as Jim is trying to remain as close as possible to the original Art Rose design.
 I have extensive helicopter experience, having built at least 12 previous competition
copter models and managed to complete this in about 6-7 hours over two evenings, although a good part of that was
figuring out how to build it as I ambled along. I would expect the released kit to take roughly the same amount of time
and is every bit a skill level 3 and more likely a 4. Even with the greatly simplified hub, this is still a complex
design and requires careful attention to detail and modeling skills.
I have extensive helicopter experience, having built at least 12 previous competition
copter models and managed to complete this in about 6-7 hours over two evenings, although a good part of that was
figuring out how to build it as I ambled along. I would expect the released kit to take roughly the same amount of time
and is every bit a skill level 3 and more likely a 4. Even with the greatly simplified hub, this is still a complex
design and requires careful attention to detail and modeling skills.
I started at the bottom, working with the motor tube. I had to punch a couple of vent holes making sure they were at least 1" back from the aft end as a nose cone goes into this tube too. Apply a good bead of glue or epoxy inside as this section will suffer a lot of wear and tear from ejection charges.
The beta kit included a centering ring to act as an engine block, but after some discussion, it looks like Jim is going to switch to a 1" coupler tube, which will help stiffen the tube and absorb some of the ejection force. At the forward end of the tube goes the aft nose cone--a basic BT-20 cone but with a hole drilled in the tip to accommodate the dowel/shaft.
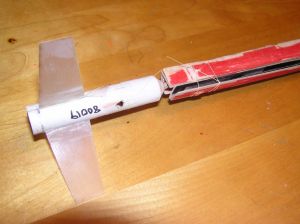
 The Rose-a-Roc standard fins are long, swept, and fairly high drag, especially since I only
planned on flying this on A and B motors so I made a little substitution and went with some smaller G10 fins from
Aerospace Speciality Products. I believe the standard kit will include the swept fin pattern as well as an optional tip
for smaller delta or trapezoidal fins.
The Rose-a-Roc standard fins are long, swept, and fairly high drag, especially since I only
planned on flying this on A and B motors so I made a little substitution and went with some smaller G10 fins from
Aerospace Speciality Products. I believe the standard kit will include the swept fin pattern as well as an optional tip
for smaller delta or trapezoidal fins.
Next up come the blades, which are the most time consuming aspect of the project, assuming you want a decent airfoil. Since the beta was a last minute cobbling together of some common materials, I am not sure what balsa the finished kit will use but will say I used a single piece of 3x12 stock for the blades. Before cutting anything, I first airfoiled the outside edges as trailing edges. I then marked 1" lines and cut one of the blades loose. Next, I airfoiled a trailing edge on the freshly cut 2" wide piece and a leading edge on the freshly cut 1" piece. I then cut the 2" piece into two 1 inch blades, sanding leading edges onto each. This seems to me to be the best method for ensuring even airfoils and consistent blade weights, which is a key to copter performance.
 Once you've got airfoiled blades, it's time to upgrade them to Rose-a-Roc folding style.
First, you need to cut out a roughly 5/8" section from the interior edge of the blade, which is used as the top
half of a balsa sandwich that hold the hinges in place. I'm sure the instructions will make this clear and simple, but
I goofed and cut mine on the wrong side (it should be trailing side, not leading side). I was able to work around this
goof, but it basically cost me over half an inch of blade length. After you've removed the notch, you need to split the
blade lengthwise. Again, I'm not sure how the final kit will handle this as Jim intends to use Monokote as hinge
material, which we did not have available for the beta build. What I wound up doing through trial and error getting
better with each blade was applying reinforced fiberglass packing tape to the flat side of each blade then making the
cut from the airfoiled side roughly halfway into the wood. I then split the seam open by hand. The key is to make it
flexible enough to fold back over onto itself but firm enough to stop and not open to more than a perfectly
flat/airfoiled 180 degree position (e.g., you don't want the tape hinge to stretch or slip, holding the underside
flat). You then glue little elastic pieces across the top side of the blades in 3 positions. With the elastic in place,
the blade can be folded onto itself but will snap back open. The final blade step is tacking on a U-hook made by
forming some heavy duty stiff wire. I had all sorts of fits getting the wire bent precisely right, which is critical.
Jim and I discussed a number of possible enhancements, and I believe he will be some sort of alignment jig or go/no-go
gauge.
Once you've got airfoiled blades, it's time to upgrade them to Rose-a-Roc folding style.
First, you need to cut out a roughly 5/8" section from the interior edge of the blade, which is used as the top
half of a balsa sandwich that hold the hinges in place. I'm sure the instructions will make this clear and simple, but
I goofed and cut mine on the wrong side (it should be trailing side, not leading side). I was able to work around this
goof, but it basically cost me over half an inch of blade length. After you've removed the notch, you need to split the
blade lengthwise. Again, I'm not sure how the final kit will handle this as Jim intends to use Monokote as hinge
material, which we did not have available for the beta build. What I wound up doing through trial and error getting
better with each blade was applying reinforced fiberglass packing tape to the flat side of each blade then making the
cut from the airfoiled side roughly halfway into the wood. I then split the seam open by hand. The key is to make it
flexible enough to fold back over onto itself but firm enough to stop and not open to more than a perfectly
flat/airfoiled 180 degree position (e.g., you don't want the tape hinge to stretch or slip, holding the underside
flat). You then glue little elastic pieces across the top side of the blades in 3 positions. With the elastic in place,
the blade can be folded onto itself but will snap back open. The final blade step is tacking on a U-hook made by
forming some heavy duty stiff wire. I had all sorts of fits getting the wire bent precisely right, which is critical.
Jim and I discussed a number of possible enhancements, and I believe he will be some sort of alignment jig or go/no-go
gauge.
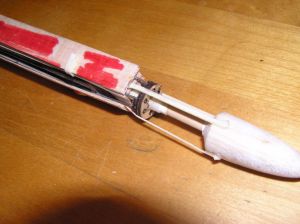
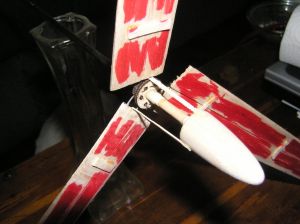
If you've gotten this far, it's all easy the rest of the way. The painful Rose-a-Roc hub is replaced by a 3-piece set of plywood disks. The aft-most piece is basically just an alignment piece to keep the blade hinges at 120-degree orientation. The middle piece is pre-drilled for the 12 holes you have to thread wire through to keep the blade hinges in place. The top piece serves to wedge the wire loops taught in place. Once Jim tipped me off that there was some thin thread-like wire (iron wire) for this, it was a breeze. Prior to that, I was trying to thread heavy piano wire, which was incredibly stiff!
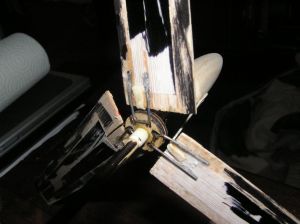 The wire hub is fixed in place on the shaft, most likely with a pair of launch lug pieces.
It's possible to convert this to a spinning hub design, although I won't get into that within this review. You would
basically attach the hub to a lug (not the shaft) and let the lug spin freely. The elastic from the blades would be
attached to the end of this lug instead of the nose cone. The NAR web site has a Whirl-a-While design that is a similar
spinning hub variant of this design.
The wire hub is fixed in place on the shaft, most likely with a pair of launch lug pieces.
It's possible to convert this to a spinning hub design, although I won't get into that within this review. You would
basically attach the hub to a lug (not the shaft) and let the lug spin freely. The elastic from the blades would be
attached to the end of this lug instead of the nose cone. The NAR web site has a Whirl-a-While design that is a similar
spinning hub variant of this design.
All that's left of construction is attaching the blade elastic--one end inside the balsa sandwich formed from that notch you cut out earlier and the other end to the bottom of the forward nose cone. Once that's done, glue the nose cone in place and glue the shaft to the lower balsa nose cone. I found the pre-drilled cones too sloppy a fit and had to build up the dowel with a paper wrap, but this will surely be resolved before release.
Finishing:
Since this is mainly a competition design, you will not want to weigh it down with a paint job so it's best to stick
with colored Sharpie marker accents on the blades. I prefer black bottom surfaces and red top surfaces, which are
easier to spot in the air and on the grass respectively.
Construction Rating: 3 out of 5
Flight:
For the first flight, I wanted to test it out on the NARAM sport range so I slipped a 1/2A-6 into it, placed it on an
18mm piston launcher (the kit comes with launch lugs, however, I chose to avoid the drag), and slipped over to the
sport check-in.
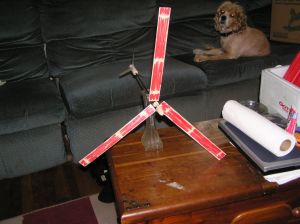
The model was a bit heavy for the 1/2A, but it still got a respectable boost to maybe 100 feet. The deployment/transition was perfect, and it settled into a great rotation. I did not time the practice flight but would estimate I held almost a minute in the air on that 1/2A.
With the practice flight under my belt, I switched to an A8-3 and went over to the contest range to enter this in the A-copter duration event. I did not expect it to be wildly competitive as the best models for this are lightweight 13mm designs, not a rugged 18mm design capable of handling a C. Nevertheless, I got a pretty good boost on that A8, equaling what the 13mm models were hitting. Unfortunately, I changed my burn string winding method a bit and that wound up being a bad idea--the burn string did not break loose so the blades did not deploy. The tumble recovery was good for about 25 seconds, but I was disqualified for the non-deployment.
Recovery:
Pros on flight would be excellent boosts and great rotation/duration. Cons would be the finicky nature of copter burn
strings in general though I reviewed this with Jim and we think we have a good technique that will wind up in the
instructions. With this type of competition-style copter there will always be some risk of non-deployment, but when it
does deploy this is a thing of pure beauty.
Flight Rating: 4 out of 5
Summary:
I love the fact that the Rose-a-Roc has been demystified that most builders can tackle it. This is a sweet
helicopter, and I highly recommend it but only after you've got a standard Rota-Roc under your belt (plans are
available on the NAR.org site under competition/plans).
The only cons I can offer up are the pure Rose-a-Roc aspects such as large, draggy fins and the fixed hub versus rotating hub. Also, this thing is a bit of a pain to store and handle--with the elastic fixed to the blade and hub, you either store it with blades extended or compressed and under tension. That's not a good design for long life and some variant with removable elastic would be a great enhancement.
Overall Rating: 4 out of 5
 |
 |
Flights
|
|
K.B.J. (September 5, 2008)
|
|
J.F. (September 23, 2007)