| Manufacturer: | FlisKits  |
The following article was a submission to the FlisKits, Inc
Deuce-Bash Contest and is archived with permission
from FlisKits. Some of these designs are not actually kitbashes, however, all come from the basic motor design feature
of the FlisKits Deuce's Wild.
(Contributed - by Scott Clement - 02/16/07)
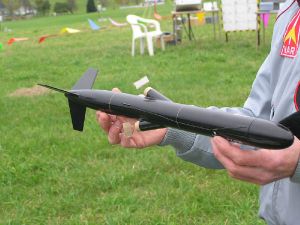
Brief:The Torpedo is a kitbashed FlisKits Deuce's Wild!
Construction:
Parts used from Deuce's Wild! kit:
- BT-60, 1" long
- BT-60, 3.5" long
- BT-60, 9.25" long
- 1 balsa fin sheet
- 1 engine mount assembly
- Recovery system
Other parts used:
- 1 Estes PNC-60AH
- 1 Estes PNC-60MS
- 1 launch lug, 2" x 1/8"
- 1 launch lug, 1/2" x 1/8"
- Yogurt container lid
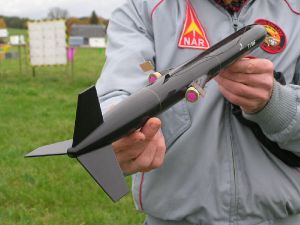
- Follow the engine mount assembly instructions steps 1 through 7.
- Use Marking Guide A and place it on the end of the 9.25" long body tube to track the engine cut out area and to draw the launch lug lines along the full length of the body tube.
- Follow Step 10 in the DW! instructions.
- Place on the end of the tube and trace out both rear end engine cut out areas as well as mark the fin and launch
lug lines.

- Using the tube coupler template, place it horizontally on the outside of the scrap piece of body tube then trace and cut out 2 copies.
- Glue these pieces in between the engine tubes so that they are flat against the inside short body tube wall while seating them on top of the lower ring of the engine assembly. Be sure that they are on the same plane as the body tube wall.
- Use Marking Guide B (found on same page as Marking Guide A) on the 3.5" long body tube to trace and cut out the two rear engine areas. Mark the fin and launch lug lines as well.
- Once that is complete, slide the tube onto the coupler of the 9.25" section. Make any adjustments as needed for alignment of engine cut outs and fin/launch lug lines.
- Using the template provided, trace and cut out the three fins. Be sure to pay attention to the grain direction and root edge when tracing and cutting the fins.
- Glue on the tail cone and extend the fin lines along the plastic tail cone.

- Attach the fins to the tail cone, 1/4" from the tip.
- Glue the long launch lug on with the aft end at the base of the 3.5" tube. The forward launch lug should be 3.5" forward of the aft lug.
- Trace and cut out the forward "shark" fin from the yogurt container lid. Attach the fin 1.5" forward of the base of the 3.5" tube/tail cone joint on the opposite side of the tube from the launch lug.
- Follow Steps 15 through 18 from the DW! instruction sheet for the recovery system.
 |
 |