| Manufacturer: | FlisKits  |
The following article was a submission to the FlisKits, Inc
Deuce-Bash Contest and is archived with permission
from FlisKits. Some of these designs are not actually kitbashes, however, all come from the basic motor design feature
of the FlisKits Deuce's Wild.
(Contributed - by Adam Selene - 02/16/07)
Brief:
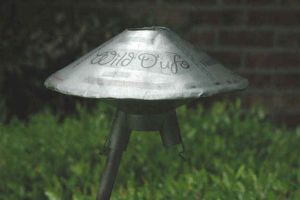
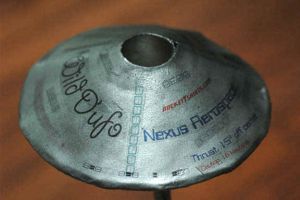
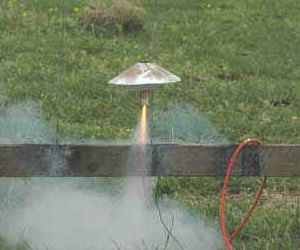
The Wild D'UFO can be built using a DW motor mount kit, 4" of BT-60, 3 pieces of cardstock and an 8" piece
of foamboard. I've included a zipped file containing PDFs of the patterns and instructions. (I hope the instructions
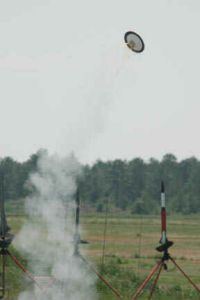
make sense.) It has flown on C6s.
Construction:
Parts list:
- 3 pieces 8.5 x 11" cardstock
- 8" or larger foamcore board
- Deuce's Wild! kit or motor mount kit
- BT-60, 4" or longer if not using Deuce's Wild! kit
Build steps:
- Print 2 copies of "Top" on cardstock.
- Print 1 copy of "Bottom" on cardstock. Measure the 1" square on the printout to make sure prints are the correct size.
- Using an X-Acto knife, cut out the parts cutting along the SOLID lines. You only need 1 of the pieces marked "Body Wrap" on the "Top" sheet.
- Take one of the glue tabs from "Top" and cover with a light coat of glue. (I suggest super tacky glue.) Place an edge of one top piece over half the glue tab (line up using the dotted line). Do the same with the opposite edge of the other "Top" piece. Spread glue on ONE HALF of the other glue tap. Glue it under one of the remaining ends. Let dry.
- When all the glue has dried, spread glue on the exposed tab. Form the top into a cone and press the edge onto the
glue tab. Let dry.
- Build the Deuce motor mount following the directions it came with.
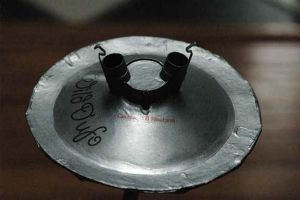
- Again using the directions in the Deuce motor mount kit, cut a BT-60 body tube and attach the motor mount. Since it is difficult to determine exactly how tall the saucer will be, use a body tube 4" or longer.
- You can glue a launch lug midway between the 2 motor tubes if you want to, however, it works fine with just holes.
- Spread glue on the glue tab of the "Bottom" piece. Form into a cone and press top onto tab. Let dry.
- Now for the tricky part. You will need to decide how much of the motor tubes you want coming out of the bottom of the saucer. Slide the "Bottom" cardstock down the body tube until it reaches the motor tubes. You can use the 2 dotted lines to line up the 2 motor tubes. Depending on where you decide the bottom of the saucer will be, you may need to remove a small area of cardstock around the motor tubes. This is where the dotted lines come in handy. Make sure that you cut out the launch lug hole! Once you have the saucer bottom where you want it, apply glue and let dry. Make sure the saucer is "square" with the body tube.
- Take an 8" or larger piece of 1/4" thick foamboard. With a compass mark 2 concentric circles. One
.8" radius (1.6" diameter equiv. to a BT-60) and the second 3.875" (7.75" diameter. this
doesn’t need to be exact--just slightly smaller than the 8" saucer top.
- Cut out the 2 circles. Remove a small area of the inside edge for the launch rod. Bevel the outside edge to an angle that roughly matches the angle of the saucer top.
- Apply glue to the top edge of the lower saucer. Slide the foam circle onto the body tube with the beveled edge matching what will be the saucer top. Make sure to align the holes for the launch rod. Allow to dry. Apply glue to the junction of the circle and the body tube. Allow to dry.
- Take 1 of the "Wrap" pieces from a "Top" page. Bend all of the tabs over towards the side with the writing. Apply a small amount of glue to the glue tab. Wrap it around the body tube, overlapping the glue tab. Press and let dry. Make sure that you do not glue the wrap to the body tube.
- Remove one of the tabs to make space for the launch rod. Cut a small area at the top edge of the top saucer for the launch rod--a paper hole punch works great for this. Apply glue to each of the remaining tabs. Slide the saucer top down onto the wrap, making sure to align the hole and the missing tab. Allow to dry. Make sure that you do not glue the wrap or saucer top to the body tube.
- Remove the saucer top from the body tube. Turn over and apply a good glue fillet inside on the tabs and wrap.
Allow to dry.
- Slide the top saucer top assembly all the down the body tube. Draw a line around the body tube at the top edge of the saucer. Remove. Apply glue to the beveled edge of the circle and around the body tube below the line you just drew. Slide the saucer onto the body tube, making sure to align the holes for the launch rod. Allow to dry.
- Cut off any body tube sticking out over the top of the saucer body.
- Apply glue fillets everywhere that seems appropriate.
- Paint.
- Launch on C6-3.
 |
 |