Giant Leap Rocketry Avionics Bay (3.0-inch)
Giant Leap Rocketry - Avionics Bay (3.0-inch)
Contributed by Scott Pearson
| Manufacturer: | Giant Leap Rocketry  |
 Brief:
When I was getting ready for my L2 rocket I decided that I wanted it to be dual
deployment capable. I was going to design my own bay when I saw the Giant Leap
Avionics Bay. Since I had never designed one before I decided it might be
better to use an existing design and learn from it before building my own.
Construction:
The GL avionics bay comes with all the basic foundation parts for an avionics
bay. It comes with an extended coupler tube, three bulk heads, one O-ring, one
length of threaded rod, two eye bolts with washers and nuts and two pages of
basic instructions on the construction and theory behind dual deployment.
The first page of instructions tells you how to construct the bay while the second page describes the theory of it.
I started out test fitting the parts and deciding how to make it fit my purposes. This bay does not contain anything for mounting the electronics--you have to decide on this yourself. This is fine as there is no one way for the electronics to fit and must be customized for each.

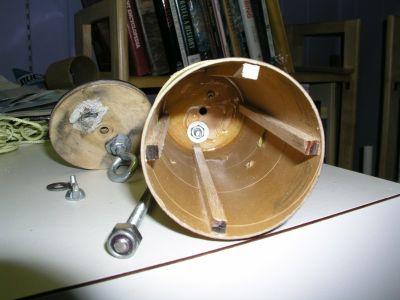
I epoxied one bulkhead on the end of the tube. I then added four basswood strips inside the tube. These strips were there for two reasons one, to provide extra support for the bulkheads when the threaded rod is tightened and the second was to keep the electronics, which would be mounted on boards, steady and stable during flight.
The instructions for the other bulkheads have the smaller one affixed to the other larger one with the o-ring seated in-between to seal the tube. I had some problems this part, as I was not sure if the o-ring should be in our out of the tube. I finally decided that it would rest on the top rim of the tube. I had to modify the smaller bulkhead; I beveled the rim on the small bulkhead to create a groove for the ring to sit in. I then glued it all together I did not glue the O-ring in but just have it seated in the groove by its own tension.
I designed my bay to fit two altimeters in the same bay. I found out that it was a tight fit but could work. With the threaded rod going down the center I put one altimeter on either side of the center of the tube. Each altimeter would be fixed to a board that was cut to fit snugly in the tube with out much play.
I cut 2 1/2 inches of tube off the rockets body tube and glued that on at the center of the bay. Then I added four equalization holes in the coupler and added holes on either end of the avionics bay for the ejection charge wiring. Finally, I sealed the wiring holes with modeling clay to keep out the ejection charges.
The avionics bay performance was as planned and on my second attempt I was successful with my L2.
Finishing:
There are special requirements to finishing this, just paint it with the rest
of the rocket.
Construction Rating: 4 out of 5
Summary:
I found the Giant Leap Avionics bay to be a great starter kit to get you going
in creating a bay for your rocket. It is a versatile system that will offer you
the basic shell to complete your bay. It should not be considered a complete
avionics system, as you must still create your own design for your purposes and
electronics.
The instructions were a bit light and could use an upgrade but are easy enough to follow and get a good foundation in dual deployment theory.
All in all a nice unit.
Overall Rating: 4 out of 5
 |
 |