| Construction Rating: | starstarstarstarstar_border |
| Flight Rating: | starstarstarstarstar_border |
| Overall Rating: | starstarstarstarstar_border |
| Manufacturer: | Giant Leap Rocketry  |
Brief:
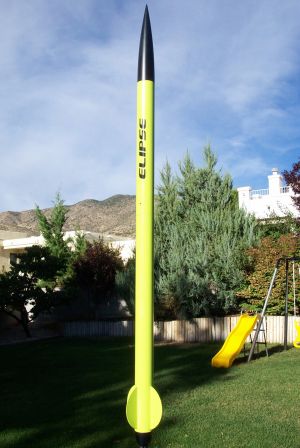
This is Giant Leap Rocketry's entry into the “sport kit” class of rockets. It's touted as the most advanced
kit in rocketry. The Elipse is a 3” diameter rocket that stands 78” tall and is not a design you are use to
seeing at a regular club launch. Its fins are half circles and with the ogive tail cone it has a very sleek look. The
kit comes with just about all of the latest and greatest stuff that Giant Leap Rocketry has to offer. The one I built
was the phenolic tube version.
Construction:
The materials include:
- GROOVE-LOK fin attachment system
- Elliptical fin design in .093 G-10 fiberglass
- FIREBALL zipper stopper
- Hardpoint shockcord anchor
- 3” Avionics Bay
- Preslotted Airframe in Phenolic (optional Fiberglass)
- 36” booster section and 24” forward compartment
- 3/16” centering rings, hardware, 18” motortube 38mm
- Pinnacle 5-to-1 Nosecone
- New OGIVE SLIMLINE aluminum tailcone motor retainer
- Aluminum railguides
- Presewn KEVLAR and nylon shockcords
- KEVLAR chute protectors
- Parachutes: 18 drogue and 48 main single piece
- Illustrated 16 page instruction booklet
- Large “Elipse” decal
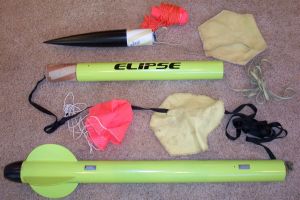
Everything needed came in multiple sealed bags. From this it was easy to determine if all the supplies were there. The instructions included 16 very well laid out and illustrated pages. I built this kit primarily with 5-minute two-part epoxy from a local hobby store. I have found that this is more than adequate for most rocket projects of this scale. I did use the manufacturer recommendation of JB Weld to secure the Giant Leap hardpoint. Since the hardpoint is exposed to hot ejection gases the JB Weld is a pretty good choice.
The directions were easy to follow and were probably the best I've ever seen, and I've built a lot of kits over the years. The first part of construction includes the assembly of the motor tube and fins. Using the supplied GROOVE-LOK fin attachment system, this process becomes a piece of cake and lines the fins up at perfect 90 degree angles.
The next part involves attaching the hardpoint anchor and attaching the FIREBALL zipper stopper shock cord assembly. As described above I used JB weld to attach the hardpoint and this went together pretty easily. After the motor tube assembly was completed I slid the aft body tube down over the fins and epoxied the whole assembly in place. The only drawback to this type of assembly is that you need to fill in the little spaces between the end of the fins and the tail cone. It's only the width of the centering ring but you have to do it if you want that finished look. You also need to secure the body tube with either tape or a rubber band until the epoxy cures so that the body tube is tight up against the fins.
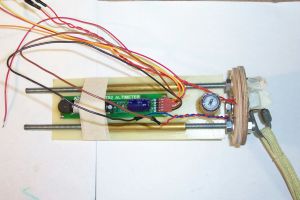 The next part was assembling the electronics bay. Giant Leap provides a rather large piece of G10 to
mount just about any electronics package to. As you can see from the photo, a thin Adept unit fits nicely between the
mounting bolts. This is a pretty typical setup for me but there is enough room in the electronics bay to use a wide
variety of electronics packages and setups. Installing the electronics bay into the rocket is a bit cumbersome. You
need to attach the recovery line to the forward bulkhead as well as attach the ejection charge (if using a dual
deployment setup) and slide the whole unit in as one piece until the threaded rods stick through the bottom part of the
electronics bay coupler. Then you have to attach the aft bulkhead and bolt it down with the supplied wing nuts. This
setup gives the rocket a very finished look since you don't need any exposed bolts to secure the electronics bay.
The next part was assembling the electronics bay. Giant Leap provides a rather large piece of G10 to
mount just about any electronics package to. As you can see from the photo, a thin Adept unit fits nicely between the
mounting bolts. This is a pretty typical setup for me but there is enough room in the electronics bay to use a wide
variety of electronics packages and setups. Installing the electronics bay into the rocket is a bit cumbersome. You
need to attach the recovery line to the forward bulkhead as well as attach the ejection charge (if using a dual
deployment setup) and slide the whole unit in as one piece until the threaded rods stick through the bottom part of the
electronics bay coupler. Then you have to attach the aft bulkhead and bolt it down with the supplied wing nuts. This
setup gives the rocket a very finished look since you don't need any exposed bolts to secure the electronics bay.
This kit is not too difficult to build and I didn't really have any problems. One issue that I did have with the first launch was with the conformal rail guides that come with the kit. I followed the manufactures instructions on attaching them but when I was loading the rocket on to the rail the rocket got a little out of alignment and caused the rail guide to break off. I ended up drilling a couple of small holes into the middle of the rail guide and secured it using some small #2-56 set screws. I much rather prefer using a backing nut and the more standard rail button. The rail buttons are a lot smaller and are more forgiving when you are not perfectly aligned with the rail while trying to load your rocket.

Finishing:
After construction I filled in all the spiral groves with DAP DryDex Spackling and sanded it smooth. This wasn't much
work since the phenolic tube that the kit came with was the Giant Leap Microseam which means the groves are
substantially smaller and shallower than that of the tubes you might get from PML. For paint, I used the Rustoleum
Painters Touch brand of spray paint from my local Home Depot store. I decided to go with a color you just don't see
that much and it was also a new color to their line. The color is called Key Lime. The way I generally do all of my
paint jobs is to first apply a few coats of primer and sand them down to make sure the surface is smooth. I then paint
the entire rocket white. This ensures that whatever color I apply to it is much brighter. The nose cone was painted
with the flat black so as to match the tail cone section. It is important to note that when using spray paints always
use the same brand for your primer and base color. This minimizes any adverse reactions that different paint brands may
have.
Construction Rating: 4 out of 5

Flight:
Recommended 38mm motors:
Aerotech; H123, H148, H242, I161, I357, I300, I211, I285, I284, 1366, I435, J420, J350, J570
Pro38: H153, I205, I285, J285, J330
Recommended 29 mm motors using the Slimline 29/38mm adapter:
Aerotech: H238, H128, H165, H220, H268, I200
My first flight was on a typical beautiful blue sky day in mid-May on the outskirts of Albuquerque, NM. The temp was about 70 degrees and no wind. The motor I chose for its maiden flight was a Cesaroni Pro38 J285. This is a great little motor and has never given me any problems. Another club member was loading up a little rocket with a J350 and thought it would be a good drag race. If you don't know it yet then this is your tip, if you want to win a drag race then go with a Cesaroni Pro motor because the way they are designed they are “instant on” which means that when you press the fire button the motor comes up to pressure in a hurry and off it goes. You will always win the initial part of the drag race if the motors you're up against aren't Cesaroni motors. Needless to say my rocket left the other one in the smoke. The Elipse flew straight as an arrow and did a perfect dual parachute recovery landing only about 75 yards away. When I picked up the rocket the Adept ALTS2 50K altimeter beeped back an altitude of 4890 feet.
The second flight was on a windy day but still good for flying. The motor I chose for this flight was an Aerotech I600R. I don't think I'll ever fly this rocket on a 29mm motor since it is a relatively large rocket and I like them to go up quick. Another club member had a rocket with an AMW I220 Skidmark ready to go so we decided it would be good to have a drag race. Performance-wise it was no contest. I had by far the better motor but it sure made for a good picture. I know from the picture the rocket looks like it's a little out of control but it seemed to right itself and attain a pretty respectable altitude. I did lose site of it when it hit apogee but when the second deployment charge went off I was able to re-acquire it. According to the Adept ALTS2 50K altimeter the Elipse worked its way up to 3914 feet and landed about 100 yards away. The temperature was about 65 degrees and the wind was around 10 to 15 mph.
The third flight took place on a very calm and clear November day with the temperature around 60 degrees. I chose the H999 which is one of Aerotech's new Warp 9 motors. Can you say, Wow! The Warp 9 motors are basically little controlled explosions. With an initial thrust in the 380 pound range and a total burn time of 0.3 seconds, it is very quick. The motor came to life almost immediately and catapulted the Elipse aloft. It seemed as if by the time the Elipse was at the end of the rail the motor was done. The Elipse continued straight up for quite some time finally reaching an altitude of 1784 feet according to my Missile Works Alpha RRC2 Mini altimeter. Jim Amos with Missile works was kind enough to give me one of the initial Alpha units for testing and after 8 flights, it is still working great. The RRC2 Mini also recorded a peak velocity of 860 feet/sec. Not too bad for an almost 5 pound rocket on an H motor. The Elipse also had another perfect dual deployment recovery and landed about 100 feet away from where it was launched and suffered no damage.
Recovery:
Recovery is pretty typical for a dual deploy setup. You can use motor ejection but I've always been real comfortable
with altimeters so I chose to do dual deployment with the electronics. The only thing I need to do is place an electric
match with the black powder charge down below the recovery in the booster section so as to push the forward section off
once the rocket hits apogee. This can sometimes cause problems with the wires getting tangled in the recovery but I
have yet to have that happen to me. As for the fit of the nose cone it was pretty much your basic real snug fit. The
Pinnacle 5:1 nose cone has an extended coupler section which makes it very easy to friction fit.
One thing I would like to have changed with the recovery is the main parachute. The parachute that the kit comes with has a lot of lines which makes it heavy and sort of bulky when packing. The main parachute bay has plenty of room but I'm just more use to the lighter cross form parachutes.
Flight Rating: 4 out of 5
Summary:
This is a great kit. It is inexpensive compared to what you get, the customer service is great, and I have had a
great time flying it.
Overall Rating: 4 out of 5
Other Reviews
- Giant Leap Rocketry Elipse By Darrell Mobley (April 7, 2007)
Presented with written permission from RocketyPlanet: Introduction Back at the end of 2006, Giant Leap Rocketry of Baton Rouge, Louisiana, released the latest addition to their family of high power kits named the Elipse. 3" in diameter and 78" long, the Elipse comes with a 38mm motor mount and stands apart from the rest of the ...
 |
 |
Flights
|
|