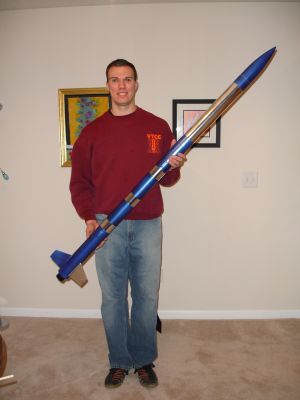
Giant Leap Rocketry Escape Velocity 2.6
Giant Leap Rocketry - Escape Velocity 2.6
Contributed by Bryan Sparkman
| Construction Rating: | starstarstarstarstar_border |
| Flight Rating: | starstarstarstarstar |
| Overall Rating: | starstarstarstarstar |
| Manufacturer: | Giant Leap Rocketry  |
Brief:
The Escape Velocity is a single stage, high power, dual or single deployment rocket for 38mm motors or 29mm with an
adapter.
Construction:
The Escape Velocity came with everything you could want for a HPR rocket and more. Included were 1 pre-cut phenolic
body tube, 1 phenolic payload tube, fin can, payoad bay, 1 18" drogue parachute, 1 36" main parachute, 2
strap nylon shock cords, 2 parachute protectors, 2 shock cord protectors, Slimline motor retainer, Nose cone, aluminum
rail guides, and all necessary hardware. All parts arrived in good condition.
I emailed Ed at Giant Leap on advice for how to finish it and he recommended fiberglassing it. I went with a 6ft section of Aerosleeve's 2.5 inch sleeve. This was my first time glassing an airframe and I was pleasantly surprised at how easy it was using a small paint roller, Great Plane's finishing epoxy (picked up at a LHS), and the Aerosleeve. Construction was fairly quick and straightforward. I used a Dremel cutting disc to re-cut the fin slot after applying the Aerosleeve and I used an X-Acto knife, 150 grit sandpaper, and a level surface to even out the ends of the airframe. The 13 pages of instructions had plenty of pictures and detail to make it clear even for the first timer.
The only "gotcha" in the instructions was the method for filling the gap between the fincan and the airframe. The fincan fits inside the main airframe. When you epoxy in the motor mount and fincan, there are significant gaps between the airframe and the fins. The instructions tell you to mix up some 6-minute epoxy and mix in talcum powder until the consistency is similar to that of cake frosting. Personally, I never could mix in enough talcum powder to get the consistency right and have enough time left to apply it to the airframe. Mine always was a bit too thin and it took me 3 attempts per fillet, which was about 6 batches of epoxy/talcum mix, to get it right. Even then, it took significant sanding with a Dremel tool to get the final fillets to look acceptable.
The only area that I decided to stray from the instructions was the electronics bay. The method outlined in the instructions is a bit vague but sufficient. I prefer a bay setup similar to that of the LOC payload bays. Any method is good as long as it works for your altimeter. I used the PerfectFlite MAWD with a 1/4 inch vent hole drilled into the payload bay from the side. If you haven't done dual deployment before, then I recommend getting someone experienced to help you through the setup of the electronics bay.
Finishing:
This being my first time fiberglassing an airframe, I almost used an entire can of KILZ primer to smooth out the
texture of the Aerosleeve. If you use an Aerosleeve on the airframe, I cannot overemphasize the need to sand well
between coats. I made this mistake and probably added an ounce or two (or more) of extra wieight in primer because I
could not get the finish smooth. I literally spent hours and hours sanding off the extra coats of unnecessary primer
that I sprayed on. I found that the KILZ primer available at Home Depot works well for this type of application.
The kit came with a large decal, however, I opted not to use this as it would not look well with my chosen color scheme.
Construction Rating: 4 out of 5
Flight:
Flight prep is fairly easy and with the parachute and shock cord protectors, I didn't have to worry about wadding too
much. The Slimline retainer held the motors in just fine.
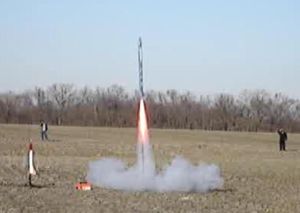
The first flight of my Escape Velocity was on an Aerotech I357T-M. The flight was wobbly off the pad. This might have been due to the rail being a little loose at launch. This was the first flight of my altimeter so I did use an ejection charge consisting of 1g of BP and 2 Oxral E-matches. The motor ejected the main chute at apogee and I used the altimeter to fire the drogue at 500ft to test my dual deployment setup without much risk. The flight was to 2632ft and landed a short walk away.
The next flight was my L2 cert flight. I completed my L2 test, built the J350W motor, loaded up the rocket, and re-adjusted the pad. The manufacturer projected an altitude of 5200 ft for a J350W and RockSim was about the same. Instead of a drogue, I hooked up about 20ft of yellow caution tape. I gave a short countdown and whoa momma! The Escape Velocity ripped off the pad with what sounded like a shotgun blast. The takeoff was neck snapping and perfectly straight. The reflective finish allowed us to see her all the way up at apogee and on the way back down. She landed about 100 yds away in the middle of the field. The Perfectflite altimeter worked perfectly, ejecting the main chute at 500ft, and reporting back an altitude of 5961 ft.
Eager to fly again, I cleaned the motor case, built the I600R motor, and prepped the rocket in about 40 minutes. I put her back on the pad, gave the countdown, and oh boy! The I600R motor put out a flame that was as long as the rocket. Flight was again perfectly straight and totally neck snapping! Just like before, she came back down in the middle of the field and the altimeter popped the main at 500 ft. The altimeter read out 5737 ft and there was essentially no damage to the rocket after all three flights other than some scratched paint.
Recovery:
The provided strap nylon shock cord and protector worked well. The 36" chute is a good fit for this kit,
although the payload section gets very full on a loose pack of this chute. The descent on the 20ft streamer was just
right for the higher altitude flights. Any slower of a descent and it might not have landed in the field. Any faster
and I would be worried about causing a failure of the recovery system. The chute protectors did their job great and the
chutes showed no wear or damage.
Flight Rating: 5 out of 5
Summary:
This is a great kit as it goes together quickly and is very tough when glassed with an Aerosleeve. Fin fillets and
finishing can be tedious and more time consuming than expected. The jury is still out when it comes to flying on some
of the smaller motors, but this kit is fabulous on the big motors. She has the performance of a sports car, the
bells and whistles of a luxury car, and the ruggedness of a Hummer.
Overall Rating: 5 out of 5
Other Reviews
- Giant Leap Rocketry Escape Velocity 2.6 By Darrell Mobley (July 6, 2008)
Presented with written permission from RocketyPlanet: Product Review by Darrell D. Mobley Sunday, July 06, 2008 One of the first rockets I got my hands on when I got back into rocketry a couple of years ago was the Giant Leap Rocketry Escape Velocity 2.6, one of their line of "Ready to Fly (Almost)" kits, a 2.56" speedster that includes everything you need other than a motor and launch ...
 |
 |
Flights
|
|