| Construction Rating: | starstarstarstarstar_border |
| Flight Rating: | starstarstarstarstar |
| Overall Rating: | starstarstarstarstar_border |
| Manufacturer: | Giant Leap Rocketry  |
| Style: | Sport |
Brief:
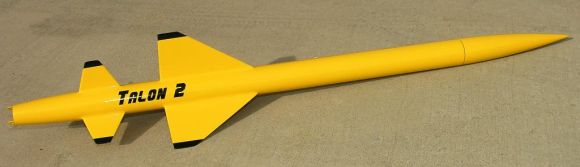
Who am I to resist the "sexiest kit alive"? Giant Leap's Talon 2 is a
48" tall, 2.1" diameter, 29mm mid/high power downscale of their
flagship design.
Construction:
Ordering was a breeze and the kit arrived undamaged despite severe damage to
the shipping box. During the ordering and early construction phase, I exchanged
several emails with Kent at Giant Leap and found him to be extremely helpful
regarding the shipping, kit components, motor retention, and flight/motor
performances. The kit components all seem top quality, and include great extras
like a 30" nylon parachute, Kevlar®
shock cord sleeve, Kevlar®
chute protector, and conformal lugs. The body tube and boat tail are
pre-slotted. The fins are 1/16" (0.062") G10.
Construction was generally straightforward, but I did deal with a number of issues that are worth mentioning. I don't want my focus on these issues to detract from what overall is a good kit. This is only my second mid-power kit, so perhaps some of my construction gripes should be taken with a grain of salt. Nevertheless, construction was considerably more challenging than what I experienced with my Binder Design Thug. After all, GL presumably wants to attract relative newcomers like me with this downscaled, lower-priced Talon kit.
The instructions are in paragraph form, but I prefer numbered steps. You are explicitly invited to call GL if you have any questions whatsoever during assembly--a very nice touch.
The phenolic body tube had the deepest spirals I had ever seen plus dimpled irregularities that were only revealed when the first round of filling and priming revealed low spots. On the positive side, the tube was exceptionally thick and strong.
The second CR is to be glued flush "on the end of the motor tube"--but which end? Someone not visualizing the big picture might glue it on the wrong end, leading to a major problem. (Even the first CR is slightly vague: 9.75 inches from one end of the tube to which side of the CR?)
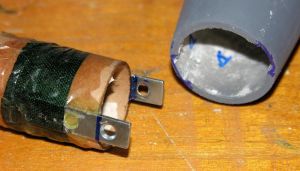 No positive
motor retention is included. Kent says GL considered adding a Slimline retainer
to the kit, but balked at the $20 price hike. I balked too and opted for the
assembly shown in the photo here, which mostly retains the "sexy"
boat tail profile.
No positive
motor retention is included. Kent says GL considered adding a Slimline retainer
to the kit, but balked at the $20 price hike. I balked too and opted for the
assembly shown in the photo here, which mostly retains the "sexy"
boat tail profile.
My biggest concern related to assembling the rear of the rocket, especially the fins. Note that the rear fins span the seam between the boat tail and the body tube, so the slots are half in each piece.
Now in one single step, you are supposed to glue the motor mount in the body, glue the boat tail to the body, and glue the end of the motor mount to the end of the boat tail. (GL gives a clear, highlighted warning to use 30-min epoxy and be sure to fully understand the 3/4 page of instructions about what must be accomplished during the cure time.) This leaves a totally enclosed rocket. Then you are supposed to apply epoxy to the ends of the 0.062 G10 fins, squeeze them through the fin slots to smear a little epoxy on the motor tube, pull them out and repeat this procedure until sufficient epoxy has been applied to glue the fin permanently.
The fin slots are so thin and epoxy is so gooey this seemed rather unrealistic to me--it's tough enough with bigger slots! Couldn't there be a way to retain access to the interior of the rocket, so we could put internal fillets on the fins, or at least see inside to confirm that we got enough glue at the root? I thought long and hard about this before diving in. In the end, the fin and CR placements just didn't seem to allow any choice that would clearly be better, so I forged ahead as instructed. However, to ensure a secure bond for my motor retention brackets, I glued the MMT to the boat tail first, separately, using the dry body tube to ensure alignment. I then glued this assembly in to the body tube in a second step.
Gluing the fins through the slots turned out to be not nearly as messy and frustrating as I had anticipated. The G10 fins are so straight and the slots are so precise that the task went quickly with not too much slop. With solid external fillets, maybe uncertainty about the fin-to-motor-tube bond won't matter much.
My final concern related to the Kevlar® shock cord sleeve. (What a luxury to be worrying about that!) I followed the instructions and did not slide the sleeve on the cord until the very end. However, inside the rocket, the cord ties on to a steel cable looped through the upper CR. I had used a bowline knot and some CA drops. But the knot so big and the steel cable loop was so big and inflexible that I doubt I got the sleeve down all the way to protect the very bottom of the nylon shock cord. I think it would have been better to tell users to place the sleeve over the nylon cable (and maybe even anchor it there with a couple of Kevlar® thread stitches) before gluing the motor mount into the body. This way, complete protection of the very bottom of the cord could be ensured.
Those were the issues I encountered. The rest was trouble free.
I beveled the fins to 15-degree edge using a homemade jig and a vibrating floor sander. I used rail buttons instead of the lugs.
Finishing:
I do a first round of filling and priming before major assembly because it's
easier, but you need to sand clear any spot where glue will bond. See the photo
of my final paint scheme. I like the Rustoleum yellow because it produces a
finish that seems almost plasticky. The sticker provided by GL was high quality
and using their detailed "hinge" instructions, I got a very pleasing
result. Two light coats of Wal-Mart clear coat went over the top of everything.
The final result was spectacular.
PROs: outstanding component quality and extras
CONs: some issues worth noting during assembly
Construction Rating: 4 out of 5
Flight:
The kids and I set out early Saturday morning to a great new site in northern
Colorado, despite the cold, low clouds, and breeze. Fearful of conditions
worsening, I launched the Talon 2 early in a very stiff breeze. Little did I
know that by the end of the day it would be calm, clear, and 20 degrees warmer.
Darn! The winds were 10-15mph for the first two flights and 5-10 for the last
one. We used AT G64-7W for the first flight, and AT G64-4W for the last two
flights. All three flights were somewhat wobbly off the 6 foot rail in the
stiff wind, and (surprisingly) arced cross-wind or downwind. The first flight
was the most severe, and the delay way too long. The bird was 2/3 of the way
back down before the chute opened. We walked at least 1/2 mile downrange in a
strong cold wind. The 4-second delay on the next two flights was fine.
I think the G64 is just enough motor for launching in these conditions. The fin profile is rather large, and the big fins are quite a ways up the body. Thus, in the wind the Talon 2 struggled a bit to orient itself off the rail, but once it established a direction, it was straight on its arc. With a more powerful boost or less wind, I believe the rocket would fly straight and true.
Recovery:
The chute is a bit snug in its Kevlar®
protector, but is perfectly sized for recovery. It opened fully and quickly
each time. Despite the wind, all three descents were swift but gentle. The
rocket is almost totally unblemished after three landings. This is a testament
to the chute and to the quality of the materials.
I'm looking forward to more flights on a calm day, and I must admit I wonder what she'd do with an H in her!
PROs: stable flight, perfect recovery
CONs: not fond of stiff wind, tempts you to certify
Flight Rating: 5 out of 5
Summary:
It just looks so darn cool and flies great.
Overall Rating: 4 out of 5
Other Reviews
- Giant Leap Rocketry Talon 2 By James Turner (October 6, 2008)
( Contributed - by James Turner - 10/06/08) Brief: The Giant Leap Talon 2 flies on MPR and HPR motors. Construction: This is a high quality kit that arrived very quickly and in good shape. The kit contains phenolic body tube (pre-slotted), 6 G10 fiberglass fins, 2 ACME 1/4" conformal launch lugs, plastic nose cone and boat tail, 29mm MMT and centering rings, 1/2" ...
 |
 |
Flights
|
|
|
|
G.H.G. (April 9, 2006)