| Construction Rating: | starstarstarstarstar_border |
| Flight Rating: | starstarstarstarstar_border |
| Overall Rating: | starstarstarstarstar_border |
| Published: | 2010-08-15 |
| Manufacturer: | Heavenly Hobbies  |
Brief:
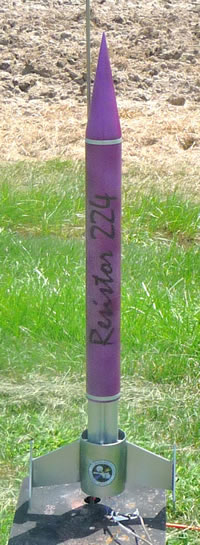
The Resistor 224 Planetary Defense
Weapon is the latest offering from Heavenly Hobbies. This futuristic, dual motor, 24mm design features their
‘Amaze’ ejection baffle, laser cut plywood fins, rings and baffles, thick wall tubes, and a single big decal.
It has two main fins with winglets at their tip. The configuration is a little reminiscent of the Jayhawk. The kit can
be built with front or ‘zipperless’ rear ejection. I opted for the latter to make the build more unique. No
parachute is provided, which is fine with me since my stash of nylon chutes are all interchangeable. HH offers suitable
‘chutes should you want one.
The instructions are provided in soft copy, along with the latest version of the H. H. Simit simulation software.
My thanks Jose at Heavenly Hobbies for sponsoring this build!
Construction:
- One big conical balsa nose cone
- Two thick-walled BT-70 body tubes and matching coupler
- Two screw eyes and one small wood screw
- A bag of BBs for nose weight
- Cotton braided elastic shock cord
- Three laser cut baffle bulkheads
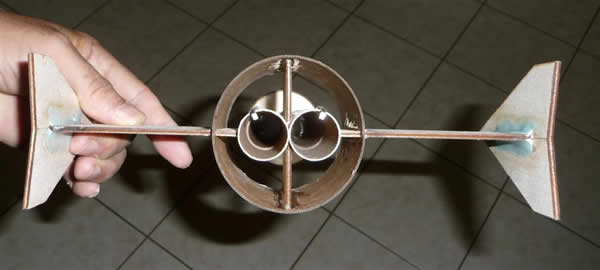
- Two 24mm motor mount tubes
- Two laser cut centering rings
- Three long couplers
- Two engine hooks
- One 1/4" launch lug
- One 3” pre-slotted ring tail
- Two sets of laser cut ring tail pylons, fins and fin tips
- A decal sheet
- Instructions and H.H. Simit on CD
The 18-pages of photo illustrated instructions are included on a .pdf file. I found them easy to follow and I liked the way they handled the ‘housekeeping’ instructions, such as what glue to use (the default is 5-minute epoxy), to fill the spirals before constructions, etc. That is, all this stuff is discussed up front..

The build starts with the 2 x 24mm mount. The motor tubes are connected at one end with a pair of centering rings. Since these tubes will be load bearing, long thick couplers are epoxied in the upper end. A third coupler is provided to help in installation. On dry-fitting, everything fit perfectly. However, the rings are thin at their closest point and I snapped one of them on actual installation. This was only a minor snag but the motor tube assembly no longer fit perfectly and required some sanding. I’ve got clumsy paws, what else can I say? Just be gentle as you work these into place.
To accommodate longer (E9) and RMS motors, the upper tab on the pair of motor hooks are to be bent upwards. Mine broke off due to metal fatigue. Makes no difference as you can bend the end 1/4” in from the original tab. This will be reflected in future issues if the instructions.
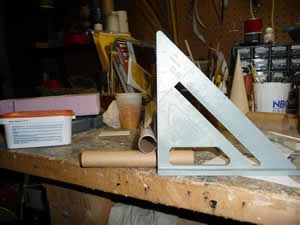
The larger ring tail is supported by two plywood pylons. The roots of these are sanded into a ‘V’ to better mate with the motor tubes. As the pylons set, I made sure they were aligned by sighting down a rafter angle (see photo).
The instructions say to install the ring tail at this point. The overall span of the tabs is about 1/4” too wide so they will require trimming. I suggest this be done before installation. However, a Dremel with a diamond cut-off wheel make quick work of the trimming in situ. I was worried about keeping the fin slots at a perfect right angle to the pylons, so I measured the mid-point between the slots and marked a line to use as a guide.
The baffle consists of a coupler and three plywood baffles. Each has three large holes on one end. They are installed so these hole alternately sit on opposite sides of the coupler. The top baffle has a hole pre-drilled for a provided screw eye. This of course should remain on top.
You attach the shock cord to this eye and then glue the baffle assembly on the top of the lower body tube. To keep
the rocket rear eject, you affix the nose cone to the upper body tube with the a
 provided screw. The rocket then separated at the body tube junction as it typical with zipperless HPR
designs. Alternatively, you can glue the upper body to the coupler and let the rocket separate at the nose. (But, you
don’t want to do that.)
provided screw. The rocket then separated at the body tube junction as it typical with zipperless HPR
designs. Alternatively, you can glue the upper body to the coupler and let the rocket separate at the nose. (But, you
don’t want to do that.)
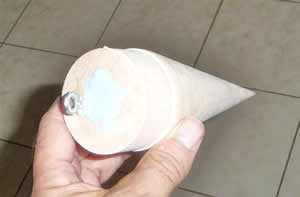
Nose cone prep involves the typical stuff - seal, sand, repeat, install screw eye. I treated the top couple of inches with thin CA. Pointy balsa cones typically don’t stay that way. You also have to drill a 3/8” diameter x 4” deep hole in the cone to embed the nose weight (BBs). I have one suitable bit and did this with a hand drill. I found this challenging since the dull bit wandered all over the place. I went slowly to make sure I didn’t breach the cone’s wall. By the time you get 4” in, it is getting thin. I got the job done but the big gaping hole is a bit funky looking. I used quick set Gorilla glue to affix the BBs. The photo shows the big hole plugged with some excess SuperFil epoxy clay.
My as-built weight, including an 18” nylon ‘chute, came in at 10.6 oz. Since the ‘chute is user
provided, I assume this is nominal.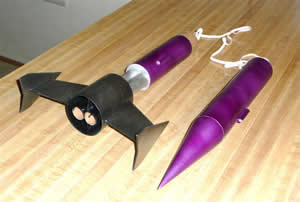
Finishing:
The kit includes general finish instructions. I decided to generally keep with Heavenly
Hobbies scheme. The ring tail and fins are shot with Krylon black with a Titanium Silver over spray. The exposed motor
tubes are straight Titanium Silver. The upper body is Metalcast Metallic Purple.
I filled the nose early in the build but didn’t do so on the fins. This was a mistake as the fancy fins are harder to work around than those on a 3/4FNC design. I also painted the rocket before permanently attaching the motor mount assembly to the lower body section. This was a good idea and made painting easier (less masking).
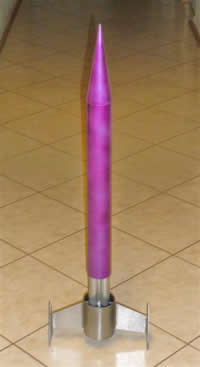 The decal is a peel-and-apply. This makes it easy to get on but the clear background stands out a bit.
A couple of silver vinyl stripes and an MDRA logo competed the finishing.
Overall the build went well. It is reasonably straightforward despite it being a rather interesting design. I will ding half a point for the unexpected trimming of the pylons and another half for the difficulty involved in boring the cone. Still, this was a fun build.
Construction Rating: 4 out of 5
Flight:
Because of the baffle, prep was simple. Attach a 'chute, slide in two motors, etc. I used the
low end of the recommended chute size (18") due to the prevailing wind. If you don’t use a motor with a built
in thrust ring you will have to add your own. The instructions recommend you glue on a thin strip of BT-50, but
I’d rather just use masking tape. Ignition was handled with Quest Q2-G2 igniters.
Two C11-2’s are a bit underpowered for my liking and ejection was early.
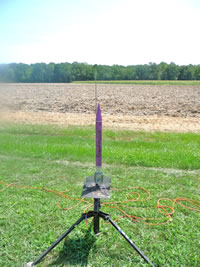
Two D12-5, however, were perfect. Great boost and ejection at apogee.
Recovery:
The early ejection on the C11 flight fouled the ‘chute, but that’s also common for
regular nose ejection. The rocket landed on mowed grass under the resulting ‘streamer’ and suffered no
damage. By the time I flew it on the D12’s, the wind had picked up. The combination of a fast descent and high
lateral velocity resulted in a hard landing. An 18” 'chute is a little small. I expected a winglet to pop off, but
it didn’t. One wing suffered a cracked fillet, which was repaired with thin CA.
Flight Rating: 4 out of 5
Summary:
IMO, this is a pretty nice looking rocket. The parts fit is good and thick walled tubes,
plywood fins, and reinforcing stuffer tubes make it pretty tough. Although it flies on C11’s, it should be hefty
enough to handle a pair of 24mm reloads (but, plan on a long walk). The baffle and rear eject option makes field prep a
cinch and it is easy to get in the air. This is a great feature and I’d like to see it on other kits. Rear
ejection also protects the cone from ‘Estes dings’. The only cons are the required trimming of the pylons and
the difficulty of boring the nose cone. The latter will, of course, vary depending on what tools the builder has on
hand.
Overall Rating: 4 out of 5
 |
 |
Flights
|
|