| Manufacturer: | Holverson Designs |
![[Picture]](/images/archive/images/ratings/rating_hov_winnie.gif) (07/16/00) After trying one of Holverson Design's gliders, I decided to try
one of their rockets, the Wicked Winnie™. It is rated at a skill level
three. It has a payload section, a boat tail design, and elliptical fins to
give it a unique look. Holverson indicates that the design goes further than
looks by saying, a properly built Winnie™ will lift from the pad faster
and fly higher on the same size of engine than a similarly sized rocket with a
blunt rear and angular fins. This is because Winnie's™ profile reduces
drag by applying basic aerodynamic theories to its construction." Other
details on this design are outlined in the introduction of the instructions
under the title "Big Rocket that Performs!".
(07/16/00) After trying one of Holverson Design's gliders, I decided to try
one of their rockets, the Wicked Winnie™. It is rated at a skill level
three. It has a payload section, a boat tail design, and elliptical fins to
give it a unique look. Holverson indicates that the design goes further than
looks by saying, a properly built Winnie™ will lift from the pad faster
and fly higher on the same size of engine than a similarly sized rocket with a
blunt rear and angular fins. This is because Winnie's™ profile reduces
drag by applying basic aerodynamic theories to its construction." Other
details on this design are outlined in the introduction of the instructions
under the title "Big Rocket that Performs!".
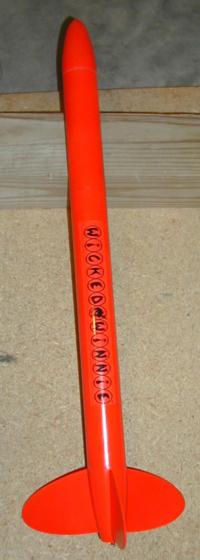 Winnie's™ stats are
23.75" long, 1.64" diameter and weighs in at 2.5oz. Again,
Winnie™ is a payload rocket so Holverson makes sure that you are aware of
what to do with a payload rocket with a dedicated step in the instructions
titled, "Suggestions on Payloading". This is a nice added feature and
it points to specific articles from Estes, NARTS, Apogee Components, Sport
Rocketry Magazine and the Handbook of Model Rocketry by G. Harry Stine as
resources to enhance your payloading experience.
Winnie's™ stats are
23.75" long, 1.64" diameter and weighs in at 2.5oz. Again,
Winnie™ is a payload rocket so Holverson makes sure that you are aware of
what to do with a payload rocket with a dedicated step in the instructions
titled, "Suggestions on Payloading". This is a nice added feature and
it points to specific articles from Estes, NARTS, Apogee Components, Sport
Rocketry Magazine and the Handbook of Model Rocketry by G. Harry Stine as
resources to enhance your payloading experience.
The kit includes two tubes (body and payload), laser-cut balsa fins, a balsa tail cone, nose cone, and bulkhead. Also included is the 18mm motor mount with retaining clip and engine block. There is a elastic shockcord, and eye-screw and pre-assembled parachute to complete the recovery system. Two launch lugs and a single decal strip with Wicked Winnie and three HD logos on it complete the kit.
CONSTRUCTION:
The instructions are printed on both sides of two 11x17" pages. Each step is fully illustrated with clear and concise steps. The instructions include fin guide templates and a engine hook guide. There is also a shock cord mount (3-fold paper method). Instructions include what was mentioned in the introduction above, plus finish and flying guidelines. Very thorough instructions!
I really only found one very minor illustration problem with the instructions. I only mention it because it made me look twice when I was mounting the fins. In step 12, it shows the fins mounting to the balsa tail cone and overlapping onto the body tube. My fins, when installed from the marks according to step 12, did not overlap the body tube at all. In fact, it was about 1/4" from the body tube.
Assembly is straight-forward, however, there must be something that makes this a Skill Level 3 bird. There was, but mostly assembly items that required patience and a good understanding of the instructions.
A few areas to mention include the boat-tail fin alignment. This is not a straight body tube so you can run this one up to your nearest door jam and draw a straight line. It requires drawing an alignment line on the body tube then using a flexible ruler extend that line onto the boat-tail. Next after carefully cutting out two fin alignment rings place the rings onto the tail cone. One is large and slides up higher on the tail cone while the other is smaller and lower on the tail cone. Then, per the instructions, use the "time honored 'calibrated eye' method of checking to see if the lines are straight with the center-line of the boat-tail and body tube." Once aligned, you draw your fin marks.
Another item that challenges a rocket builder is again associated with the boat-tail. The fins need to be formed to match the curve of the boat-tail. They are pre-cut close, but need to be sanded to have a nice fit.
Step 10.5 is optional, but I would strongly encourage it to get a nice finish on your rocket. This step suggests that you sand and fill and sand the joint between the body tube and tail cone.
 The instructions also
give good direction for fin fillets and finishing. I didn't use anything to
fill the shallow spirals and was successful in using several coats of
Plasti-Kote Sandable Primer. The balsa nose cone, tail cone and fins took more
than two coats to hide all the grains. The instructions suggest using sanding
sealer but I didn't. After that I used Plasti-Kote Fluorescent Orange to really
allow this bird to be seen. The finish came out pretty good.
The instructions also
give good direction for fin fillets and finishing. I didn't use anything to
fill the shallow spirals and was successful in using several coats of
Plasti-Kote Sandable Primer. The balsa nose cone, tail cone and fins took more
than two coats to hide all the grains. The instructions suggest using sanding
sealer but I didn't. After that I used Plasti-Kote Fluorescent Orange to really
allow this bird to be seen. The finish came out pretty good.
The kit comes with a self-adhesive decal sheet that has "Wicked Winnie" and three HD Logo's on it. The decal is really glossy and the edges stand out due to that. Even after I sprayed the entire rocket with a clear-coat the decal stands out. So, I'm not so thrilled with the decal.
Overall, for CONSTRUCTION I would rate this kit 4 points. Instructions are excellent, some of the best of Low Power Rocketry that I have seen. The components of the kit are all of good quality. As a Skill Level 3 kit and payload rocket, the builder gets to learn some new techniques. Really, my only complaint is the decals.
FLIGHT/RECOVERY:
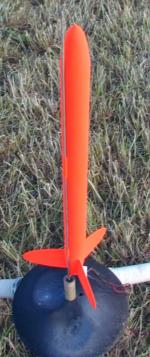
Holverson recommends a B4-4, B6-4, and C6-5 as motors of choice.
For my first flight I threw in an A8-3 just to get it into the air. That's all it really does. Up, pause, pop, down. Not even a 10 second flight. But it was stable . . . I think!
Second flight was with a B6-4. This was a nice flight (predicted altitude of 260 feet) and it had a good recovery.
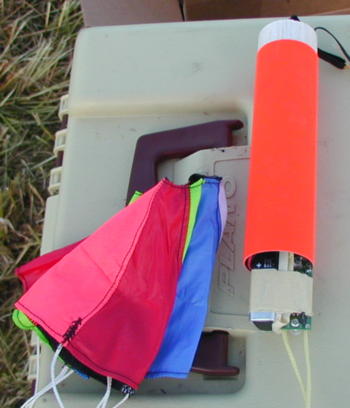 Third flight was to test
out the payload capability. I decided to send my
G-Wiz
Deluxe up in the payload section. Just to be safe, I added a parachute to
my G-Wiz in case somehow it got separated from the payload section. In
addition, I added a second 18" parachute to the rocket to deal with the
added weight (2.65 ounces). I also went with a C6-3 due to the added
weight.
Third flight was to test
out the payload capability. I decided to send my
G-Wiz
Deluxe up in the payload section. Just to be safe, I added a parachute to
my G-Wiz in case somehow it got separated from the payload section. In
addition, I added a second 18" parachute to the rocket to deal with the
added weight (2.65 ounces). I also went with a C6-3 due to the added
weight.
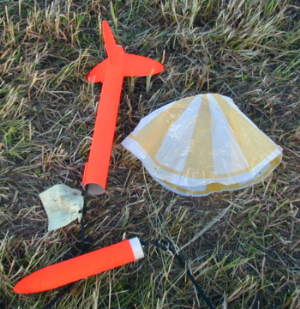
The launch was successful and the chutes deployed at apogee. The rocket still fell fairly quickly with all the added weight and even with the second parachute. This is an area Holverson could expand on in the instructions. Add parachute sizes and different motors depending on weight of payloads to their flying instructions.
Well, I didn't get what I was hoping for with my payload. I was hoping to get an altitude reading, however, it looked like the G-Wiz was still in the flying mode. After contacting Pratt Hobbies, it seems that the G-Wiz might not have activated "launch detect. To detect launch the G-Wiz has to see 2 Gs for half a second, 4 Gs for a quarter second, or 8 Gs for 1/8 second." So, now I have a D21 ready for this payload!
 As mentioned earlier,
the Wicked Winnie™ uses the 3-fold method of shockcord attachment. The
shockcord is ¼" elastic and about 6 foot long. The shockcord is tied
to a small eye-screw that is screwed into the balsa bulkhead. I highly
recommend using a lot of glue here and "bridging" the glue through
the eye-hole of the screw. If you are flying with a heavier payload, this joint
takes a lot of stress.
As mentioned earlier,
the Wicked Winnie™ uses the 3-fold method of shockcord attachment. The
shockcord is ¼" elastic and about 6 foot long. The shockcord is tied
to a small eye-screw that is screwed into the balsa bulkhead. I highly
recommend using a lot of glue here and "bridging" the glue through
the eye-hole of the screw. If you are flying with a heavier payload, this joint
takes a lot of stress.
I used a piece of Rogue Aerospace's Perma-Wadding™ for the wadding which has held up well to the three flights.
Lastly, the Winnie™ uses a pre-assembled 18" plastic parachute which with an empty payload section allows the rocket to descend at a good rate.
For FLIGHT/RECOVERY, I would rate this kit 4 points.
In summary, the Wicked Winnie™ is a nice kit to build and fly. It is a good choice to start some basic payload flying and gives plenty of instruction to help the new person decide what to use in the payload section. Instructions are excellent, making this kit easily buildable by young and old. I would even say new or experienced because even though it is rated as a Skill Level 3, a new person could do it if they followed the instructions.
I give the kit an OVERALL rating of 4 points.
 |
 |
Flights
|
|