| Construction Rating: | starstarstarstarstar_border |
| Flight Rating: | starstarstarstarstar |
| Overall Rating: | starstarstarstarstar_border |
| Manufacturer: | The Launch Pad  |
Brief:
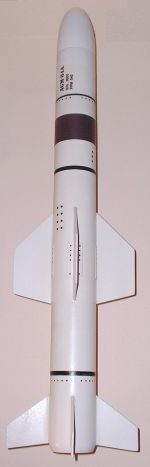
A roughly 1/5th scale model of the air-launched version of the HARPOON missile, designed for the modeler. Some skills required for optimum appearance results but otherwise easy to build and fly.
Construction:
My Harpoon kit arrived in a small package for what promised to be a big kit. Everything was there, good quality tubes, and a neat purple Mylar parachute (which works well and is easy to see), but no decals provided.
A note: There have been previous reviews of this and other Launch Pad kits that have pointed out some issues. I offer a slightly different perspective in that yes, some things about this kit are not super-easy, but I think of the kit as a foundation for some modeling artwork. The skills needed to turn this kit into a really good military model are all in the paint, finishing, and build techniques. So on with the build!
The fins have to be cut out of balsa stock with a provided pattern. (They are not laser/precut so we need to work a bit harder.) The balsa is soft, which is a good thing, not a bad thing. It's easy to cut. Strength is not a problem because I always laminate/reinforce my fins for any model. (Don't you?) For the Harpoon, I used sheets of peel 'n' stick paper from the local office store used for printing shipping labels. Cut the balsa, peel back a sheet of paper, lay it down, trim, flip over, and repeat. In the end all you have to do is sharpen and finish the edges. It's real easy. No CA glue, no soaking, no wrinkles.
The kit came with a great looking nose cone, and of course instructions to mount that little paper "hat" extension to give an authentic profile. Well here's a confession. I just flew mine with the stock cone. No paper hat because I didn't want to mess with it at first. Now that the Harpoon has flown, I'm actually retro-fitting the hat extension, and it's fine. So again, it's a modeler's kit, skills not included but well rewarded. The nose cone is weighted with provided clay, and we're cautioned to install it exactly as designed!
There's a neat paper tail cone adapter that's formed by cutting out and gluing a paper shape. I found it a little difficult to keep it round and smooth but with some body filler and paint, another problem once again solved. There are eight fins, lots of cutting and finishing to do, but alignment in the four-four pattern is real easy. I found it cool that the forward fins even have little wooden tabs at the root edges, decorated with rivets, which I believe represent the fin hinges. In any case, they are a fun detail and look great. And again, the instructions give location but no alignment tool. That's fine. We shouldn't need one if we're building and flying at this level. Same for the lugs. I chose to discard the lugs provided and went with ¼ plastic tubing of my own, epoxy bonded in place.
Installation of the recovery system is straightforward and the same as any other kit of this size. I chose not to use the recommended method (thread to nosecone)...and used my own shock cord design with a removable locking hook (makes parachute maintenance easier). So overall construction: easy enough if you like to build models.
Finishing:
Standard body cleanup and paint techniques were used. Though really, with good primer and paint the body did not need much attention to fill up any lines. The only problem was entirely my fault when I inadvertently switched paint brands between coats (warning: Krylon and Rustoleum may not always be compatible)... That wasn't pretty and resulted in lots of sandpaper use.
No decals came with the kit, so between internet look-up and the illustrations provided by TLP, I made my own interpretation and printed them onto Testor's decal paper with my printer. I used paper wraps for the broad stripes, which once clearcoated are fine.
I did not try the recommended method of using nail-heads to simulate rivets. I chose to make decals. So for future products, if TLP would provide a good decal sheet, I'd be willing to pay a bit more for the kit just to cut back on at least some of the finishing work, but that's a small detail.
One last nitpick: the engine mount tube holds a regular 24mm Estes type motor, like the D12. To run an E9, I have to friction fit because the tube is short. A good modification would be to put a long E9-sized engine mount, like what is on the Estes Big Daddy, and provide a spacer for the short engines. Just a thought.
This model looks great and ready to go. Whether or not it's exactly a photo-real replica of the original down to every rivet is debatable, but the message is there. It's a model, not a toy, so the builder is expected to make some decisions based on experience. Good. It keeps the price reasonable and works fine.
Construction Rating: 4 out of 5
Flight and Recovery:
I first flew the Harpoon out on the frozen lake near here with an Estes E9-6. There was even a small audience in the area. Sunny day, wind 10-12MPH. First flight was straight up and away, slow takeoff, a very realistic-appearing rocket launch. Instead of weathercocking into the 10MPH breeze, the Harpoon steered a bit, twisting and "seeking" slightly but all the while still proceeding straight up. One spectator pointed out that it looked like a real military missile, tracking a target as opposed to a whoosh-bang rocket. What a great flight. It went maybe about 350-400 feet up. Recovery with that Mylar chute was perfect. I thought the 6 second delay was getting a bit long though.
I flew again a week later with an Aertotech E30. Result: not so much a high flight but very sudden, almost explosive acceleration. No wind that day, but the harpoon seemed to corkscrew into the sky pretty broadly. I don't think this is the right engine for the job, but I will definitely try an E15. Last flight on another E9 was a repeat of the first, so it wasn't just luck, as it was smooth, slow, and maybe to about 400 feet max, but straight with a bit of steer.
Flight Rating: 5 out of 5
Summary:
This is a very convincing, realistic flyer, well worth every effort.
Overall Rating: 4 out of 5
Other Reviews
- The Launch Pad Harpoon AGM-84 By Mike Kent
The Harpoon is a scale model of a US Air-Launched Anti-Ship Missile, The Launch Pad's kit is an excellent first mid power and scale rocket. I was so glad when I finally got my hands on my AGM-84 Harpoon. One of the members of my club was going down to the US and was kind enough to bring it back for me. I received the Harpoon with all pieces present, in good condition, and good quality. I have ...
- The Launch Pad Harpoon AGM-84 By Kevin Drayson
Brief This is an approximately 1/5th scale model of the Harpoon anti-ship missile. Construction My kit arrived in a "standard" long plastic bag. All parts were accounted for, and in good shape. The body tubes appear to be standard BT-80, and the nose is a PNC-80B. There were a couple of nice sheets of balsa for the fins, plus some strips for making some of the detailing. The included recovery ...
 |
 |
Flights
|
|
J.C. (October 1, 2000)
D.P. (February 24, 2002)
B.Z.H. (October 11, 2002)
|
|
J.D. (September 1, 2000)