The Launch Pad TAN-SAM (Type 81)
The Launch Pad - TAN-SAM (Type 81) {Kit} (K045)
Contributed by David Pierce
| Construction Rating: | starstarstarstar_borderstar_border |
| Flight Rating: | starstarstarstar_borderstar_border |
| Overall Rating: | starstarstarstar_borderstar_border |
| Diameter: | 2.60 inches |
| Length: | 44.00 inches |
| Manufacturer: | The Launch Pad  |
| Skill Level: | 3 |
| Style: | Cluster, Scale |
Picture courtesty of The Launch Pad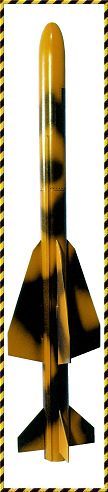
Brief:
This is a single stage model of a Japan Air Defense missile using a parachute
recovery and 2 engine cluster for power.
Construction:
The kit contains:
- two body tubes
- body tube coupler
- plastic nose cone
- sheets of balsa for 8 large fins
- parachute
- shock cord and string
- two metal engine retainer clips
- parachute attachment clip
- ejection charge baffle and washer
- and instructions
The instructions are more than sufficient for experienced builders and enough for most amateurs. They are easy to follow if you have built at least one rocket before. The two body tubes are joined with a body tube coupler. A large very flat surface is needed to insure that body tubes are joined straight. A kitchen counter is sufficient for this task. A second coupler is put at the bottom of the rocket for strength and coated with glue for protection against the rocket blast.
Next, the engine mounts are constructed from precut engine mounting rings, engine mount tubes, and metal retainer clips. This is similar to many other models, such as Estes, and is easily performed.
Following this, the ejection charge baffle is constructed. The baffle consists of a black paper washer the diameter of a body tube. Small holes are cut/drilled in this paper washer and a metal washer is tied (with string) and glued to the paper washer. The only hard part of this step is to get the paper washer down in the body tube without it flipping over. I pushed on opposite sides with balsa sticks and it went in very easily. I could align it further by continuing to push on it gently on the high sides. Then a long stick is used to place glue at the intersection between the washer and the body tube so that a nice fillet is formed. The location makes a tough fit for recovery wadding, but I assume you use less than normal since it is a baffle. More about recovery later.
The rocket has eight balsa fins. These are cut from balsa using templates cut from a pattern supplied in the kit. The mid-body fins are very large and the fins at the bottom are about average. This resembles a real prototype missile as the mid-body fins are used for flight stabilization and the lower fins used for steering. The balsa is very light, like rubber airplane contest balsa. There are small balsa details at the big fins and a balsa strip running up one side of the rocket to match the prototype. The large fins were not any harder to glue on, but they are fragile such that I was afraid to lay the rocket on the fins. I eventually did resort to laying the rocket on its side, but the fins would bend a little and I treated them with super glue per the instructions. I used a pool of super glue and a stiff piece of paper to spread the glue over the surface of the fin. It makes a rough surface that needs to be sanded. But it does strengthen the fins (also see recovery).
The parachute has a traditional shock cord, which I did not glue far enough down in the body tube, such that it interfered with the nose cone slightly. The parachute is a thin Mylar® (silver) 18 inchs by 30 inchs chute attached with thread to a double ended clip, which is attached to the shock cord. This is identical to any other rocket I have built. It seemed a bit fragile for this size of rocket (see recovery).
The last item is the launch lug attachment. Two lugs are provided and I glued them in line with the two sets of fins. There is significant discussion about this issue with Launch Pad rockets, but I didn't really find a solid answer. The best explanation I have read is that they are attached slightly below GP.
Finishing:
The fins need to be sanded, which I did outside since it is basically super
glue which shouldn't be inhaled. The joint in the body tune and the spiral
grooves should be filled, although I didn't do it. No decals were included, but
the kit includes a nice picture of the prototype, which I followed loosely. The
camouflage schemes always gets nice comments. The model looks very much like a
missile and is therefore impressive.
Construction Rating: 3 out of 5
Picture courtesty of The Launch Pad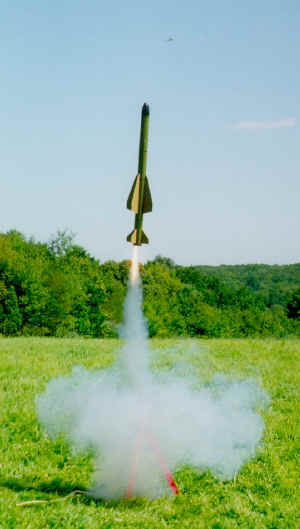
Flight:
I only got one flight using recommended two D12-5s. Two D12-7s are also
recommended. I had wanted to fire a cluster engine rocket and only recently
read about the trick of tying the igniter ends together. I also read that 12
volts is recommended. So I used both of these tricks and had a successful 2
engine launch. I used only a little wadding because of the baffle. There was
very little wind, less than 5 mph.
The rocket lifted off and quickly pitched over into an approximately 30 degrees above horizontal flight path. Good thing we were at a very large gravel pit. It continued until the engines ran out. When the engines quit firing, it began to pitch further toward the ground. It reached about 200' in altitude and at about 60' the delay charge fired. With the bad (good?) flight path, it looked just like a real missile headed for its target!
Recovery:
At 60', the ejection charge fired, ejecting the cone and the parachute. The
parachute opened as soon as it hit the air stream and it tore completely off,
leaving the rocket and nose cone to find their own way to the ground. At the
recovery site, the parachute was in a tree, the nose cone was on the ground
within 50 feet of the rocket.
The coating of glue inside the rocket tube was burned such that it was obvious both engines fired. The engines were not in the rocket when it was recovered, which is odd considering the engines have metal retainer clips. The parachute could not be examined since it was 30 feet up in a tree, but there was no evidence of burning on the shock cord.
There was only one item of damage to the rocket body, the lower launch lug was torn off. This is likely an indication of the flight problem. There was no damage to the nose cone or fins, which is good considering the size of the mid-body fins.
I left the ranking at a 3 because I did not have enough flights to give it a fair assessment.
Flight Rating: 3 out of 5
Summary:
The torn lower lug, which was on the opposite side of the body from the flight
path, indicates extreme wind-cocking or a balance problem. It was launched at
less than a 5 degree angle, so balance would not seem to be a problem. And
there was little wind, so wind-cocking would not be likely either. I do not
know which one is at fault, but my solution will be to remove the current lug
and attach a longer, single lug.
There is no CP or CG indicated with the kit, so I do not know if this was okay.
I like the look of the rocket, it looks just like a missile in flight, which is what I wanted. I like the simple construction, although it was light in the recovery department. I like the price. I would recommend it because it is a very good value.
Overall Rating: 3 out of 5
 |
 |
Flights
|
|