| Construction Rating: | starstarstarstarstar_border |
| Flight Rating: | starstarstarstarstar_border |
| Overall Rating: | starstarstarstarstar_border |
| Manufacturer: | LOC/Precision  |
After some consideration of a smaller kit for general purpose flying I chose the LOC Precision Vulcanite kit. Since I was going to be flying it on higher powered motors also I ordered it with one extra centering ring for the motor mount. After getting the kit I opened the package and inventoried the parts, all were there and in good order. I had decided to make some changes to the design for better strength and the ability of flying with an altimeter for two stage recovery on higher altitude flights.
The construction was very straight forward and simple but I changed a couple of steps for my modifications. In constructing the motor mount I measured the mount tube and installed the extra centering ring at the front of the through the wall cuts for the fins and installed the mount in the airframe with only the two forward centering rings on the motor tube. This allowed me to install the fins and fully fillet the inside of the airframe and the fin joint to the motor tube before fitting the rear centering ring into place. This way the fins are joined to the inside of the rocket at the motor tube, leading edge to a centering ring, trailing edge to a centering ring, and the body tube. The fins are highly shaped and aerodynamic with both the leading and trailing edges having a good taper. After installation they were sealed with a coating of thin epoxy to seal the ply's.
The standard payload section became the avionics bay and I added an 18-inch piece of Giant Leap tubing to the front for a forward parachute bay (the reason for the Giant Leap tubing was that I had an order going out to them anyway). I changed the way that the recovery attached to the nose cone by drilling holes into the rear of the nose cone and threading the hardware through the cone instead of using the lug as this is almost a guarantee you will eventually loose your nose cone. For the avionics bay to forward parachute section I used three #12 button head screws to attach it with blind nuts epoxied into the rear of the parachute section. Then I drilled three 1/4 inch holes at the base of the avionics section to allow for proper ventilation of the altimeter, the holes are far enough to the rear to be through both the airframe and coupler, then are finished out with an epoxy coating to smooth and strengthen the area. The altimeter is attached to the back of the parachute section using a mount I made myself so that it is quick changeable between rockets, only two #12 button head screws and two wires. I installed a rocker switch on the back of the parachute section between the legs of he altimeter mount and this is also installed on my other rockets.
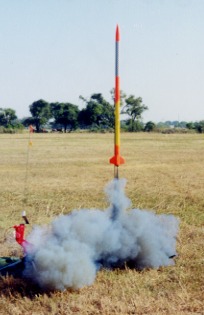
I finished the rocket in day-glow orange and yellow with the forward parachute bay wrapped in black and white checkerboard monocoat. It proudly caries the name of Mr. Spock and most of the regular Texas fliers recognize it immediately. The inaugural flight was on an H128 and it flew great, I did not have the avionics bay installed on this flight so it was not the full length. Since then it has been flying on everything from a G35 to an I195 and in all configurations of motor or altimeter recovery. The Highest altitude so far has been 4562 feet with an I211. The next planned flight is going to be on an I284 so that will be increased significantly. The rocket flies straight and true in almost any conditions and recovers well with any of the chutes that I have used with it, from a LOC 36 inch to a B2 Skyangle three footer. I have included flight logs for examination and with over twenty flights of all kinds on the rocket it is getting a little beat up but still flies like a champ.
 Prior to 9-10-99 - (1) H128, first flight. (1) H97, (3) G64, and (4) G75 flights
- Installed a Missile Works RRC2 installed for flights after 9-10-99, rocket now 711/2 inches in length, 3 pounds minimum flight weight with altimeter.
- 9-17-99 OSP -G75 with full two stage recovery, flew to 873 feet with good deployment of all recovery gear. Altimeter setting at 300 feet for main deployment.
- 11-6-99 Bomber Field - H123 with full two stage recovery, flew to 2119 feet with good deployment of all recovery gear. Altimeter set at 500 feet for main deployment.
- 11-13-99 Scout launch - H97 with full two stage recovery, no altimeter readout with good deployment of all recovery gear. Altimeter set at 500 feet for main deployment.
- 1-1-00 Bomber Field - I357 with full two stage recovery, flew to 3166ft with both a good apogee deployment and main deployment, main set at 800 ft after the failure to deploy correctly with Gold Rush. Immediate launch (fast igniter) and boost was very high G with a long coast to altitude.
 2-12-00 OSP -G35-7 with simple recovery as originally designed to fly, just over 1000 feet est, altitude.
- 3-18-00 OSP - G75 with altimeter recovery. Check flight for the returned RRC2 Missile Works altimeter. Flew to 671 feet in high winds with good recovery. Bounced off the hard-packed access road to the hill and kinked the body tube at the forward centering ring, repairable.
- 4-22-00 OSP -Flew on a G38-4 (new fast jack EconoJet) to about 1000 feet with good recovery using the 36" B2 Skyangle chute, looks good with the chute rotating in the air, will have to try this on a high power flight.
- 5-6-00 Bomber Field - Flew on an I211 to 4562 feet with altimeter recovery. Flawless flight with a 1/2 mile walk to recover due to high winds.
- 6-18-00 OSP - G75 with two stage recovery using the 36" B2 chute. Good flight to 775 feet with everything coming out at once for recovery, nose cone not tight enough. Good landing close to the pad to the oohs and ahhs of the crowd. 36" B2 chute good match for flying, just a little tight to pack.
- 7-8-00 McGregor Inaugural launch - Attempted to fly on an I300 but the motor CATO’d, blew the rear closure out of the rocket. Postmortem by Aerotech determined the there was one grain of white lightning propellant with three grains of blue thunder. Aerotech replaced the damaged parts and the reload, the rocket will fly again after making another altimeter bay bulkhead and straightening out the coupler a little, minor damage considering the impact of the case inside the rocket after the blowup.
- 9-2-00 Windom Texas - Flew on the I300 motor to 4428 feet reported altitude. Good straight fast boost to a good altimeter recovery with no damage and a great flight. Put rocket on scales before flight and was 4 pounds on the dot, very high G takeoff.
- 9-18-00 McGregor - Flew on an I195, do not think I will get any more black jack 38mm motors, to 4305 feet. Had a perfect two stage deployment and recovery about 200 yards from the pad. Boost was good if boring, not as many G's as expected and less performance than the four grain motors proceeding it. Plan on an I284 next time.
- 2-1-01 P3 field - Flew on an H242, perfect flight to 2266 feet with two stage recovery.
- 2-3-01 P3 field - Flew on an I284, great flight to 5837 feet. Very high G launch, 30-35, and a very straight flight, used 4 seconds of mach delay and may have needed it. Two stage recovery worked well and recovered inside of the field.
- 2-10-01 P3 field- Flew in an H242 to 2153 feet reported. Good flight in windy conditions, the altitude was about a hundred feet less than the same motor in calm conditions. Good motor for windy days and smaller fields.
- 2-24-01 P3 field - Flew on an I435 for a neck snapping flight to 5728 feet with a good recovery just on the other side of the trees, the rocket got a little muddy but otherwise was ok. With the kind of instant velocity available with this motor there was no weathercocking but at altitude it did move around a little due to confused winds aloft. Used tracking chalk for the first time and made finding the apogee easier (big red splotch in the sky), will use again even though it is a little messy.
- 4-14-01 at P3 field - Flew on an H242 to 1987 feet with dual recovery and the 36 inch B2 chute, good recovery close to pads in a medium wind. Low altimeter reading was probably due to the extra weight of the B2 chute.
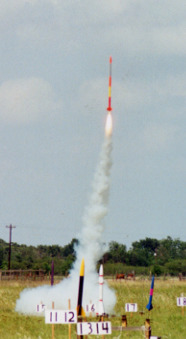
- 4-28-01 at P3 field - Flew on a J350 for a high G flight to 6790 feet with good recovery deployment. Winds caused about a half mile walk to recovery. Tracking chalk used and very helpful with finding apogee. Lost sight on the way down and found again when the main chute came out.
Overall I would recommend this kit for anyone getting into high power rockets and have certified other individuals who have chosen it as their level 1 certification rocket, it rarely fails the test. The most impressive flight that I have seen on a Vulcanite was at the August McGregor, Texas launch when a stock Vucnite was flown on a J570, this figures out to over 50 G's and the rocket took it without a hitch, it just flew so high that we were unable to find it to recover it.
NOTE: Even though Rick has made a couple of modifications, he has flown the rocket without the extra payload, at its original length, and has reported much success.
Update 11/01 -
Changed to Acme conformal launch lugs for rail launching.
- 9-16-01 P3 field - Took the J570 out to fly on the new I285 Redline to 4319 feet and a good straight up flight with recovery 200 feet from the pad. Tracking chalk really helped with the apogee event. This is the first flight of the RRC2 after the L3 where it indicated a false altitude, think it might be oversensitive with the batteries now, would not fly on a new Duracell Ultra but when Brett Noak offered a new Eveready Titanium it worked fine. Will get with Jim Amos about the situation. Performance is sterling with the new rail launch system for this rocket. Now all rockets are rail equipped and no rockets will be constructed in the future without rail launch lugs.
- 10-20-01 P3 field - Flew on the J570 with the challenge to take pictures if you can, Dan Stroud succeeded. Ripped off the pad (approximately 70 G�s) and with only 2 seconds of boost made 8304 feet to a perfect recovery inside the launch field. No damage and a good altitude readout from the flight. Last flight in the Aerotech White Lightning series, now will concentrate on the Red motors and EX launches.
Other Reviews
- LOC/Precision Vulcanite H76 By Curt Hillier (June 19, 2013)
LOC Vulcanite H76 is a 2.2" diameter high power rocket kit. It is a sleek rocket capable of flights well over one mile in altitude and supports 38mm diameter motors (29mm can be used with an adapter). Components Most components are of high quality. Airframe tubing is thick and robust. Fins are aircraft quality plywood. Nose cone - ogive, very ...
 |
 |
Flights
|
|
|
|
D.M. (June 4, 2005)