Maximum Thrust Rocketry Mach III
Maximum Thrust Rocketry - Mach III
Contributed by Moira Jean Whitlock
| Construction Rating: | starstarstarstarstar |
| Flight Rating: | starstarstarstarstar |
| Overall Rating: | starstarstarstarstar_border |
| Manufacturer: | Maximum Thrust Rocketry |
Brief:
Single-stage parachute recovery, suitable and simple to adapt to a level 3 project.
Hosts a 3 or 4 inch motor mount and can fly on M and above class motors.
Engineered to employ single event recovery, but can be set up for dual event deployment as well. There is ample room in the payload compartment for several avionic devices.
 Construction:
The nose cone is Maximum Thrust Rocketry's own creation, and appears to be cast fiberglass. It's very strong yet not overly heavy. This nose cone as well as the payload section, was drilled to accept 6 large wood screws that keep the nose cone in place during flight.
The airframe is ultra thick and strong paper tubes that are unglossed and take on epoxies and fiberglass readily. These are the same strong tubes I used and reviewed in my latest pair of scratch cluster designs, Hazmat and Shockwave.
The airframe was reinforced internally from the top of the motor mount all the way to the middle of the payload section with thick coupler tubes made of the same thick material, but without the white coating. These were liberally soaked with West Systems slow epoxy and fitted into place. The outside of the airframe was double fiberglassed with two layers of cloth, the first heavy, the other medium grade, adhered again with West Systems epoxy. The grains of the layers were placed perpendicular to one another. The fin faces were glassed continuous with the face adjacent with one large piece of medium grade cloth. The top layer of epoxy is Z Poxy finishing epoxy.
There are 4 fins made of Baltic birch honed to an actually sharp airfoil shape. They were expertly cut and matched well. They were not warped at all. Their size is impressive, creating a 30 inch fin span between adjacent tips when the rocket was assembled.
The motor mount is 4 inches and comes with a 3 inch adapter with 4 centering rings. I chose to fiberglass and foam it permanently in place to prevent any chance of a free flying motor. The main motor mount comes with 3 centering rings, nice thick 1/2 inch birch. I used these to reinforce the airframe between the couplers. I also used 2 part polyurethane to foam in the gaps in the airframe inside where the fins were. All joints of the fins to the motor tube and to the inside of the body tube were fiberglassed with strips of medium grade cloth and West Systems slow epoxy. The fiberglassing of the main body was extended over the aftmost centering ring to add extra strength. The main body tube was further affixed to the aft centering ring with 4 wood screws under the fiberglass.
The shock cord is 20 feet of 1 inch wide tubular nylon. As per the recommendation of both my TAP advisors, I installed a parallel redundant shock cord twice as long, with a 20 foot length of 1/2 inch wide tubular nylon quick linked to 20 feet of 1/2 inch thick bungee cord. Both cords are quick linked to MASSIVE 4 inch u-bolts through bulkheads made of 1/2 inch thick birch in the booster and in the payload section bulkhead.
The instructions were hand-drawn but adequate. Since this isn't for a new rocketeer, details are probably not as important to spell out. I also modified this kit anyway, to suit my level 3 requirements and to incorporate my past reinforcement ideas. The instructions were in a simple, logical order and there are a couple simple pictures that mainly illustrate the big picture, not fine details.
I created my own motor retention system using a pair of 5.5 inch by 1/4 inch thick centering rings from Space Modeling Solutions. I ordered these rings with 3 inch holes to accept my Kosdon 76/6000 hardware. The first of the pair of rings was permanently epoxied and bolted to the aftmost centering ring of the main body. The motor's thin metal thrust ring rested against this ring. then the second ring was screwed with 4 wood screws until it lay flat and tight against the first ring. Two steel mirror hangers were screwed in through both rings and their hooked ends held the motor 180 degrees apart from each other.
 The parachute is a decommissioned 15 foot white nylon military chute. It came with links to add it right into the recovery system.
The rocket comes with two very thick and strong launch lugs that can take one inch rods and I glassed them onto the rocket, but TAP members seemed to prefer the rail system, so I came prepared with a set of rail guides and a friend with a rail launcher. (Thanks, Marc Casanova!)
The only difficult part was cutting the grooves in the body tube to fit it over the motor mount/fin assembly.
The result is a strong rocket that can fly well unglassed, but I glassed it just to be certain of strength.
Finishing:
I used teal and purple Krylon spray paint for the nose cone and fins and Monokote for teal, black, and purple color fields along the length of the rocket. This was meant to be an Arizona Diamondbacks tribute, and was named The Big Unit. The parachute had red markings to make it look like a giant baseball in the sky.
Metallic band accents separated the color fields. These bands are self adhesive mylar.
While this looked nice, it doesn't stand up to near-mach conditions. A small section of the black field on the payload section was shorn off during the flight. But the rocket still returned to me flyable.
Construction Rating: 5 out of 5
 Flight:
Any M class motor is recommended. I didn't see whether any N types were recommended, but I think that with my glassing, it could withstand that.
I chose the Kosdon M1130 and recovery was accomplished with 3 altimeters. Yes, three. This was my level 3 cert that I'd lived and breathed during every free minute off work for a month before it finally flew. I was having paranoid thoughts and decided on a second backup. My primary altimeter is a Blacksky AltAcc, and accelerometer. The first backup is a Skyward Electronics barometric altimeter. I added a G Wiz 800, another accelerometer. 7 grams of FFFF black powder proved to be sufficient on my front yard tests...yes, it sounded like a small cannon too. The chute was protected with a pair of Nomex/Kevlar round protectors.
Everything went together easily, but mainly because I chose to mount the electronics at home and place the charge in the field.
I had been nervous all week, but now I was simply cool and said to the guys, "It's showtime."
The RSO had already made his rounds, so all I had to do was march to the pad...500 feet away. Yes, I had added 300 more feet of cord to my system to prepare for this, and guys had helped me clear lots of area to prevent fires. Thanks, Randall (my husband) and Bryan Foss (a friend in the club).
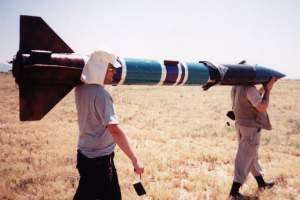
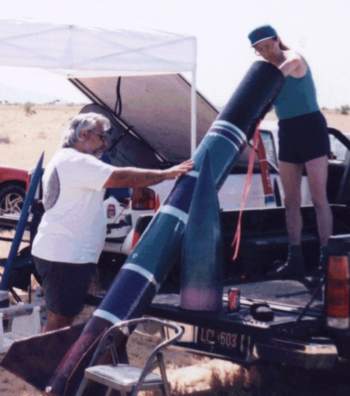
Placing the behemoth on the pad was a 3 man job. I realized this when I actually saw my creation full standing.
 Than it came time to arm all the altimeters. One had a screw to turn and the other two had banana jacks to pull out. But the rocket was so tall that I had to stand on top of the cab of my husband's truck to reach!!! If anyone has a photo of that, I'd love it.
The igniter was a pair of magnums from Fire in the Hole, with an extra 3 inches of thermalite dipped in Igniterman pyrogen. I would these igniters around a wooden dowel rod and put it up into the motor and taped it securely. I didn't want pressure to blow them out.
Then I was about to hook up my system. I always tap the alligators together to be sure it's not live. IT WAS!!! When I heard the continuity piezo signal, I blanched for sure. I'm SOOO glad I didn't have an M go off near my face.
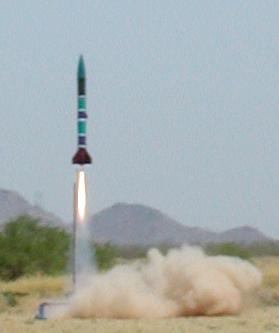
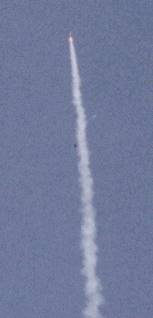
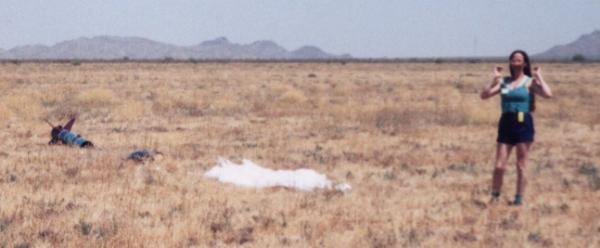
Well, when it flew, it roared so straight that I could have climbed the smoke trail. It seemed like the chute tangled, but opened without any body tube zippering. But it seemed like there was an awful lot of smoke up there. When the RSO said there might be a fire, I was looking up. maybe 7 grams was too much...but the RSO was worried about the ground. The motor had churned up so much dust that it looked like extra smoke and created a hole in the ground!
Yahoo! 4736 feet the altimeter said. that was fun. I think I'll do it again.
Recovery:
I think the recovery was at the right time. Not too early and not late. The chute took a moment to open, but maybe that was due to its great size.
Other than a little Monokote being peeled, the rocket was flyable again and unharmed.
The only thing I'd change is to use paint instead of Monokote, or to apply more heat to apply it. The last coat, which was the one torn, was a rush job the night before and I could have applied more heat for longer. Maybe it would have stayed on then. Monokote does look really great, though, and can hide rough bits on fiberglassed surfaces.
Flight Rating: 5 out of 5
Summary:
Great project, huge and magnificent. A real attention getter. Simple and straightforward and a performer. Really, no CONS.
Overall Rating: 4 out of 5
 |
 |