| Construction Rating: | starstarstarstarstar |
| Flight Rating: | starstarstarstarstar |
| Overall Rating: | starstarstarstarstar |
| Manufacturer: | Mercury Engineering  |
Brief:
The Hijacker is a good sized mid-power rocket with a 3” body, 29mm motor mount, 4 light-ply through-the-wall
fins, a nice baffle in the coupler and recovery on a 28” rip-stop nylon chute.
Construction:
The parts list:
- (2) 3" x 17" body tubes
- Body tube coupler with ejection baffle set
- 11" nose cone
- 29 mm motor tube and engine mount set
- 1/4" launch lug
- 4 laser cut light-ply fins
- 28" rip-stoop nylon parachute and shock cord
- Decal sheet
I don’t think I can count how many rocket kits I have built over the years, but this one was something special. While not a beginner kit, this was a very straightforward build. The components were high quality… sturdy body tubes, laser cut fins, centering rings, and baffles ensured a near perfect fit. I did not have to sand to fit at any step. While intended as a mid-power kit, I had every intention of building it to fly on H motors. Wood glue is frequently recommended throughout the clear and detailed instructions. My only deviation from the plan was to use epoxy on the motor mount and fins. This is really just a personal preference.
Construction begins with a standard motor mount assembly and includes a foil tape strip on the aft end of the motor tube to facilitate taping engine thrust collars to the tube. Well more precisely, this facilitates untaping the engine after the flight without destroying the motor tube. Simple, nice touch.
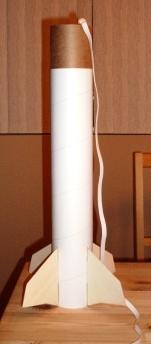
The aft body tube was clearly marked and cutting the fin slots was a breeze. The engine mount is installed and next the through-the-wall fins are glued giving a sturdy business end of the rocket.
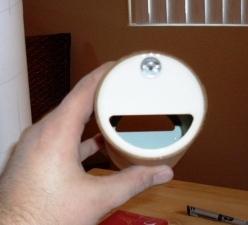
I really liked the ejection baffles on the body tube coupler. In addition to anchoring the shock cord they also protect the recovery system. I’ve had enough separations to appreciate this feature.
Construction wraps up simply… glue the forward body tube to the coupler and attach the nose cone and parachute to the shock cord.
Finishing:
I sanded the fins and nose cone a bit, a coat of primer, sand, and then the finishing coat of paint. Couldn’t be
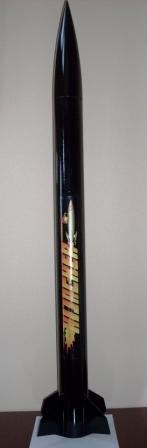
simpler and looks great. I went with black as per the manufacturer design. I placed the large “HIJACKER” peel
and stick decal and was in business.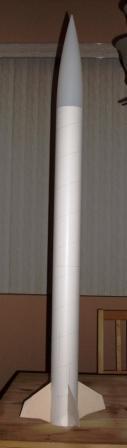
Construction Rating: 5 out of 5
Flight:
I had a G80-10 on hand and wasted no time getting this bird in the air. Spectacular flight and recovery. I can’t
wait to boost it on an H128 at our club launch next month.
Recovery:
A few sheets of wadding and some help from the baffles is all that is needed for prep. I had a perfect recovery on
the first flight.
Flight Rating: 5 out of 5
Summary:
First of all, this is a good price for a very capable rocket. Mid-power flights are plenty of fun, but if you are
also a thrust junkie on a limited budget (like me) this type of kit is good for what ails you. I’ve watched
countless less than stunning level 1 flights on H and I motors lift heavy, Baltic Birch laden rockets. I’ll take a
light and strong rocket ripping a hole in the sky over that, no contest.
Overall Rating: 5 out of 5
 |
 |
Flights
|
|