| Construction Rating: | starstarstarstar_borderstar_border |
| Flight Rating: | starstarstarstarstar_border |
| Overall Rating: | starstarstarstarstar_border |
| Manufacturer: | Micro Classics |
| Style: | MicroMaxx |
Brief:
This is a roughly 1/3 scale Estes "classic" (only available from
1981-1982) is a wonderfully detailed kit. When you're tired of all those feeble
RTF MicroMaxx rockets that came with your starter set and you want to move up
to a somewhat challenging build and beautiful design.
Construction:
I'd heard good things about Micro Classics but had no idea where or how to get
them. (I learned that you can email microclassics@aol.com for a price list.)
Somehow reading my mind (or maybe my posts on The Rocketry Forum), Nick
included this one as a sampler when I bought a few Model Minutes kits. The list
price for this is $12, which is a bit steep until you actually build it and get
a feel for what's involved.
There are a lot of little parts to this kit and no formal parts list, so I'll attempt to summarize what was included:
- 2 pieces of 5/16" plastic tubing
- 3/16" tubing (fits inside the 5/16)
- paper coupler
- styrene fin stock
- hardwood nose cone
- styrene rails
- styrene launch lugs (two sizes, depending on your pad)
- BT-55 tail ring
- Kevlar® shroud line
- Mylar streamer
- Waterslide decals
All of which fit inside a Ziplock sandwich baggy. The instructions list this kit as a skill level 4 out of 5, which I would say is fairly accurate mainly due to working in such small scale where precision and fit are so critical.
The instructions were fairly straightforward. The illustrations are a bit crude (all hand drawn) and some of the steps required a little page flipping to see the illustration for a better understanding of the process. It also doesn't help that the back of page 1 is page 3, followed by page 2 on a separate sheet (the steps are clearly numbered but the pages are not).
Construction begins by cutting the various tubes into smaller pieces, as well as cutting the fins from stock (2 sets of 3 fins). I was able to muddle through the cuts using a good utility knife blade for the tubing and a fresh #11 X-Acto for the fins. A Dremel or a decent razor saw would work as well.
For bonding, the instructions recommend liquid plastic cement. I used this wherever possible (not the squeeze tube but the clear stuff in a bottle that is brushed on). I really like the liquid cement because it doesn't leave any of the residue or stringy trails like the tube stuff. I also used a bit of thin CA for fin fillets.
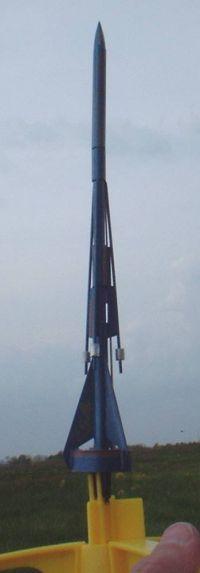
Assembly starts with construction of the main body tube. This is actually a series of large and small tubes (OK, mini and "mini-er"), with the smaller tubes acting sort of like couplers but exposed enough to break up the straight line/single diameter look.
Next, fins are tacked on, using an alternating 120-degree alignment pattern (forward fins on 60/180/300, aft fins on 0/120/240). At this point, I would suggest checking the fit of the aft fins and the BT-55 tail ring. I followed the fin template fairly closely, and my aft fin did not line up very well with the BT-55 at all. The tips of my fins were off by about 1/8", which is an enormous gap in this scale. This took a lot of trial and error plus some plastic filler to get reasonably close. Once the fins are in place, tack the rails (plastic dowels) in place.
The original Cassiopeia had a pair of discs for trim on the rails. These have been replaced in this design by 1/4" lengths of tubing. These go on the rails about 1/4" from the aft end.
There are two different launch lugs provided in this kit, since there is not exactly a "standard" MicroMaxx rod. Once you've confirmed which size rod you will be flying with, the appropriate lug is tacked in place.
Next comes the fit and bonding of the tail ring. As I mentioned, mine didn't fit well and I had a lot of rework here. I would have been better off checking the fit, measuring the discrepancy, and breaking off the fins to cut again and/or trim on a firm surface.
The Kevlar® shock cord is anchored on one end through the tube coupler and glued on the other end into a hole you get to drill in the nose cone base. Tack on the mylar streamer and you're done with the construction.
Finishing:
There were no specific paint instructions in the instructions, although there
was a reference to the DARS/Jim Z site for more information. After consulting
that site, I found the original kit specified blue metal flake for the body and
silver for the trim discs. I went with a single coat--just enough for the
finish coat to grab on to--of white primer, followed by two coats of Rustoleum
blue metallic paint. The result was a very nice looking finish and thanks to
the plastic tubing, I didn't even have to fill any spirals.
One of the things that probably drives the price of this kit up is the waterslide decals. They were exceptional quality, especially considering how much they were downscaled for this. The decals were produced by Excelsior Rocketry and come with very explicit instructions on how to apply. Read the directions and follow them to the letter. I find these decals to be very thin and finicky but after getting used to them on a couple Excelsior kits, I had no problems with this kit. The only thing I'd do over though would be to try to go with a lighter blue. The decals don't stand out as well against the darker background, and I waited a full week for the paint to cure before applying these.
Construction Rating: 3 out of 5
Flight:
For the first flight, I tried out my new MicroMaxx pad. If you haven't snatched
up one of those mega starter sets with 10 RTF rockets, 50 motors, and a pad for
half off, jump on one at the next opportunity. The rockets are worthless but
it's a good deal on the motors and the new and improved pad is great. It's
similar to the Estes 3-leg assembly, has a spot for inserting either a micro
rod or a 1/8" rod, and you can actually use a regular 2-clip controller!
The ignitor slips into the pad with exposed wires and you can clip your leads
straight to these. This allows you to deliver a lot more power than the regular
9V battery that's good for at most 1-2 days' worth of flights.
I popped an MMX into the tail, stuck in a tiny bit of wadding, and stuck the Cassiopeia on the pad. With my 12V system pushing through the charge, it lit right away.
Normally with MicroMaxx style rockets, you hear a pffft and immediately look for the puff of smoke in the air to find your rocket. Not so with this "brute". At 0.3 ounces, it went slow and smooth, peaking at about 50 feet. I got to see it the whole way. This could easily be a backyard flyer and would definitely stay in the infield if flying from a pitcher's mound.
Recovery:
My streamer stuck leading to a tumble recovery, but there was no damage in the
soft grass. I think the stuck streamer is going to be a frequent occurrence
with this as the tube is awfully tight when you stick the streamer and all that
Kevlar®
inside.
Flight Rating: 4 out of 5
Summary:
I love the micro scale of this and the incredible details and decals. At $12
it's a bit pricey, but I'm glad to have this in my fleet and will probably pick
up another couple of the Micro Classics line just for the mini-wow factor.
Overall Rating: 4 out of 5
 |
 |
Flights
|
|