E-MadeinCHN Instant Firing System
E-MadeinCHN - Instant Firing System {Launch Controller}
Contributed by Art Applewhite
| Published: | 2010-03-16 |
| Manufacturer: | E-MadeinCHN |
Brief:
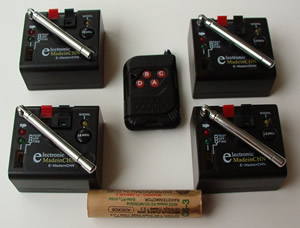
This system is designed to be a wireless fireworks firing system but it is easily adapted to work as a multiple pad, launch controller. The simplest, complete system consists of a transmitter, a receiver and a set of clip leads. E-MadeinCHN makes systems for 1, 2, 4 & 12 channels. The system I'm reviewing here has a 4 button transmitter and 4 individual receivers. A user's manual, in English, was included with the set.
Construction:
This system is extremely compact. The entire set of one transmitter and four receivers came well-packed in a box only 6"x 4.5"x3". It took about 2 weeks after it was ordered to arrive from Hong Kong. The total cost for everything including shipping was $51.00. Their one receiver system costs $18.00. I paid using PayPal
 The Transmitter:
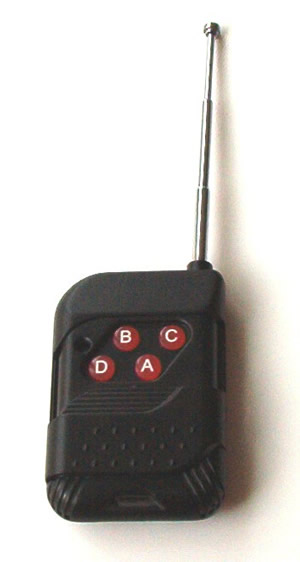
The 4 channel transmitter has a rated range of 200 meters. I only tested it to about 100 feet because that's all the range I need for model rockets. The transmitter uses an "A23", 12 volt battery which is included. The A23 battery is available at most places that have a good selection of batteries and it is commonly used in garage door opener remotes and wireless doorbells.
The transmitter is about the size of a small box of matches or a Zippo lighter. Versions of this transmitter with only one and two channels are also available and are the same size. In the stored position, the telescoping antenna is flush with the case and it extends 2-3/4" for maximum transmitting range.
There is a sliding cover over the buttons with a detent that locks it in the closed position. Beside the four buttons marked A,B,C & D there is a red LED that lights up when any of the buttons is pushed. At the base of the transmitter there is a handy hole for attaching a strap.
I recommend a bright colored neck strap because it is very easy to misplace the transmitter. The manufacturer also sells larger transmitters more buttons and a range of 2000 meters (over a mile).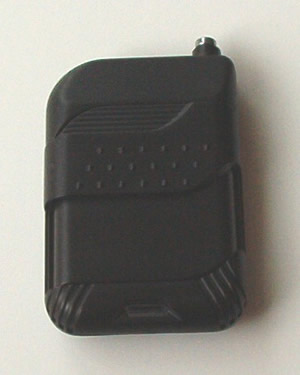
The transmitter is small and as a result the buttons are close together. It is easy to press the wrong button or more than one button if you aren't paying attention to what you're doing. Normally only one rocket would be launched even if more that one button was pushed because only one channel code can be sent at a time. The code of the first key pressed.
The Receivers:
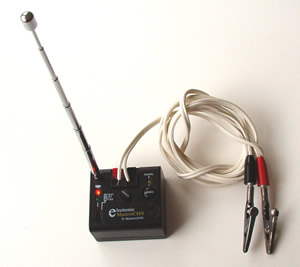
Each receiver is about twice the size of the transmitter. They use four AAA batteries which, for weight reasons, were not included. The receivers have a three position, TEST/OFF/FIRE switch, a LEARN pushbutton, three LEDs, a telescoping antenna, and two quick connect terminals. The antenna folds down flat against the case when not in use and when extended, is 8" inches long and can be swiveled 360 degrees horizontally and 180 degrees vertically.
Each receiver may be programmed to any of the transmitter buttons (channels)at anytime before it's hooked up to an igniter. No tools are required. For such things as drag races you can easily program two or more receivers for the same channel and they can then be activated by a single button on the transmitter.
 Programming a receiver is very simple and quick. First put the TEST/OFF/FIRE switch in the FIRE position. Then hold down the LEARN button for 3 seconds. The Yellow SIGNAL LED will come on to let you know the receiver is in the "Learn" mode. Release the LEARN button and press one of the transmitter buttons within 3 seconds. The receiver will be programmed to accept that button to activate it. The Yellow SIGNAL LED will flash three times to indicate that programming was successful. It would be a good idea to mark the receiver with the transmitter's button designation once it's programmed to avoid confusion and accidental firings later.
Once programmed, the receiver retains the channel setup even when it's turned off or the batteries are removed. Clearing the receiver is nearly as simple and quick as programming. Put the slide switch into the FIRE position and hold the LEARN button down for 6 seconds. After 3 seconds the SIGNAL LED will come on and after 3 more seconds it will blink once to indicate that the receiver channel code has been cleared. Once it's been cleared, the receiver should not respond to any of the transmitters button until it's once again programmed.
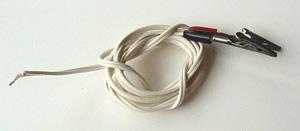 The only thing needed to adapt this system for launching model rockets is a short length of two conductor zip cord and two alligator clips. You could even recycle the leads from an old launch controller for this. Just cut them off at a suitable length and strip off about 1/2" of insulation from the ends. Once you twist the strands together of the individual wires, they will be ready to insert into the quick connect terminals of the receiver. The igniter is hooked up via the clips as usual. With an igniter connected, the TEST/OFF/FIRE switch can be put in the TEST position. If the GREEN LED comes on, you have continuity. Returning the TEST/OFF/FIRE switch to the FIRE position will cause the GREEN LED to go out and the RED LED to come on. If the RED LED flashes, that means the batteries are low and should be replaced before you proceed. The continuity test current is less than 10 mA so it should not set off the motor prematurely. With the slide switch back to the FIRE position and the RED LED on solidly, the receiver is ready to launch the rocket as soon as the appropriate button on the transmitter is pressed. When the button is press, the receiver output will be energized for one second. There is a 5 second delay before the receiver output can be re-energized. Some would consider this a limitation while others would see it as a safety feature. I am certain that it extends battery life of the receiver a great deal. The Yellow SIGNAL LED on the receiver comes on when the RF carrier from the transmitter is detected. An internal RED LED, that can be seen through the smoky gray case, just to the side of the three position slide switch, lights when the output is energized.
 This system worked very well with Estes and Quest igniters but it didn't work at all with Quickburst Twiggy or RoadRunner igniters. I did not test it with Aerotech FirstFire or Copperhead igniters but it is unlikely to work with them either. According to the user's manual, the output current is rated at a minimum of 3/4 ampere and a maximum of 5 amps but the 6 volts provided by the four AAA batteries in series is too low for most high power rocket motor igniters.
If a high current output is required a 6 volt relay could be connected to the receiver's output terminals to allow control of a more robust, independent power supply such as a 12 volt car battery.
To test to see if the receiver could be triggered by anything other than the transmitter it was programmed with, I tried the following:
A microwave oven
A similar transmitter made by the same company
A cordless telephone
A remote transmitter to lock a car door
A TV remote
While this was by no means a comprehensive test, it did demonstrate the system's immunity to interference from common radio frequency devices.
During testing, each transmitting device was within an inch of the receiver's antenna and none of them triggered it's output.
To use this system for a typical model rocket launch, first program and label each receiver for a different button on the transmitter. This can be done at home in a couple of minutes or it can be done at the field. The Launch Control Officer (LCO) should have the transmitter with him at all times, preferably on a lanyard around his neck with the safety cover snapped shut. At the field, connect the clip wires to the output terminals of each receiver and set them close the launch pads with their antennae extended. To launch a rocket, hook up the motor's igniter using the clip leads the same as with any other launch system. Check continuity by putting the TEST/OFF/FIRE switch of the receiver in the TEST position. Only the GREEN LED should light. If it doesn't light check you connections to the igniter. Setting the TEST/OFF/FIRE switch to the FIRE position arms the receiver. When it comes time to launch the rocket(s)the LCO should carefully locate the correct button on the transmitter and start the countdown. At zero the LCO should gently presses the button and WHOOOOOSH! That's all there is to it.
Summary:
PRO's:
- Small, light, modular, wireless
- The transmitter is so small it becomes it's own safety interlock.
- Simple setup
- Relative low cost when compared to other launch controllers.
- Uses easy to get batteries.
CON's
- The transmitter buttons are too close together
- The transmitter is easy to lose track of.
- The output is not powerful enough for clusters and high power igniters.
- A wireless system can be susceptible to interference and hacking.
- The "FIRE" position of the three position switch should be labeled "ARM" or "ON".
- The receivers are not waterproof.
Overall Rating: 4 out of 5
Other:
Once you get over how tiny this system is compared to normal launch controllers you'll come to love it. You will wonder why you ever bothered lugging out all those long cables and heavy batteries.
 |
 |
|
|
A.K.S. (April 20, 2010)