| Manufacturer: | Missile Works  |
![[Picture]](/images/archive/images/ratings/rating_mw_viking.gif) (07/16/99) As
Missile Works just released their rocket kits, I was excited to try my hand at one of their
Research Kits, the Viking 7 Sounding Missile.
(07/16/99) As
Missile Works just released their rocket kits, I was excited to try my hand at one of their
Research Kits, the Viking 7 Sounding Missile. CONSTRUCTION:
The Viking 7 is made up of 2.63" diameter "exclusive" Phenolic/Kraft body tubing. I'm not sure what makes it exclusive, but it is 1mm thick, were as PML Phenolic is just under 2mm thick. This gives Missile Works some strong tubing and keeps the weight down. The airframe was made up of a 30.75" main body tube, a coupler and another 8" section. The main body tube was pre-slotted too.
Included in the kit were laser-cut birch plywood fins (4) that pass through the slotted frame and attach to the motor tube. Two laser-cut birch ply centering rings, a 12" 29mm motor tube and a brass motor clip complete the motor mount. An "authentic proportional" plastic nose cone and 1/4" launch lug. Making up the shock cord system, the kit provided 1/8" Kevlar® Bridle cord (two times the body length once outside of the body) and mounting hardware for attachment to the nose cone.
A unique, and appreciated, feature of Missile Works' kits is that you have some options that can be added. In the case of the the Viking 7, you can order a payload option which includes a bulkplate and hardware, a baffle option, and/or a Nomex® protector option. One key difference is that they do not supply a recovery device such as a parachute or streamer. I personally like this considering I have a dozen or so parachutes sitting around, thereby, allowing the savings of a few bucks. You can order a recommended parachute from Missile Works if desired.
The Viking 7 assembly instructions were excellent. From assembly tips to flight preparation. Each step is boxed out with a text description and a clear picture to ensure understanding. They are even written to handle the above options and are noted to give the builder the appropriate guidance. They include finishing techniques, even discussing filling of the spirals with their own suggestion. The flight preparation section clearly describes the CG/CP expectations for a stable flight. A scale drawing and paint scheme is also attached.
![[Motor Clip]](/images/archive/images2/rp_mw_viking_7_clip.jpg) As
mentioned the Viking 7 comes with a motor retention device. Really? Indeed!
This is somewhat unique when building kits with 29mm motors and above. They
have a nice idea that is more flexible that the method Aerotech uses.
Aerotech's method is an over sized Estes' method whereby the top of the clip
acts as a thrust ring. If one used shorter motors (EconoJets or F's), adaptors
are needed to fill the space between the top of the motor clip and the motor
(unless other arrangements are made for a thrust ring).
As
mentioned the Viking 7 comes with a motor retention device. Really? Indeed!
This is somewhat unique when building kits with 29mm motors and above. They
have a nice idea that is more flexible that the method Aerotech uses.
Aerotech's method is an over sized Estes' method whereby the top of the clip
acts as a thrust ring. If one used shorter motors (EconoJets or F's), adaptors
are needed to fill the space between the top of the motor clip and the motor
(unless other arrangements are made for a thrust ring).
The Viking 7's clip does not hook into the motor tube. It is attached using "at least" 6 wraps of masking tape and the bottom center ring. This method does not put limitations on the motor length and requires that a thrust ring is utilized (RMS or tape method). The 6 wraps of tape had me a bit nervous, but once you put the center ring in place and epoxy, I felt it was a viable method.
The Kevlar® shock cord is attached by passing it through the upper center ring and knotting it. The nose cone end was fun. An eye-screw, washer and nut are provided to attach to the nose cone. A small rectangular hole is cut into the base of the nose cone to allow you just enough room to get the nut on the threaded eye-screw on the inside of the nose cone. I read the step twice and looked at the illustration twice. Actually though, I got it threaded right off. I would say this technique is stronger than using an eye-screw (wood or sheet-metal type) that simply threads into the plastic.
I purchased the Ejection Gas Baffle option. It is made up of a 3" baffle tube, a perforated disk, an aluminum mesh and two rings. The instructions tell you when you should assemble it and when to attach it to the motor tube.
Outside of the the above, assembly was straight-forward went without a problem.
![[Rocket Pic]](/images/archive/images2/rp_mw_viking_7.jpg) For finishing I started
with Elmers' Light Spackle to fill the spirals, then several good coats of
Plasti-Kote primer. I then varied
from authentic colors and went with silver. I painted the entire rocket and let
it dry a couple of days. I came back and masked off the fins and nose cone and
hit them with black paint. When I removed the masking I found strange effects
on the silver paint! I have since learned that with silvers and golds, clear
coat them before doing any masking to avoid issues with discoloration. The
clear coat also protects from discoloration caused from touching the paint (see
left top of photo). I cleaned up masking issues.
For finishing I started
with Elmers' Light Spackle to fill the spirals, then several good coats of
Plasti-Kote primer. I then varied
from authentic colors and went with silver. I painted the entire rocket and let
it dry a couple of days. I came back and masked off the fins and nose cone and
hit them with black paint. When I removed the masking I found strange effects
on the silver paint! I have since learned that with silvers and golds, clear
coat them before doing any masking to avoid issues with discoloration. The
clear coat also protects from discoloration caused from touching the paint (see
left top of photo). I cleaned up masking issues.
The Viking 7 comes with some paper tabs that mount on the fins to give it a more detailed look. It also comes with four decals that say "7", two white and two black. I did not use the decals. (note: I changed the paint scheme with my rebuilds as you will see in pictures below.
Overall, for CONSTRUCTION I would rate this kit 5 points. Good quality materials, excellent instructions and a motor retention system.
FLIGHT/RECOVERY:
Attempt #1 - At Battle Park '99, the Viking 7 sat out on the launching pad for 20 minutes with a dozen or so other rockets as the RSO waited for the wind to die down. Finally, when it came to the Viking 7, the count down occurred but yield nothing. The wind had blown the the clips off of the igniter. That was it for me, so I packed up.
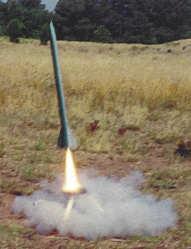
Attempt #2 - I took it out a day or so later and launched it on my own. I used a F40-7 (one of the recommended motors). Lift off was smooth and she was stable all the way up. I counted after thrust and at 7 counts she had just started coming down and pop. I saw the nose cone push out but the parachute stayed in the body tube the entire way down.
I have determined that this was my fault (a learning event) and a habit I must break. I have a tendency to not use the full ejection charge on my 24mm RMS system and Meanie because it is so short. I believe I did the same thing on this one. Well, with the baffle AND I had a Pratt Heat Shield (I don't know why) in it, there was not enough ejection to force the parachute out. The less-than-forceful exhaust gases must have passed by the chute to pop the nose cone out but did not have enough umph to push everything out.
I was able to salvage the motor mount, all fins and the nose cone. Everything else was tossed. I have a resolve to get this bird flying and so I'm rebuilding it. In fact, I even purchased a Missile Works' Rocket Recovery Controller (RRC²) for my rebuild. Should be ready in a couple of weeks.
REPAIRS:
It took the real Viking flight team many attempts before they finally obtained a flawless flight, in fact, from the Viking 7 (you should read about Viking 1 - 6!). So, after my first failed attempt, I will repair and fly and then come back and complete this section and flight/recovery section at a later time.
 FLIGHT/RECOVERY (again): So I have
now taken two more cracks at obtaining a successful flight out of the Viking. I
am beginning to really feel like the original Viking team as mentioned above.
Please be advised that the issues have been self induced.
FLIGHT/RECOVERY (again): So I have
now taken two more cracks at obtaining a successful flight out of the Viking. I
am beginning to really feel like the original Viking team as mentioned above.
Please be advised that the issues have been self induced.
Attempt #3 - My very first experience with electronics. I had purchased the RRC² from Missile Works and had built the electronics bay per the instructions. I was very excited and got out to the pad and loaded it up and pushed the launch button. A puff of smoke, then a pause, then VROOM! off the pad on a G80-7. I had picked the G80-7 because my RockSim had this ejection at apogee. I had the RRC² unit set up for a main 'chute deployment at 300 feet and was relying on the G80-7 for the drogue deployment. Well, the flight was picture perfect, straight as an arrow. Beautiful all the way to apogee and the drogue deployed. We watched it fall and fall and fall and bam! Yep, I forgot to arm the electronics.
Attempt #4 - I repaired the crack in the upper section with CA and a piece of newspaper soaked in CA on the inside of the tube. Sanded the nose cone for fit and was ready for flight attempt number three a few weeks later. While out on the field, I prepped the rocket and was trying to remove the old G80 and the bottom section broke in two, obviously stressed from the previous fall.
I repaired that by gluing a coupler in place and was ready one week later.
Attempt #5 - I did everything right this time. Tested, loaded parachute, tested for continuity, prepped motor, armed and placed on pad. Just before launching listened for 3 beeps of continuity check from the RRC². This time I was using a G80 that I had removed all the ejection BP from and set the RRC² up for both primary and secondary deployment.
Again, launch number five was excellent coming off the pad on the G80. I was angled more this time due to some wind. As it arced in continued downward for about a second and the ejection. Well the drogue deployed, but I also recognized the entire upper section descending toward the ground absent of the rest of the rocket. The electronics bulkhead pulled right through the two mounting screws, jerking on the arming wire and damaging the electronics.
The upper section, except nose cone and electronics bay is destroyed. The lower section is good as it descended on the drogue.
So, how does one summarize. Well, first, I have a determination to have a successful Viking flight and hopefully before number 7 . . . two more attempts left. On the other hand, the Viking has proved with its three flights to be a stable and good performing rocket of F's and G's. I think this would be a good candidate for EconoJet's! For FLIGHT/RECOVERY, I would rate this kit 5 points. Yes, even despite my difficulties, I'm confident that with the Kevlar® shock cord, the baffle and the motor retention mechanism along with how stable she flew, that all could enjoy many successful flights with this bird.
I think this would be a good candidate for EconoJet's! I give the kit an OVERALL rating of 5 points.
UPDATE 8/00:
Attempt #6 - I thought it would be appropriate to update everyone on the next (and last) two attempts to fly the Viking 7 with a RRC² deployment. After the last crash, I had to replace the entire upper section. I used the upper section from my THOY Snipe, whose bottom section had long since been thrown out. I loaded this with an EconoJet F23 and prepared everything else per the instructions. While setting up and arming on the pad, my main charge went off and popped the nose cone. I disarmed and re-setup.
Ignition produced a slow, even lift-off and a straight ascent, but the F23 is not really enough motor for this bird. As the thrust ran out the rocket started to slow and back down tail first, then pop the main charge pushed the main parachute out and the rocket descended. The drogue charge never fired. (Well, let me take that back, it did fire while I was disassembling the rocket which was still armed). The RRC² beeped out 528 feet. This was my first successful altitude reading! I figured that I didn't get enough altitude and therefore that is why the drogue charge never went off.
Attempt #7 - The critical attempt! If this one is not successful, then the Viking 7 doesn't live up to its name when compared to the "real" Viking 7. History indicates that the Viking 7 was the first successful launch while Viking's 1 through 6 were not successful.
This time I set everything up with a G80. At launch, the Viking 7 jumped off the pad and headed straight up. The tail got a little wavy at the end of the ascent. The rocket arced over and actually started heading back (fully vertical with nose down) before the drogue charge blew. Immediately, the drogue chute opened and then the main chute opened and then the two sections separated enough to know they were no longer attached. The drogue charge pulled the electronics bulkhead apart (again, see attempt #5) as well as having enough momentum that it popped the nose cone allowing the main chute to deploy.
The upper section enjoyed a very soft descent. At about 300 feet I heard the main charge fire. It landed softly with the RRC² beeping out 870 feet. The lower section fell much quicker on only the drogue. It had some zipper damage and a chunk missing from the top of the body tube. I have retired the rocket.
Learnings - After 7 attempts, I feel I have had some learning which will be applied to my current 2.6" project that will be solely electronic ejection. Here is what I'm going to apply:
- I need to build a stronger electronics bay - with only two screws holding the bottom cover, which takes the shock force of deployment, it seems to be too weak.
- -AND/OR -
- I need to turn the electronics bay around so that the initial ejection that separates two heavy sections is taken by the side of the electronics bay that is epoxied in place, allowing the screwed-on side to only take the stress of letting the nose cone eject.
- -AND/OR -
- I need to use elastic or bungy material to take some of the shock off of the electronics bulkhead. This rocket uses just a Kevlar® line.
- -AND/OR -
- Adjust the design so that the electronic bay isn't used to secure the shock cord at all. Possibly by adding a centering ring to mount the shock cord too.
 |
 |
Flights
|
|