| Manufacturer: | Model Minutes  |
![[Picture]](/images/archive/images/ratings/rating_mm_flying_spider.gif) (04/01/04) The Flying Spider will
be my 4th Model Minutes kit (3 purchased + 1 free download). I purchased it to
do a comparison article
on U.F.O.'s along with the FlisKits' Pheord X150 and an Art Applewhite's
6" Flying Saucer. Model Minutes' rockets are constructed primary with
cardstock and foam board. The Flying Spider is no different.
(04/01/04) The Flying Spider will
be my 4th Model Minutes kit (3 purchased + 1 free download). I purchased it to
do a comparison article
on U.F.O.'s along with the FlisKits' Pheord X150 and an Art Applewhite's
6" Flying Saucer. Model Minutes' rockets are constructed primary with
cardstock and foam board. The Flying Spider is no different.
The Flying Spider has a story according to Model Minutes: "The reflection of the stars from its metallic legs has inspired many legends among the oldest space sailors. According to the legend, the Spider weaves its web nebulas too dense to allow detection and it eats unlucky ships which get caught. Space monster or mechanical creature? Legend or reality? Until we know for sure, steer clear of small nebulas!"
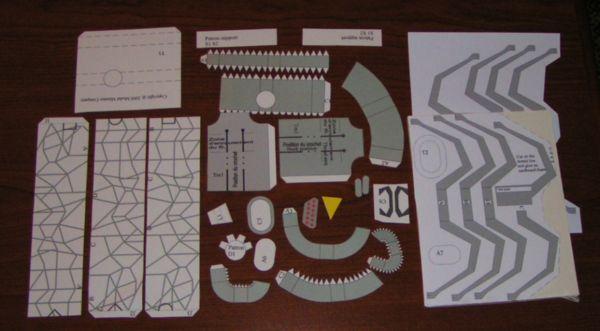
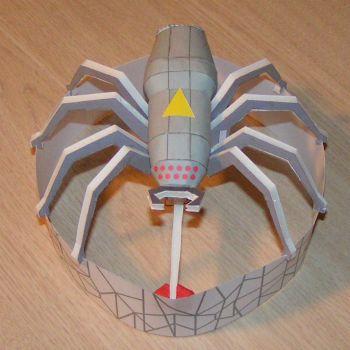 The kit includes multiple pages of cardstock templates
for the body, legs, and outer web. It includes the cardstock and components for
a motor mount with a retainer. There is foam board for the legs, pinchers, and
supports. Also there is a 9" plastic parachute, shock cord, and clay
weight.
The kit includes multiple pages of cardstock templates
for the body, legs, and outer web. It includes the cardstock and components for
a motor mount with a retainer. There is foam board for the legs, pinchers, and
supports. Also there is a 9" plastic parachute, shock cord, and clay
weight.
Oh yes, I almost forgot. There is a set of 3D glasses that you assemble to read the instructions. Something unique to Model Minutes kits are the 3D pictures in the instructions.
CONSTRUCTION:
The instructions are printed on 7 pages of 8½ x 11" paper. The primary feature of the instructions are color 3D pictures. The instructions include a general guide for folding and forming paper parts. There is also a diagram showing all of the parts from a top, side and front views. This is an important addition to the instructions.
The instructions do include many 3D pictures, however, following them is a bit difficult. It is clear that the instructions were translated from French to English. This was not much of a problem with these instructions.
I used Elmer's White Glue for assembly.
Plan on spending over 2 hours cutting out parts! This is the most intense part of the building activity. There are many, many parts and many of them have "triangle teeth" with are used for folding over and attaching. If you're not committed to finishing this rocket... don't start!
The front-side of the legs are glued to a piece of form board. At a later point, once dry, these are cut out using a hobby knife. Then the back-side of the legs are cut out individually and glued onto the other side of the foam board. This is also the case for the Spider Pinchers.
The body of the Spider is assembled first. Easier said than done. This body consists of no less than a dozen pieces. Cut, fold, glue. Cut, fold, glue. Cut, fold, glue.... The most troubling spot I had in following the instructions was the insertion of the the inner body (T1). The picture provided at the step shows it partially installed, which threw me. But as I compared other pictures, including the extra diagram page, it understood it.
The motor tube is consistent with other Model Minutes motor tubes. It is a card stock piece that is rolled and glued. A two prong wire is inserted and black thread is wrapped around the motor tube to hold the wire. It is then soaked in glue. I absolutely love this set up and have bought 10 of the wires from Model Minutes to use on standard kits.
The instructions were clear, but somehow I missed installing the motor tube top (D1). I believe it is designed to add protection from the ejection charges, so I will be sure to place a piece of wadding directly on top of the motor.
The motor tube is placed into Spider body perpendicular to it. Then six legs (three pieces) are attached to the bottom of the body. These glue onto markings on the body and are then folded to align with the outer web (ring). The outer web is made up from 3 pieces of cardstock that are glued together to form a ring.
The last two legs are glued in place, right to the motor tube. The launch lug (a small section of a drinking straw) is glued to one of these last legs.
Next, two foam board supports are attached to the front and rear of the motor tube and to the front and read of the web (ring).
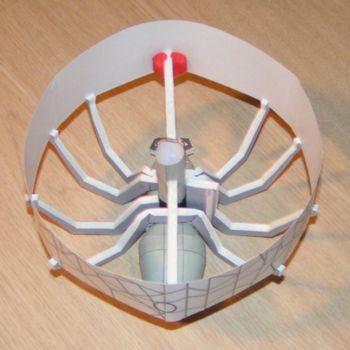
The last section that is built includes the recovery system and nose cone, as it is. The parachute is assembled by attaching the shroud lines to the parachute with some highly adhesive silver tape. The nose cone includes paper shrouds glued to a piece of foam board. An eye-screw is put into the foam board. The parachute shroud lines are then threaded through the eye-screw. This assembly is attached to the rubber-band shock cord and then attached via a 3-fold method to the inside of the body.
The instructions final steps include balancing and swing testing this rocket. To balance the rocket, some amount of the provided clay is attached to the front of the rocket at the support to web (ring) joint. There are then good instructions on how to swing test the rocket.
No other finishing is required.
Overall, for CONSTRUCTION I would rate this kit 3 ½ points. This is a tough rocket to build and the instructions could be enhanced to make the experience clearer. It is not a beginners kit and may require some experience with building "paper" rockets. The materials fit was excellent, in fact, extremely impressive considering the number of pieces. Love the motor mount and retaining hook.
FLIGHT/RECOVERY:
Model Minutes recommends the C6-3 or C5-3 motors. Yes, that is right, a U.F.O.-type rocket that uses delays. That is because, as you have already noticed, it has a parachute for a recovery system.
Model Minutes indicates the Flying Spider should weigh 35 grams (1.2 ounces) and that is exactly what mine weighed.
I prepped the rocket for its first flight with a C6-3 motor and some wadding. When I was folding the parachute and pulled on the shock cord, it came out of the 3-fold attachment! I re-attached with another 3-fold mount.
The next opportunity to fly it came shortly afterward. I got it all ready and the parachute packed. As I was putting it onto the launch pad, the launch lug fell off! Does the "flying" Spider really want to fly? I re-attached the lug using CA.
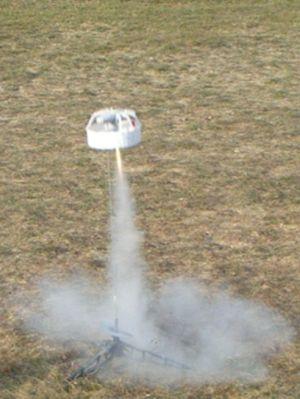 The third opportunity, simply required me to insert an
ignitor and place it on the pad. I did just so. After a countdown the Flying
Spider flew. It was excellent. Straight up and quite high for being such a
large U.F.O. rocket. At apogee, the parachute popped out. The rocket inverted
and the parachute kind of dangled out one side. I suppose helping to slow it
down.
The third opportunity, simply required me to insert an
ignitor and place it on the pad. I did just so. After a countdown the Flying
Spider flew. It was excellent. Straight up and quite high for being such a
large U.F.O. rocket. At apogee, the parachute popped out. The rocket inverted
and the parachute kind of dangled out one side. I suppose helping to slow it
down.
To prepare for the second flight, I pulled back the motor hook (I am very found of Model Minutes motor hooks), removed the old motor, inserted another C6-3, packed in 3 pieces of wadding, folding the parachute and inserted.
The second flight was another success. Straight up and again, I'm surprised at the altitude when comparing it to my AAW Smiley, FlisKits Pheord, Estes Snitch, and Quest U.F.O.. Some of these are 30% lighter than the Flying Spider.
Well, at apogee on this second flight, the ejection charge fired and the 'chute was pushed out, but did not open due to being slightly melted together. The rocket inverted and fell. Upon inspection a main support came off of the motor mount. Easily fixable.
For FLIGHT/RECOVERY, I would rate this rocket 4 ½ points. The complexity of the recovery system makes this one of the most challenging U.F.O.-style rockets to fly. I'm wondering if it is really needed at all? But it is paper. The altitude gained by this rocket is impressive for its size. Not a lot of room in there for packing the parachute but it can be done.
I give the rocket an OVERALL rating of 4 points. If you want something different and you want a challenge to build, then the Flying Spider is the answer in the U.F.O.-type model rockets. I'll give it a thumbs up, as long as you know what your in for. If you're happy building and flying Art Applewhite's Saucers and find them challenging to build, then you will want to avoid the Flying Spider. Me, I'm glad I accepted the challenge.
 |
 |