Model Minutes M.O.M. (Multi Operations Missile)
Model Minutes - M.O.M. (Multi Operations Missile)
Contributed by Nick Esselman
| Construction Rating: | starstarstarstar_borderstar_border |
| Flight Rating: | starstarstarstarstar_border |
| Overall Rating: | starstarstarstar_borderstar_border |
| Manufacturer: | Model Minutes  |
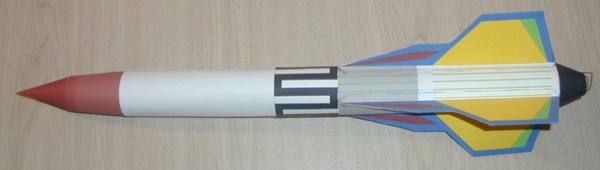
The Multi Operations Missile (M.O.M.) kit is my second kit from Model Minutes and includes two rockets (note: the Minute in Model Minutes is not pronounced "min'it" like the time unit, but rather "mie nuet" like something small). Both rockets are the same with the exception of the color pattern. One is colorful with red, blue, yellow and white, while the other is a camouflage finish in various greens.
Model Minutes is good about including a story on their kits and here it is for the M.O.M.: "The performance of this model will surprise you. In spite of its advanced aerodynamic design it is easy to assemble. Each kit includes two rockets: one civilian rocket and one military rocket. Double your fun and the altitude you can reach with this very stylish rocket. Used jointly by the scientific and military communities this long range missile allows both the study of destruction of comets and meterorites in order to protect the earth. Operations which are sometimes carried out almost simultaneously." [instantaneously?]
The M.O.M. kit came packaged orderly in an 9x11 plastic zip-lock bag. It included the two rockets printed on three (3) 8½ x 11" card-stock pages each. Also included was the extra parts need to assemble and support the card-stock rocket. These parts include ¼" foamboard that is used for the nose cone shoulder, baffle, and centering rings. A piece of household drinking straw is provided for the launch lug. There is a wire motor retainer and a piece of thread that is used with the motor retainer. In addition, a silver Mylar parachute, shroud lines and a rubber band shockcord are provided for the recovery system. Clay for the nose weight is also included. All parts were doubled to allow the building of the two rockets.
Lastly, there is a set of 3D glasses that you assemble to read the instructions. Something unique to Model Minutes kits.
CONSTRUCTION:
The instructions are printed on 9 pages of 8½ x 11" paper. The primary feature of the instructions are color 3D pictures. They can be viewed without 3D glasses well enough, however, with the included 3D glasses (assembly required) you can add depth to your building experience. The instructions are clear, especially with the support of 54 color pictures! One of the main detractors from the instructions of my other Model Minutes kit, the Space Racer, was the translation from French to English. This was not much of a problem with these instructions. I don't even remember a confusing spot. The instructions include a page on how to balance (check stability), how to build a launch pad, launch controller, and then the launch sequence. You will need your standard rocket building tools, including a sharp hobby knife. I used Elmer's White Glue for assembly.
After assembling the 3D glasses you're ready to go.
Assembly is relatively simple. The fins are first and once cut out are simply folded in half and glued to create the finished fin. I followed the instructions and placed them in a book (protected with wax paper) after gluing. I still did not get straight and stiff fins. Much like my experience on Model Minutes Tricarrow my fins where a bit wavy.
The body tube requires two sections to make up the length. The first section is supported by a stiffener-baffle that is cut from the 1/4" foam board. Then a paper coupler is attached. The upper tube is slid into the paper coupler. This gives you 12 inches of body tube.
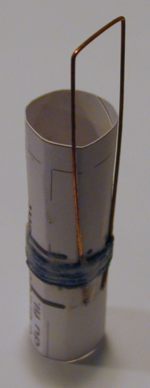 The motor mount is then assembled from card-stock, thread and the wire thrust/ejection retainer. I really like this wire design. The wire inserts into two holes and extends into the tube to act as a motor thrust stop. It then over hangs to act as motor retention. The wire is "strapped" to the motor tube by wrapping a black thread around and around and around it. Once wrapped it is soaked with glue. It made for a good strong motor tube. After this two 1/4" foam centering rings are added.
The motor mount is installed and then a boat tail is added to the rocket. The boat tail comes down to the end of the motor tube and requires two slits to be cut in it to allow the retention wire to bend out for inserting and removing motors.
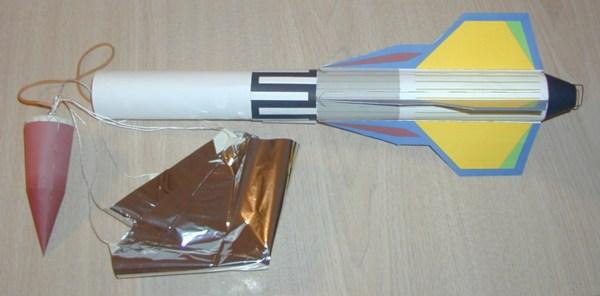
The nose cone is assembled from two different cones to give it a unique shape. Clay is added for nose weight. A piece of 1/4" foam is used as the shoulder. I would have liked to see two or three pieces stacked since just the one made the shoulder so small. An eye-screw is then screwed into the foam to attach the rubber band shockcord and parachute. The other end of the shockcord is attached to the inside of the body tube using the 3-fold paper method.
Next, the parachute is assembled using masking tape to make the corner tabs and the nylon thread provided for the shroud lines. This is then tied to the eye-screw on the nose cone.
To finish the rocket, the fins are attached and a launch lug is added.
Overall, for CONSTRUCTION I would rate this kit 3 points. After building three "free" paper models and the Model Minutes' Space Racer I've come to expect certain things in paper-building. As far as the kit goes, very nice. The instructions are solid especially with all the pictures. The issues are the double-over fins and the short rubber-band shock cord. I also didn't like the 1/4" short nose cone shoulder. The motor tube and retainer are great.
 FLIGHT/RECOVERY:
Model Minutes recommends the C6-3 or the C5-3 motor for the M.O.M. rockets. I didn't choose one of these. Instead I used a B6-4 for its first flight.
Even though there is a baffle the instructions recommend using wadding. So I inserted several sheets of Estes wadding. Then loaded the motor. With the Model Minutes motor retention wire, loading and unloading is a breeze. I really like this method.
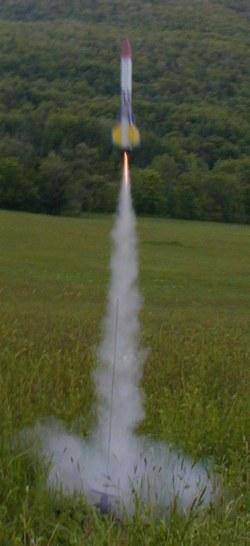
Had a successful launch on the B6-4. The flight was stable. There was some movement which I believe is induced by the fins not being perfectly flat (straight). I was able to follow the rocket all the way to apogee and the 4 second delay was good. If you are going to use a C6, I would use a C6-5 verses the C6-3 recommendation.
Ejection produced the silver mylar parachute and the descent rate was good. Unfortunately the wind carried the rocket over some trees and I was unable to see where is landed (or not) and the rocket was lost. So, I only got the 1 flight.
All would not be lost though, because the kit comes with two rockets. I'm not actually going to build the second one and am sharing it with a fellow rocketeer to get another opinion on this kit.
For FLIGHT/RECOVERY, I would rate this rocket 4 points. The single flight was stable and on the B6 gave a nice small field (football field size) flight. The recommended motors would seem to have too short of a delay. The parachute is sized right for descent, but I have no way of knowing how well that short rubber band shock cord will hold up.
I give the rocket an OVERALL rating of 3 ½ points. It isn't a "free" rocket, but gives the builder a "paper building" experience. The kit is about $10 USD and gives you enough supplies to build up two rockets. I think that is a fair price considering you get the nose weight, parachute, wire retainer, etc. The design is nice looking with the unique two-piece nose cone and the boat tail. It is big for a paper rocket too. Standing 19" tall and having a 1.5" diameter.
For the "experience", which is why I chose this rocket, you should give it some consideration. Model Minutes have some other interesting rockets and they can all be purchased on a CD so that you can print your own templates. I didn't want to sink the additional money to do that, but perhaps for a school teacher...
Other Reviews
- Model Minutes M.O.M. (Multi Operations Missile) By Kathy Kippen (March 15, 2009)
( Contributed - by Kathy Miller - 03/15/09) Brief: This is a skill level 1 kit with pre-printed full-color body parts printed on sturdy paper. Each kit comes with instruction sheets done up in a three dimensional effect with 3-D glasses for viewing the color photos. I made the 'glasses' but could not use them so I just followed the photos best I could. Construction: The ...
 |
 |