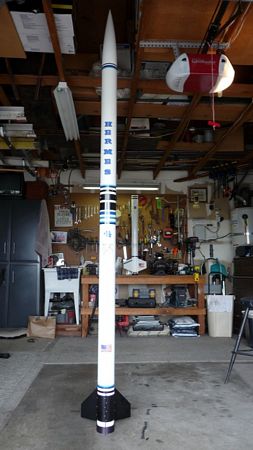
Hawk Mountain Enterprises Bad Attitude Long
Hawk Mountain Enterprises - Bad Attitude Long
Contributed by Frank Hermes
| Manufacturer: | Hawk Mountain Enterprises  |
Brief:
This review describes the substitution of a 54" x 4" booster section for the standard 42" x 4"
booster.
Modifications:
The booster section did not require much work other than finish/paint and bolting on the fin can.
Since the tube is rather long, I decided to take it to an auto-body paint shop for painting. The tube itself was in great shape with only a few pin-holes that required filling--I used some of the Bondo surface filling I mentioned in the Hermes 3 article.
After a wet sanding with 320 grit, I applied an initial primer coat with Rustoleum Plastic Primer and then filled in the few remaining pin holes. A little touch-up with primer and another sanding, and the tube was ready for the paint shop. They applied two coats of "Chevrolet" white and a coat of acrylic gloss clear to protect the water-based paint.
I brought the tube back home and applied some decals and pinstripes in a theme similar to that of Hermes 3 since the payload from that rocket is coupled with the new booster. Back to the paint shop for a final clear coat. I should have had two coats applied since some of the pinstripes peeled away during the initial flight.
Once painted, I cemented a Giant Leap Slimline 98mm motor retainer with JB Weld to the rear of the tube, as I had masked off the rear 3/4" of the tube prior to the painting process. The retainer comes with a flange that is normally supposed to sit in front of the rear MMT centering ring, but since this is a minimum-diameter application, I had the flange parted off in a machine shop to provide a more aerodynamic profile. I could have sanded it off on the bench sander, but I wanted a very clean result and was not sure I could achieve that on the sander.
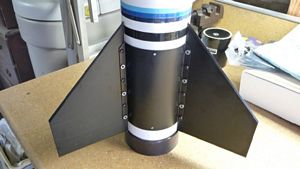 I then assembled the fin can around the rear of the tube, just forward of the
motor retainer. It is a relatively straightforward process and the included instructions from HME are clear.
I then assembled the fin can around the rear of the tube, just forward of the
motor retainer. It is a relatively straightforward process and the included instructions from HME are clear.
I added a couple of rail buttons to the body tube with Loctite E120-HP super-strength epoxy and a couple of sheet metal screws that I ground down to make sure they did not protrude into the motor cavity. That only allowed about a half-turn of the screw into the airframe tube, but with the addition of a bit of the epoxy, it should help a little with the shear strength of the button mounting. I also sanded the bottom of the buttons against a sandpapered 4" airframe section in order to provide a conforming fit. I used aluminum buttons, however, I learned later that these are really a no-no since they can gall on the rail. But in this case with the E120-HP, I think I'm stuck apologizing.
A 1/4" vent hole for the recovery cavity and a couple 1/8" holes for the shear pins and the booster was set to fly! Since this is a minimum-diameter application, a screw eye screwed into the motor's threaded forward-closure will provide the recovery anchor. A Giant Leap Fireball provides zipper control in the event of an early/late drogue deployment.
Construction:
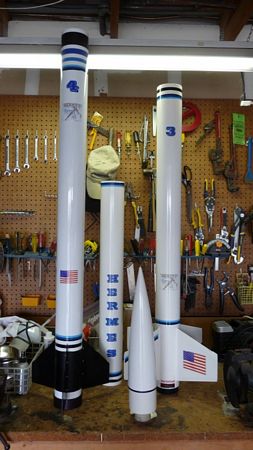
The Bad Attitude from Hawk Mountain Enterprises (HME) is a standard kit. I built the initial configuration as Hermes
3 (reviewed elsewhere on EMRR) with a couple of options (75mm MMT and the thicker 3/16" G10 fins). When I placed
my initial order, I also ordered a second booster section that is 54" long and a HME aluminum fin can with the
intent to build a minimum-diameter variant as Hermes 4 (H4).
Flight:
The initial flight used an AT M750W slow-burn motor. The loaded weight of Hermes 4 with that motor is around 35
pounds, so the M750 provides a ~6:1 thrust-to-weight ratio which got it off the rail unless just fine. If the wind is
up, then a better motor choice might be an AT M1939W which increases the T-W ratio something over 11:1.
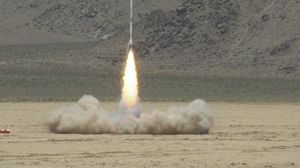
I flew Hermes 4 on July 11, 2009. The plan was to do a test flight on a small K805 via nested Aero Pack adapters, but I found that my Aero Pack 98-75mm motor adapter would not fit into the rear of the Slimline motor mount... So after checking with a couple of people and having them look over the construction on the new booster, I decided to go ahead and roll the dice and fly first flight with the big motor.
I built the AeroTech M750W moonburner and hauled the rocket out to the pad. Launch was very straight and it roared and coasted to an altitude of ~21K' (average of the three recording altimeter readings).
Recovery:
The BeeLine GPS worked perfectly and I recovered the rocket downwind about 1.8 miles away. The rocket was in perfect
shape except for some of the pinstriping that apparently didn't like the sustained time above mach and one pyro battery
that dislodged on landing (it hit a little harder than H3 had--I'd used a Sky Angle 60" Classic instead of the 10'
Rocketman chute I used on the heavier H3).

Summary:
I am very pleased with the overall performance and quality of the Hawk Mountain components and very happy to have
gotten over 20K'!
 |
 |