
(by Carl Tulanko)
 Brief:
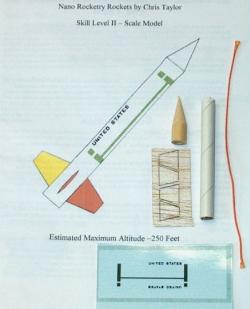
Nano Rocketry is one of only a few exclusive manufacturers that produce the 6mm
micro series of rockets. The Nano Nike Smoke is an actual true miniature
representation of the full scale rocket, which has been modeled by many
companies and tends to be one of the more popular scale rockets found at the
field.
 Construction:
The kit came in a colorful envelope which described the contents and displayed
a picture of the final product. YES, I did say KIT! Nano must be the only
company out there, at least that I have found, that actually manufactures and
sells a kit instead of an ARF. I couldn't wait to see the inside goodies!
The envelope contained a 6mm x 3 inch long body tube, a unfinished wood nosecone, Kevlar® thread for shock cord, pre-cut balsa fins, detailed instructions and a decal! I was very impressed with the quality of components, especially the very thin, but accurately cut fins; Nano did a great job in this department. Component Rating: 5 of 5
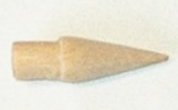 Construction begins with the
shaping of the nosecone. The Nike cone is oversized so you have to do some
sanding to give it the proper look. I used a small file at the base of the
nosecone to narrow the diameter so it would fit inside the body tube. Once this
was completed, the shoulder of the nosecone was tapered from about 1/8" up
to the base for a scale appearance. Finally, a piece of Kevlar®
thread was glued using medium CyA into a pre-drilled hole at the base of the
nosecone for a shock cord.
Construction begins with the
shaping of the nosecone. The Nike cone is oversized so you have to do some
sanding to give it the proper look. I used a small file at the base of the
nosecone to narrow the diameter so it would fit inside the body tube. Once this
was completed, the shoulder of the nosecone was tapered from about 1/8" up
to the base for a scale appearance. Finally, a piece of Kevlar®
thread was glued using medium CyA into a pre-drilled hole at the base of the
nosecone for a shock cord.
 Body tube construction was next and the
fins were removed from their balsa sheet in preparation for assembly. There is
actually a template printed on the manual for marking the location on the body
tube for each fin, a very nice touch. These fins are of excellent quality for
their size; I was impressed with both the shape and density of the wood.
Lightly sand the body tube base for a good glue joint, then apply a bead of CyA
to the root edge of each fin and check orientation before gluing to the body
tube as the leading edge actually has a different taper on it. Hold the fin to
the body tube until the glue sets. A small bead of CyA should be added to each
side of the fins for a fillet.
Body tube construction was next and the
fins were removed from their balsa sheet in preparation for assembly. There is
actually a template printed on the manual for marking the location on the body
tube for each fin, a very nice touch. These fins are of excellent quality for
their size; I was impressed with both the shape and density of the wood.
Lightly sand the body tube base for a good glue joint, then apply a bead of CyA
to the root edge of each fin and check orientation before gluing to the body
tube as the leading edge actually has a different taper on it. Hold the fin to
the body tube until the glue sets. A small bead of CyA should be added to each
side of the fins for a fillet.
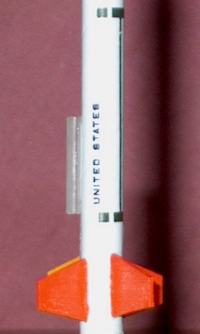
Once the fins are attached, you spray some CyA accelerator into the body tube, then apply a bead of CyA to the free end of the shock cord and place it about ½" deep inside the top of the body tube. Finally, the launch lug is mounted to the side of the body tube, but my kit did not have a lug. I fabricated my own from some spare plastic tubing I had from an Aileron horn kit I had for my R/C planes. It is a bit thicker and a perfect diameter for the launch rod. The lug was cut to a length of ½" and sanded well for good contact; then was mounted around the mid-point of the body tube. Construction: 4 of 5
 Finishing:
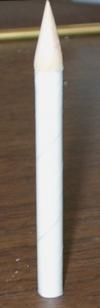
I used Krylon white primer on the entire model for a basecoat, then the
nosecone was painted with White glossy Testors bottle paint and a brush. This
gave it a thicker coat then a spray and filled in the wood grain. The body tube
was painted with White Testors spray and three fins were done with a brush and
Testors Orange, while one fin was done in yellow to imitate the scale colors.
It really turned out nice for such a small model and I was very pleased with
the finished product. As a final step, a water-slide decal was wrapped
completely around the body tube for scale appearance. Very impressive indeed!
Finish: 5 of 5
Construction Rating: 4 out of 5
Flight:
Anyone familiar with the Micro rockets knows there is only one motor available
from Quest; the MicroMaxx motors produce more than enough thrust to get even a
heavy bird airborne. The motor was fitted into the base of the body tube and
fit just right. The body tube is of a diameter that allows a perfect friction
fit. This model, as with all Nano kits uses nosecone separation and freefall
for recovery. When hooking up the igniter, you do not use the plug-in socket at
the base of the Quest MicroMaxx launch pad, but rather pull one half of the
igniter plastic plate off, then insert it into the base of the motor. Alligator
clips are used and connect to the wire tabs at the bottom of the Quest Igniter.
I was expecting some real performance at launch time as this kit was at least 3 times lighter than the Quest MicroMaxx ARF models. The launch was not disappointing; when the button was pushed, it literally disappeared like a bullet!!! Extremely fast launch and reached an estimated altitude of 250'; very awesome for such a small rocket.
Recovery:
A well defined "pop" was both seen and heard at apogee, indicating
nosecone separation. The model free fell to the ground and landed safely,
partially due to the non-existent weight of the model. Upon examination, the
motor was still secure inside the body tube and the rocket faired without a
scratch. A small rod was used through the top of the body tube to push out the
used motor and the rocket was prepared again. Five additional launches
followed, each with the same results & FANTASTIC! Flight/Recovery: 5 of 5
Flight Rating: 5 out of 5
Summary:
The Nano Nike Smoke is a very slick kit and a "must have" for micro
rocketeers. The difference is like night and day between these models and the
Quest models. The fact that these are kits should not deter you from trying
them; assembly is very straight forward and a rocket can be ready for paint in
under a half hour. Plus you get the added bonus of more selections, especially
in scale, for this model category. The only problem encountered was the lack of
a launch lug, but this was easily remedied. Performance is nothing less than
astounding and if you want to triple the fun you have with Micro rockets, all I
can say is get a Nano Nike Smoke! Overall Rating: 5 of 5
Overall Rating: 4 out of 5
 |
 |