
(by Carl Tulanko)
 Brief:
Nano Rocketry is a manufacturer that produce 6mm micro series rockets. The Nano
Star Booster is one of their "Fantasy" series of rockets and is
quoted as being one of their highest performance models.
Construction:
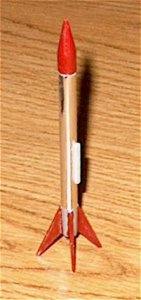
The kit came in a envelope which described the contents and displayed a picture
of the final product. Nano rocketry is the only company that I know of to date
that actually sells kits for this family of rockets. As this was the second kit
in a series that my daughter won in a recent EMRR photo contest, we could not
wait to get started building. Thanks go out to Nano Rocketry and Nick of EMRR
for providing the prize models.
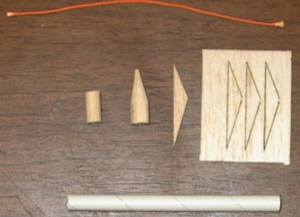 The envelope contained a 6mm x 4.5 inch
long body tube, a unfinished wood nosecone, Kevlar®
thread for shock cord, pre-cut balsa fins and a good set of detailed
instructions. I was very impressed with the quality of components, especially
the very thin, but accurately cut fins; some of the larger manufacturers could
take lessons from them in this department. Component Rating: 5 of 5
The envelope contained a 6mm x 4.5 inch
long body tube, a unfinished wood nosecone, Kevlar®
thread for shock cord, pre-cut balsa fins and a good set of detailed
instructions. I was very impressed with the quality of components, especially
the very thin, but accurately cut fins; some of the larger manufacturers could
take lessons from them in this department. Component Rating: 5 of 5
Construction begins with the nosecone. Not that CyA medium glue was used
throughout the construction and the directions were complete and easy to
follow. The nosecone was already fit to the body tube and just required some
light sanding to prep.
 A piece of Kevlar®
thread was glued into a pre-drilled hole at the base of the nosecone for a
shock cord.
A piece of Kevlar®
thread was glued into a pre-drilled hole at the base of the nosecone for a
shock cord.
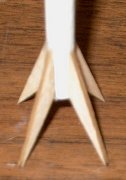
Body tube construction was next and the fins were removed from their balsa sheet in preparation for assembly. There is a template printed on the manual for marking the location on the body tube for each fin, which is a nice feature of the kit. The template works well and fin locations can be easily marked. Fins for this model are thicker than the ones supplied in the Nike kit and are of a unique shape. The wood fins are of excellent quality for their size. Lightly sand the body tube base for a good glue joint, then apply a bead of CyA to the root edge of each fin and glue each fin on with the bottom of the root even with the bottom of the body tube. Hold each fin to the body tube until the glue sets. A small bead of CyA should be added to each side of the fins for a fillet.
 Once the fins are attached, you spray some
CyA accelerator into the top of the body tube, then apply a bead of CyA to the
free end of the shock cord and place it about ½" deep inside the top
of the body tube. Finally, the launch lug is mounted to the side of the body
tube, however, this was the second kit I had that did not come with a launch
lug. I wound up fabricating my own from some spare plastic tubing I had from an
Aileron horn kit I had for my R/C planes. The lug was cut to a length of
½" and sanded well on one side for a good glue joint, then it was
mounted around the mid-point of the body tube. Construction: 4 of 5
Once the fins are attached, you spray some
CyA accelerator into the top of the body tube, then apply a bead of CyA to the
free end of the shock cord and place it about ½" deep inside the top
of the body tube. Finally, the launch lug is mounted to the side of the body
tube, however, this was the second kit I had that did not come with a launch
lug. I wound up fabricating my own from some spare plastic tubing I had from an
Aileron horn kit I had for my R/C planes. The lug was cut to a length of
½" and sanded well on one side for a good glue joint, then it was
mounted around the mid-point of the body tube. Construction: 4 of 5
 Finishing:
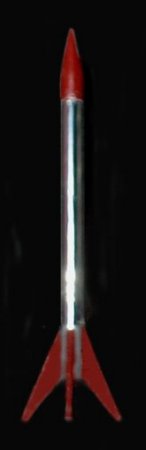
The kids wanted this one in the same colors as our PML Matrix; chrome with red
fins. I decided to take the easy way out by using some Chrome Monokote self
stick sheet and wrapped the entire body tube with chrome. It added almost no
weight and left a perfect finish. The nosecone was primed with Krylon white
primer, then painted with a brush in dark red Testors bottle paint. Finally,
the fins were brush painted and the model was left to dry. Note that the chrome
wrap was applied PRIOR to gluing on the launch lug; a small area was removed
from the chrome in order to provide some area for good glue purchase. Finish: 5
of 5
Construction Rating: 4 out of 5
Flight:
Anyone familiar with the Micro rockets knows there is only one motor available
from Quest; the MicroMaxx motors come in packs of eight and I really need to
invest in Quest stock, as I usually purchase these motors in 100 quantities or
larger. To date we have had over 500 launches with MicroMaxx rockets and have
long since given up trying to document every flight. The are just plain fun and
make great backyard launchers.
The motor was fitted into the base of the body tube and fit just right. The body tube is of a diameter that allows a perfect friction fit. This model, as with all Nano kits uses nosecone separation and free-fall for recovery. When hooking up the igniter, you do not use the plug-in socket at the base of the Quest MicroMaxx launch pad. The igniter sits on top of the pad surface and the rocket is placed on the launch rod, then slid down and plugged into the igniter. In order to do this, you need to separate the igniter halves, discard the plastic only half and position the "flat" side so it faces the launch rod. I was expecting great performance at launch time since I had seen the Nano Nike Smoke "cook" off the pad! The launch was unbelievable; when the button was pushed, it literally disappeared into the sky!!! It was an extremely fast launch and reached an undetermined altitude like it was warped there!
Recovery:
A definite "pop" was heard at apogee, indicating nosecone separation.
Unfortunately, this was the last pop we heard from the Star Booster. I would
have thought the chrome body tube and dark red colors would have made this an
easy to spot model on decent, however, the rocket was never found. I can only
suspect the either it was claimed by the tree gods or that it is still going
and half way to Mars by now!
Flight Rating: 5 out of 5
Summary:
I really miss the Star Booster as it has to be the best performing rocket in
the Nano arsenal. Another one will soon be on order to replace the loss; that's
how much we liked this kit. As far as price and quality goes, I am extremely
impressed with what you get for your money. My only concern was this was the
second received without a launch lug, but it is a minor setback considering
what you get. A great kit, easy construction and unbelievable performance are
what you can expect with the Star Booster and, from my experiences so far,
EVERY kit you get from Nano Rocketry! Well done!!! Overall Rating: 5 of 5
Overall Rating: 5 out of 5
 |
 |