Norad ProMaxx - Anti-Zip modification w/ altimeter sled
By Glenn Pickett
2013-04-27
| Manufacturer: | 3D Rocketry  | |
| Diameter: | 2.2600 inches | |
| Style: | Sport |
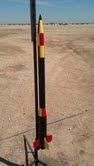 Norad ProMaxx before modification
This kit was my first HPR build. I followed the LOC/Precision instructions to the T although with trepidation regarding the recovery set-up. Without any experience beyond the old "Estes glue the shock cord to the inside of the airframe" I went ahead and "glued the shock cord to the inside of the airframe". I finished it in February '13 and after two flights including a successful Cert 1 launch I decided to modify the configuation. I decided to do an anti-zipper design after reading an article in the NAR Member Guidebook. In addition, I wanted to know how high the thing was actually flying, and not just assume the Open Rocket simulations were correct, so I ordered a PerfectFlite Stratologger altimeter. Since I plan on building a dual-deploy rocket in the near future, I decided to set it up for altimeter controlled apogee deployment so I could gain experience with black powder ejection charges.
Parts List:
LOC/Precision - 2.1"ID airframe-34", 2-2.1" bulkheads, 5.75" coupler for 2.1" airframe, 2 quicklinks, 1 swivel.
Dog House Rocketry - 1.5oz. Charge cup, 2 position terminal strip, rotary switch, wiring pigtail.
PerfectFlite - Stratologger altimeter, USB data transfer kit.
I started with the altimeter sled first. Using 1/8" aircraft grade plywood, I cut a 2.1"w X 8"l piece with my table saw. I had to slightly notch the bottom 2.5" or so, so that it would slide in past the coupler at the bottom of the payload section. This notch will lock the sled in place with the nose cone installed as it will be sandwiched between the nose cone and the coupler.
 Altimeter Sled Components
 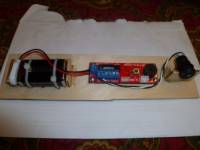 Completed Altimeter Sled

 |
 |