| Construction Rating: | starstarstarstar_borderstar_border |
| Flight Rating: | starstarstarstarstar |
| Overall Rating: | starstarstarstarstar_border |
| Manufacturer: | North Coast Rocketry  |
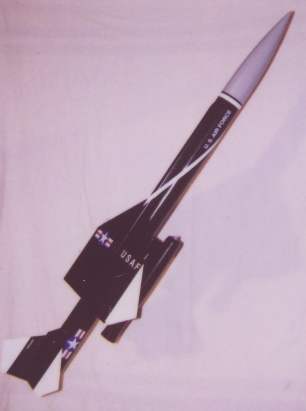 I bought this rocket this past summer as a birthday gift to myself. I finally got around to building it last month. I knew what I was in for when I got it. I had read all the reviews and comments posted on the newsgroup as well as here on Essence. The first thing I did away with was the vacuum formed skins. I prefer not to work with this if at all possible. The nacelles would be hard enough but skinning the wings with this stuff was not an option for me. I bought a piece of 1/64 veneer ply 12"x 24" and this was enough to cover all the flying surfaces. The balsa framework structure is the same as per the plan sheet and the 1/64 ply is the same thickness as the plastic. After assembly the leading edges were then shaped for better aerodynamics.
The next change was how the nacelles were mounted. I heard of the stories of ejection blowing them out and how flimsy the mounting was on landing. To fix this I moved the forward bulkhead to a point just ahead of where the nacelle supports come through the body tube. I used a LOC motor tube coupled to the supplied NCR motor tube to extend to where the forward bulkhead would now be. The nacelle pylons would now go through the body tube and mount directly to the NCR supplied motor tube. This is a very strong mount and makes sure no ejection blowby occurs.
Another weak spot was the joint between the rudder and the horizontal stab. This joint is only a butt joint and not very strong since there is minimal surface area to join. Even with an epoxy fillet. To remedy this I used several short pieces of bamboo skewers inserted into the base of the rudder then thru the stab and body tube all the way to (but not thru) the motor tube. This is now a very nice, strong joint.
I did replace the shock cord mount with regular 1/16 aircraft cable since the one supplied by NCR seemed too small for my liking. I needed to add about 8oz of weight to the nose. For this I used copper BB's and some 30 minute epoxy. This mass is held in place by bamboo skewers cross drilled thru the nose cone tip with the BB's added then the epoxy poured in. This method is preferable to me rather than using the clay supplied with the kit. The model is balanced to handle up to a H180 motor. The supplied NCR motor retainer was discarded in favor of APIs machined motor retainer (see my Saturn 1b article). The NCR retainer will not work with reloadable motors, which is what I intend to use for this model.
The model is now a true high power bird. After sanding, sealing and prepping I finished the Bomarc as per the diagrams shown in the instructions. The finished weight, without motor, was 44oz. I modeled the flights using win-roc and found the G75-6 and H128-6 were the best suited motors. (the model also flies on AT G64-4 reloads) First flight was on an AT G75-6. The model boosted straight with a slight roll. At apogee it arced over and flew flat for a second or so then the ejection went off and deployed the chutes. The main body came down on a single 36" chute while the nose recovered separately on a 24" chute. I opted not to use the supplied chutes from NCR since my recovery method was going to be two separate pieces. I also used Pratt's 1/8 tubular Kevlar instead of the NCR supplied elastic. (elastic is a no-no for me now)
In the final analysis, while this is a nice kit and a great size to build, per the instructions and with materials supplied it yields a rocket not quite up to high or mid power standards. To be fair most high power fliers have certain methods and techniques that work for them and kit suppliers cannot meet all those needs. But in my opinion, at the price charged for this kit, (retail $89) there could have been better ways to achieve a fine model without so much extra work. If you can find this kit for a good deal ($40 or less) then I would say buy it and incorporate the mods I made. You will have a nice flying and great looking scale model. I can say it was a real crowd pleaser at our last launch.
As for ratings.......
Construction 3 . . . mostly due to vaccu-form parts and need for mods to improve survivabilty
Flight/Recovery 5 . . . excellent flight (keep in mind to add necessary nose weight for stabilty)
Overall 4 . . . I like the looks and impressive size of this model. However, the user mods required does not make it suitable for everyone.
 |
 |