| Manufacturer: | Nova Hobbies |
![[Picture]](/images/archive/images/ratings/40_50_45.gif)
- by Mike Goss
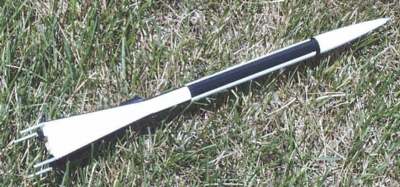
The Nova Hobbies ASP is a 1/12 scale model of the Atmospheric Sounding Projectile (ASP) that was used to carry instruments through the mushroom clouds of nuclear test explosions. The completed kit produces a rocket that is 12.25" long and .544" in diameter.
Construction Rating: 4 out of 5
The kit comes in the standard clear plastic bag. All of the parts for the kit were included and all were in excellent shape. The kit includes die cut balsa fins, balsa nose cone, a small hardwood dowel, washers for nose weight, paper body tube, a sheet of heavy paper details, a Kevlar® Shock cord and two sheets of instructions. The assembly instructions are printed on the back of a sheet of 8.5 x 14 paper that has the painting guide, parts list, and package display information.
The second sheet of instructions includes, painting tips, Flying instructions and the NAR safety code. They are in a logical order, but I like to re-arrange the order to make the most efficient use of time by doing one step while another is drying. They are clear and easy to follow, provided that you have build a few rockets before you start this one, this is definitely not a beginner kit! They include templates for the fin details and a tube marking guide.
The ASP is a skill level 2.5 for difficulty on the Estes scale. There are several small parts that must be cut out of the heavy paper sheet that comes with the kit. The instructions have a template for their position on the fins. The spin tabs and flares are tricky items to glue to the fins. Use the wax paper the instructions call out, but tape it to your workspace, and allow the instructions to slide underneath. This way you can use the template in the instructions as a guide for one fin, and then slide it over for the next fin. The spin tabs at the bottom of the fins are easier to glue once you have made a jig to prop them in place while drying. I made one from scrap balsa to hold the tabs all at the same angle (probably overkill :).
I also deviated from the instructions in the assembly of the nose cone. The instructions say to insert the screw eye into the nose cone, remove it, add glue to the hole, and then assemble the washers to the nose cone with the screw eye. Historically I have had trouble with the screw eye pulling out of soft balsa. So I did the following; First I centered the screw eye in the nose cone and screwed it in, then I removed it and added epoxy to the hole and the bottom of the nose cone, then I added the washers, careful to ensure that they were glued together and to the base in the center, Finally I added the screw eye, snugged it down and filled the center of the washers with epoxy, making sure that I covered the bottom of the opening of the screw eye, and leaving the rest open and glue free. I set that assembly aside for several days to ensure that the glue had hardened. The result is a bullet-proof assembly that should last for many flights.
All of the parts fit well and resulted in a sturdy rocket with one exception, the flares on the tips of the fins, they are easy to break off.
There are no special tools needed for the construction. The second sheet of instructions gives instructions for sealing the balsa, painting the rocket, and applying the decals. The painting guide on the first sheet of instructions shows where to apply the decals. There are two paint schemes that are included with the kit, one is for a test round and the other is for an operational round used at Bikini Atoll. The decals are water transfer and are sharp and clear. I painted the rocket in the "Test Round" paint scheme, and the result is a sharp looking model.
Flight Rating: 5 out of 5
The shock cord is a long piece of Kevlar® that is tied around a heavy piece of paper glued into the body tube. I was skeptical at first but it produces a very strong mount. The other end is tied to the nose cone and streamer. A small amount of wadding is required to ensure the ejection gasses do not melt the plastic streamer.
The Motor is retained by a friction mount as there is no room for a clip in the minimum diameter model. The recommended motors are: 1/2A3-2T, 1/2A3-4T, A3-4T, A10-3T. I used a A3-4T on the first flight. Fortunately there were several people with me when I launched the rocket, as the ASP disappeared into the sky. I lost track of the small fast-moving rocket, and had to be pointed to where it landed. I suggest using a smaller motor, and possibly tracking powder in this little beauty.
I have flown the ASP on an Estes 1/4A3-4t. It seems about perfect for the little rocket. The ejection was near apogee and the rocket accelerated quickly off the pad even with the low thrust. On landing I lost another flare, but those are easily replaced. If you can figure out a way to use something other than a butt joint when attaching the flares, they will be much sturdier.
Conversely, this could be an excellent scale altitude model for 1/4A to A contests. The only damage on recovery was the loss of one of the flares from the fins. There was plenty of dowel in the kit to make several extra flares, so be sure that you keep it in your parts box!
Overall Rating: 4 out of 5
I give this kit a 4.5 for it's balsa nose cone, and overall excellent materials and instructions. It is a slightly challenging kit, but it rewards the builder with a first rate, and great flying model. With the exception of the flares on the fins, this kit should fly for many years in your fleet.
 |
 |
Flights
|
|