Balsa Machining Service F.S.I. Viking (Clone of the Month)
Balsa Machining Service - F.S.I. Viking {Kit}
Contributed by Chan Stevens
| Construction Rating: | starstarstarstarstar_border |
| Flight Rating: | starstarstarstarstar_border |
| Overall Rating: | starstarstarstarstar_border |
| Manufacturer: | Balsa Machining Service  |
Brief:
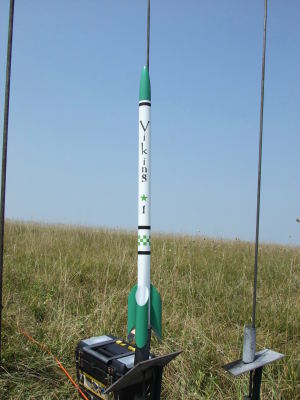
This was the first of BMS's recent Clone of the Month program offerings and is a reproduction, slightly upscaled, of
the 1971 Viking I produced by Flight Systems Inc. There were 4 versions of the Viking that year with minor differences
in length and tube/fin styling. This version uses purely tube fins for stability with none of the fin tabs or braces
used in other versions. Featuring a 24mm heavy-wall motor/body tube, think carefully about your motor selection, as
this could almost wind up being a moon shot.
Construction:
BMS's bag o' parts included top quality components:
- 2 heavy-wall BT-50 tubes (9" apiece)
- 3 laser cut heavy wall tube fins (nicely scalloped)
- TC-50 coupler
- Balsa nose cone**
- CR2050 motor block
- laser cut shock cord mount
- 18" length of elastic shock cord
- waterslide decals
- launch lug
- heavy 1/4" eye bolt
- no parachute/streamer--clone kits omit them to keep costs down
Normally the clone kits do not include instructions. Instead the modeler is directed to one of the online archive sites such as rocketshoppe.com or JimZ's site. This particular kit though included a reproduction of the original FSI instructions, which I found kind of neat, having never built an FSI kit before. The instructions were pretty basic handwritten notes and illustrations, but for an experienced builder, there's nothing terribly tricky about the build and so instructions are not that critical.
Starting with the finished product in mind, I knew trying to paint the tube fins contrasting color once mounted would be a pain, so I pre-treated the body tubes and tube fins (including inside spirals on the tube fins) with filler first. I then drew fin mounting/alignment lines, and masked them off with tiny strips of tape (less than 1/16" wide).
I glued the two body tube halves together with the coupler, again filling the seam, and mounted the launch lug. Sliding the nose in place, the various parts were ready for paint [covered in finish section].
Attachment of tube fins was fairly easy. I peeled off the masking tape, applied a small bead of CA to the alignment line, and mounted the first tube fin, making sure it was as well aligned as possible. For the remaining two tube fins, I used the supplied spacer (another section of BT50H) and tacked on the second tube such that it fit snugly against the spacer. If you've ever built a 6-tube rocket such as Totally Tubular, Razor, etc. you'll know once the first tube's in place, the others are a snap. In this case, as long as you think of every other tube as temporary spacer, not bonded, you'll be fine.
Figuring the bead of CA would not be enough, I followed up with a tiny fillet of white glue (dries nice and clear) applied via a syringe (check out Lee Valley Tools online for this sweet little tool).
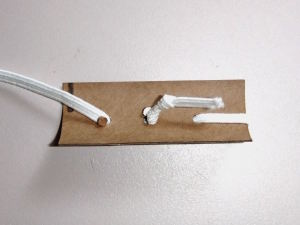 The shock cord mount is a neat little upgrade to the old tri-fold. In this case, BMS supplied a small
section of heavy-wall BT-50, cut down the length so that you've got a slice about a third of a tube around, by
1.5" long. There are 3 laser-cut holes in this piece, and you thread the shock cord through the holes and tie off
one end. The finished piece is then glued inside the body tube like a regular tri-fold. This has the look and feel of
something much more rugged than the paper mounts, so we'll see how it holds up.
The shock cord mount is a neat little upgrade to the old tri-fold. In this case, BMS supplied a small
section of heavy-wall BT-50, cut down the length so that you've got a slice about a third of a tube around, by
1.5" long. There are 3 laser-cut holes in this piece, and you thread the shock cord through the holes and tie off
one end. The finished piece is then glued inside the body tube like a regular tri-fold. This has the look and feel of
something much more rugged than the paper mounts, so we'll see how it holds up.
Overall, this is a very simple build, no worse than skill level 2, and I probably had 30 minutes of construction time in it, plus another hour of prep and paint.
Finishing:
Finishing the main rocket body is straightforward--a couple coats of primer followed by gloss white. I painted the
nose a solid green. Trying to match the green of the decals, I went with Krylon's OSHA green which looks like a decent
match although it's certainly not perfect.
For the tube fins, I wanted to stick with the two-tone look from the FSI catalog, so I painted the insides and outsides the same gloss white as the rocket body. I then masked off the insides, and painted the outsides the OSHA green I used on the cone. It really wasn't as difficult as I'd thought, and looks pretty good at the end. For what it's worth, I caught a suggestion on a rocketry forum by Fishhead (Bill Eichelberger around these parts) to use silver paint for the insides. That sounds cool and might be worth a try if I get my hands on another one of these.
After paint, I applied the waterslide decals (which were very good quality and easy to apply) and topped everything with a couple coats of clearcoat.
Construction Rating: 4 out of 5
Flight:
For the flight, I was a bit paranoid as RockSim didn't like he stability calculations even factoring in the tube fins
with a projected stability margin of 0.15. It predicted fairly straight up flight and put the D12-5 at almost 1500
feet. I asked around on various rocketry forums, and the feedback I got was that it flies fine on D12-5s.
With a nearly perfect day, clear skies and winds under 5 mph, I decided to go for broke with the D12-5. It weathercocked a bit into the wind but generally flew straight and true. It tested my eyesight a bit, and while not quite to 1500, I'd bet it topped 1200-1300 with ease. The -5 delay popped the chute just as it was turning over for a perfect flight.
Recovery:
To keep costs down, no recovery device was supplied with this kit. As BMS Bill quips,the last thing any of his
customers need after all these years is another 12" plastic parachute kit. He certainly had me pegged, as I
grabbed one of the many 12" nylon chutes I have in my range box and slipped it onto the hefty eye bolt. The chute
was a good size as it kept the drift a reasonable walk and provided just soft enough a landing to avoid any damage to
the tube fins.
Flight Rating: 4 out of 5
Summary:
The clone of the month program--in particular this first offering--is an outstanding value. Dirt cheap pricing,
quality components, and the corners that have been cut are things most of us don't need anyway. Having never before
built an FSI kit, this opened up a new set of models and more potential clones that I really like.
The only con I could come up with was that the "Viking I" decal was split in order to fit on a smaller sheet footprint.
Overall Rating: 4 out of 5
Other Reviews
- Balsa Machining Service F.S.I. Viking (Clone of the Month) By Bill Eichelberger (April 10, 2008)
The Viking is the initial monthly offering (hopefully to be followed by more) by Balsa Machining Services. Originally produced by Flight Systems, Incorporated, the Viking is a unique looking tube finned, minimum diameter bird with what should be the potential for "outasight" flights (to borrow an old Estes phrase). The parts list: 2 T50H body tubes 9" length 3 bias cut T50H tube ...
 |
 |
Flights
|
|