| Construction Rating: | starstarstarstarstar_border |
| Flight Rating: | starstarstarstarstar_border |
| Overall Rating: | starstarstarstarstar_border |
| Manufacturer: | Fat Cat Rockets |
 Brief:
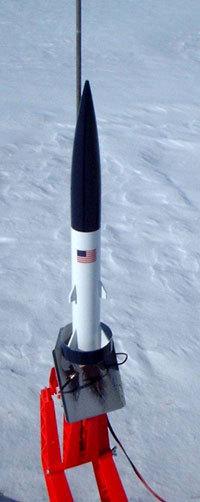
This little wonder is clearly a Fat Cat. Weighing in at a little over 8
ounces, it's built like a tank and could probably even be bashed to handle HPR
motors. As it is, this is about the smallest thing I've ever stuck a composite
motor in, though well worth it. It's a great little kit, with a combination of
ring and fin stability, and awesome performance.
Construction:
Picking up the bag, it's instantly clear that this is not your basic modroc
kit. This is one heavy bird!
Parts include:-
- A cast resin nose cone
- BT-60 kraft body tube
- 24mm motor tube
- Plywood centering rings
- A tail ring (roughly BT-80)
- Pre-cut fins & canards
- Kevlar®
- Elastic shock cord, 18" nylon chute,
- A launch lug (what, no rail buttons?!)
The instructions consist of a two-sided color printed sheet, mostly illustrations, with very little instructions. This was fine, as this is a very simple kit, accurately described as a skill level 1. The motor mount assembly is the basic tube with centering ring approach, though one of the centering rings has a flattened edge to allow a small gap for the shock cord to pass through. If you're considering using composite motors, especially reloads (and that's DEFINITELY worth considering), I'd suggest drilling out the aft centering ring and adding a couple of blind nuts for positive retention, as there's no engine hook with this kit.
After installing the motor tube assembly, the fins and canards are mounted and filleted, using the basic 3-fin pattern guide. Finally, the outer tube/ring is bonded to the fins. Everything fit very well on my kit.
The shock cord is attached to the nose cone by making a loop in the
Kevlar®,
pouring a good inch or two of epoxy into the tip of the nose, then dipping the
Kevlar cord and allowing it to cure in the epoxy. I'm sure this is solid, and
the added nose weight helps with what is probably not an overly stable design,
but I would have preferred to see a disk/screw eye attachment to the nose.
Finishing:
This was a little tricky to paint, mainly due to the inside edges of the outer
ring, forming corners with the lower fins. My primer coats tended to run a bit,
but after sanding them out I went with two very light coats of gloss white,
without any problems. I then trimmed the nose and outer ring a dark blue. The
result was a fairly nice-looking effect.
Construction Rating: 4 out of 5
Flight:
First flight was on a very chilly winter day, temperature in the single digits, but clear skies and no wind, so I had to take advantage of it.
For the maiden flight, I opted for the Estes D12-5. It raced straight up, arced over, and deployed slightly past apogee. The 18" dayglow yellow chute was certainly easy to track as it gently returned to the ground 50 feet from the pad.
Somehow, despite virtually indestructible components and a good deployment, I managed to zipper the kraft tube. Feeling foolish (there was no one else anywhere near the field today), I stuck an Aerotech F21-6 in to really test this bird. It screamed up, well out of eyesight, though it did eventually return to earth in fine shape. I'm not sure if the deployment was early or not, but would have to guess that it was, based on the D12-5 earlier flight pattern.
Recovery:
Very rugged/durable recovery, suspect the zipper was bum luck more than anything (and easilly repairable)
Flight Rating: 5 out of 5
Summary:Very nice kit, deceptively solid and durable, you'll definitely get funny looks when the RCO calls out the motor selection on this one...
Other Reviews
- Fat Cat Rockets Lil Leader By Chan Stevens
( Contributed - by Robert Runnalls - 07/01/02) Brief: This is a downscale version of Fat Cat Rockets Ring Leader. It's distinguishing feature is the round tail fin and the 3 canards. Construction: 1 38mm body tube 1 24mm motor mount tube 2 plywood centering rings. 1 thick walled plastic nose cone 2 lengths of Kevlar ® cord 3 plywood rear fins 3 plywood canards 1 ...
 |
 |