| Construction Rating: | starstarstarstar_borderstar_border |
| Flight Rating: | starstarstarstarstar_border |
| Overall Rating: | starstarstarstarstar_border |
| Manufacturer: | Model Minutes  |
Brief:
Based on the 1953 French ramjet attempt to hit Mach 2, this very challenging
paper model looks impressive and flies amazingly well. I would recommend it
highly to anyone with prior experience with paper rockets.
Construction:
Drake's review covered the basics, presumably an older version of this kit. My
kit was purchased in early 2005 and I'll focus on the differences.
A major difference in my kit is that the paper patterns are pre-finished, so I did not need to paint mine at all. As he noted, it can be built in either an 18mm or 24mm configuration. I went with the 18mm mount. I'm just not too wild about putting the massive ejection charges of 24mm black powder motors into a paper motor tube.
My instructions were also in the hokey 3-D, which I simply ignore now, after having built about 6 Model Minutes kits. My pattern sheets though were mostly in English, so I had very little trouble finding and forming the right parts along the way.
The instructions are fairly decent, although the pictures are weak even if using the 3-D glasses. Also, some of the tubes are not clearly marked which way to roll form them, so prior experience helps as does dry fitting of pieces.
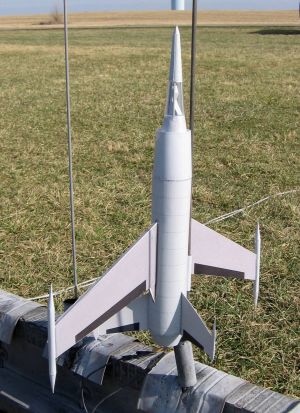
The main body tube consists of 2 rolled tubes joined by a paper coupler. "Paper" is a bit of a misnomer, as the pattern sheets are all printed on a light cardstock, certainly heavier-duty than regular printer paper.
The wings plus a nose cone shoulder and a couple of centering rings are cut from foamboard. This was a very tight fit, so you need to pay attention to the layout template to get it right. Also, a fresh X-Acto knife blade will come in handy.
Drake was right that there is a poopload of cones and paper do-dads to this kit. Some people might expect a paper kit is quicker (and cheaper) than a regular kit. Not so with this--it lists for $18.95 and I spent the better part of 2 hours cutting out all the patterns pieces while cooped up in a hotel room one evening. You'll spend lots of time cutting and forming the components in this kit.
In addition to the two main wings, there are 3 paper fins. Use a very thin layer of white glue on these and resist all temptation to rush the job--just leave them flat under a heavy weight (like coffee table books) to dry overnight, otherwise they might warp.
After attaching the fins (but not the wings yet), you slide a centering ring onto the body tube, form a larger outer fuselage tube, slot it, and slide it over the body tube/fins. Add the tail cone and this finally starts to look like something that might fly.
The motor mount is either 18 or 24mm with a couple of centering rings and a metal retainer. It then slides into the body tube. I had no problem but think it might have worked better to bond this first then attach the boat tail later.
The wings are thru the wall, which means slotting the fuselage tube. That was a pain since the paper tube doesn't offer a very firm cutting surface. There are also a couple of small trim (reinforcement) pieces that go behind the wings. Mine didn't fit very well in the wing/fuselage angle, so I had to sand them down a bit for proper fit. The last piece of wing trim consists of a tube and a pair of cones bonded to the end of each wing. I think these are the cones that drove Drake nuts--they're among the sharpest angles I've ever had to form and are very prone to dings. I decided to beef mine up by filling the ends with white glue and curing them overnight.
The fuselage assembly is also a good bit of work, made from 2 paper transitions, a cone, 3 wood dowels, and an optional seat (a serious work of origami). There's also a clear plastic shroud cover, which caused me a lot of grief. I tried attaching it using clear liquid plastic cement, hoping to make a virtually invisible bond line. This didn't stick, so I tried CA. CA only fogged it up and still was not bonding. I tried liquid weld for plastics, still with no luck. I finally managed to attach it using the Testor's plastic cement, but there are some noticeable globs where it bonded.
One note on the nose weight: I completely packed my nose cone with clay and had a perfectly stable rocket. Drake's was slightly overstable and he felt confident 24mm would be no problem. I'm not as sure there's enough room for nose weight to cover a 24mm motor.
The elastic shock cord is attached to the motor tube. The parachute is a very feeble plastic chute, barely 9", and I tossed it out favoring a 15" mylar sport chute instead. I'm just not willing to risk carefully crafted paper cones to an aggressive landing speed.
Finishing:
As noted, the patterns were all pre-printed, so no painting was needed other
than touching up the wood dowels with silver paint.
To protect the finish, I applied 3 coats of Krylon clear coat in extremely light coats to prevent runs. This added a little texture to the finish.
Construction Rating: 3 out of 5
Flight:
For the maiden flight, I went with a C6-3. In very light winds, it flew
absolutely straight, finishing off the coast phase at the top with a very cool
barrel roll. Ejection was right at the top. You simply can't ask for a better
flight and I was very impressed with how stable and straight this was,
especially for a paper model.
Recovery:
My 15" chute brought it back safely, although one of the tail cones on the
wings was dented a bit. I can't imagine how it would recover on the stock
chute, so would consider upgrading to at least 12" mandatory.
Flight Rating: 4 out of 5
Summary:
I would consider this an excellent kit, however, the skills required to form
the details is certainly a challenge and would rate the kit about a skill level
4. Drake's review mentioned he can't imagine building one harder--I think the
XFLR-7 was a bit tougher, but this would be a close second. It's an outstanding
flyer!
Overall Rating: 4 out of 5
Other Reviews
- Model Minutes Leduc 22 By Chan Stevens
Brief: A "paper rocket" made with cardstock and foam board. The kit is designed to fly on either 18 or 24mm engines. A nice cloth parachute is provided for recovery. Construction: This kit basically consists of several sheets of printed cardstock, a wooden dowel, and a sheet of foam board. A cloth parachute, clear windshield material, and a few other items are provided ...
 |
 |
Flights
|
|