| Construction Rating: | starstarstarstarstar_border |
| Flight Rating: | starstarstarstarstar_border |
| Overall Rating: | starstarstarstarstar_border |
| Manufacturer: | Paper |
Brief:
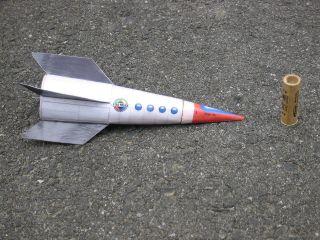
This rocket is based on plans from http://www.lansbergen.net. Philippus Lansbergen has some really cool paper model plans of scale model rockets, fantasy rockets, gliders, and UFOs. They are not flight-worthy rockets, but with a little modification they can be made to fly off a launch rod. I was attracted to the Ranger Ray's rocket because it was so clumsy and campy. I thought it would be a fun conversion. In order to find the plans, you have to click on the "Modelbouw" link on his site.
Construction:
Here is what you need to make your own Ranger Ray Rocket:
- Cardstock
- Kevlar shock cord material
- Shock cord and streamer
- Screw eye for nose cone
- Clay or BBs for nose weight
- 13mm body tube (BT-5)
- Engine block
The instructions are pretty minimal (mostly illustrations with some Dutch and some English), but the rocket goes together pretty quickly. The rocket consists of three different body tube shrouds because of the different diameters. Each connecting section of the shroud has an additional transition part that sits inside the main body shroud. I designed my version to have the upper most shroud be the nose cone. The fins fold together easily and are quick to attach to the side of the rocket. Creating nose cones out of paper can be difficult, but with practice, it becomes easier and easier.
Next, I cut some space in the bottom nozzle/bulkhead of the plans to make room for the 13mm motor mount. After making a few test fittings, I glued the nozzle together and let it dry. After the nozzle unit was dry, I glued the 13mm motor mount to the nozzle, along with a small centering ring, and fit the motor mount into the rocket from the bottom. I made sure the motor mount was long enough to make it to the top of the second shroud. Once dry, I could glue the engine block with Kevlar into the motor mount.
Lastly, I added weight to the nose cone (nose cone weighs about 5 grams) and used some extra card stock to roll a plug that would sit within the motor mount tube. The plug would act as the shoulder of the nose cone, keeping both parts of the rocket together for the flight. I plugged the shoulder with some glue and tissue paper, let it dry, and then put in the screw eye with CA for the shock cord. All I had to do was tie the shock cord to the screw eye and attach the streamer.
PROs: Cheap rocket, cool design, quick to build, and parts easily replaced.
CONs: Paper construction can be fragile. The cardstock I used was very wimpy and my fins turned out a little leathery at the end. They have a tendency to curl when I place the rocket upright.
Finishing:
Since all the detail is printed on the paper, there is really no painting required.
I have built numerous paper rockets, and am always thinking about how to strengthen the paper for launching. I used ModPodge (MP) on Ranger Ray's Rocket, and if you look closely at the photos, you can see the built-up gloss that MP leaves. I am not entirely convinced that MP is the way to go since it does have the tendency to cause the ink to run a bit. Next time I will try an acrylic spray coat first and then add the MP. Also, I added about 3 or 4 layers of the MP to get a nice build-up/coating on the rocket.
PROs: No painting required and no decals need to be applied.
CONs: You need a color printer for best results.
Construction Rating: 4 out of 5
Flight:
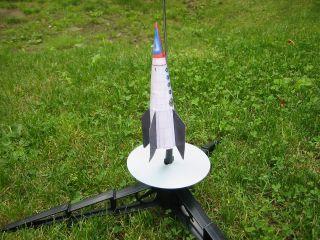
I flew the rocket twice, once using an A3-4T, and a 1/2A3-4T. Interestingly, the 1/2A3-4T had just the perfect delay. The rocket really reached a nice high altitude on the A3-4T. The 1/2A3 flight was nice to watch but nowhere near as exciting. The model is easy to prep. I used wadding and tape to friction fit the motor since there is no engine hook.
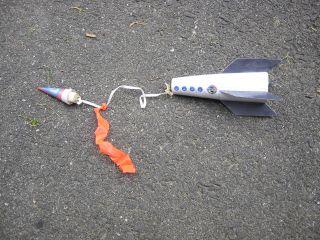
Since the nose cone weighs more than the rest of the rocket, it came down pointy end first both times. The nose cone is slightly damaged (a little rip), but I think that it can easily be repaired. I now have a better sense of how to build stronger paper nose cones, which is by building up the insides with additional card stock and wood glue.
Recovery:
Pros: It only costs a few cents to build another rocket if anything gets slightly damaged on recovery!
Cons: The 13mm motor mount is very small, so the streamer that fits inside cannot be very large. The rocket flies surprisingly straight and is fun to build and fly. If a larger streamer could be put inside the rocket, perhaps the nose cone wouldn't suffer dings to readily.
Flight Rating: 4 out of 5
Summary:
PROs: Cheap, fun, goofy rocket. Considering the plans are free, it's a great build. The rocket is very stable (make sure you don't forget nose weight!) and flies well.
CONs: Dealing with paper is always a problem. First, with creating paper shrouds there are always going to be seams. If you don't like to deal with visible seams, then don't get involved with paper rocketry. Also, If you want to build a solid rocket, then you will have to find a way of beefing up the strength of the paper.
Overall Rating: 4 out of 5
 |
 |