| Construction Rating: | starstarstarstarstar |
| Flight Rating: | starstarstarstarstar |
| Overall Rating: | starstarstarstarstar |
| Manufacturer: | PD Rocketry |
Brief:
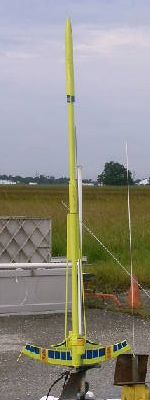
PDRocketry's Alien Explorer is a replica of the Estes classic that appeared in the Estes 1981-1982 catalogs. The
model is a Skill Level 3 of an incredible alien starship. It has spectacular liftoffs, exotic decals, and alien fin
design.
From the Estes 1981 catalog: "Incredible alien starship believed to be from a distant galaxy. Is it friend or foe? Its size and unique appearance make it a most dramatic demonstration and display model. Really spectacular liftoff and recovery."
I had won this kit from PDRocketry last year in the first of the vendors' "first to post" contest in PDRocketry's blog website. After receiving the package, I was surprised to see how complicated the model must be from all the parts and extensive instructions, not to mention how cool the alien decals were! Because of this, I knew I'd have to set aside plenty of time and dedicated effort to build and paint the model. Wow, this model was looking like what I like best: a builder's model rocket.
Construction:
PD-1372 kit includes:
- Plastic nosecone
- Pre-assembled mylar parachute by PDRocketry
- All body tubes are white Kraft paper cut to correct length
- Laser cut rings for exterior detail
- Detail panels are pre-cut
- Alps waterslide decals
- All instructions, pattern sheets, and guides
- High quality balsa sheets from Midwest Products for fins (fins are not pre-cut)
Parts List:
- 2 Balsa Sheet Stock (3/32" Thick)
- 2 18" Long Wood Dowel (1/8" Diameter)
- 1 Pattern Sheet
- 1 Die-Cut Card
- 1 12" Long Wood Dowel (1/12" Diameter)
- 1 Tube Coupler (3/4" Long)
- 2 Body Tubes (Type BT-20) 18"
- 5 Adapter Rings (Type AR-2050)
- 1 Split Adapter Ring (Type AR-2050S)
- 1 Engine Hook (Type EH-2)
- 2 Reactor and Secondary Body Tubes (Type BT-50S), 4"
- 1 Parachute Compartment Tube (Type BT-50H), 7 3/4"
- 1 Elastic Type Shockcord
- 1 Shock Cord Mount (Type SCM-50)
- 2 Ion Tubes (Type BT-50AH), 1 7/8"
- 1 18" Mylar Pre-assembled Parachute
- 1 Nose Cone (Type PNC-50X)
- 1 Launch Lug (Type LL-2B)
- 1 Decal Water Slide (Type KD-1372)
In addition to the parts included in this kit, you will need: scissors, household white glue (Elmer's, Titebond, or similar), pencil, ruler, fine or extra-fine grit sandpaper, sanding sealer, a medium-size modeling paint brush, modeling knife with sharp blade, masking tape, chromate green enamel spray paint, and a bottle of red enamel paint.
Because this model requires you to cut out the fin patterns, trace them on the balsa fin stock and cut them out yourself. PDRocketry's version of the Alien Explorer is actually a bit more complicated to build than the Estes version (Estes came with die cut balsa sheets). Due this factor alone, I would rate the Skill Level of PDRocketry's Alien Explorer closer to a Skill Level 4. You'll need to really take your time to do a good job here. The fin pattern sheet is printed on card stock. Carefully cut them out and trace them correctly on the balsa fin stock. Since the shape of the fins are not all straight lines, you'll need to make several light passes along the trace lines before the cut goes all the way through.
The instructions runs nine pages long, are well illustrated, and easy to follow. I pretty much constructed my model in the order given in the instructions. Because of these factors, I had no real problems nor issues during the build phase. All I can say is just take your time and concentrate on the tasks at hand.
Finishing:
Because this model has plenty of balsa parts, you'll need to spend plenty of time using sanding paper and sanding
sealer to get the balsa surfaces prepared for the final finishing. At some of the hard to reach areas, I also used a
nail file (or emery board) for sanding. I must have applied about four coats of sanding sealer with plenty of drying
time and light sanding in between before I was satisfied that the balsa surfaces were done.
You'll also need to be careful in the handling of this model due to the "antennas" located about midpoint of the main body tube section. Also, the dowels that are located on each end of the main sail panels will need special attention to insure that they don't break off accidentally.
For the overall paint scheme, the instructions say use Pactra Chromate Green spray enamel. I could not find any such color near where I live. At my nearby Home Depot, I saw a can of spray Apple Green that appeared to closely match the Chromate Green color, but the Apple Green was a flat finish and I didn't want to use flat paint on this model (as it may cause issues with the water slide decals on the flat surface). I spotted a can of gloss Lime a few shelves down and liked the "emotion" of that color compared to the others so I bought the Lime spray paint to finish this model. I'd have to say the Lime color actually looks very good, and I'm pleased as to how it came out.
The decals worked like a charm and when all were applied, they really give the Alien Explorer a cool, unique look.
Construction Rating: 5 out of 5
Flight:
The recommended motors for this model are: B6-2, B6-4, B8-5, and C6-5. The main parachute section will require about
four or five squares of wadding loosely crumpled. I did increase the length of the elastic shock cord of my model to
make it 1 1/2 times the length of the Alien Explorer so that there will be no possibility of the nose cone snapping
back.
The engine fits very easily in the motor mount, and the engine hook latches securely over the end of the engine without any problems.
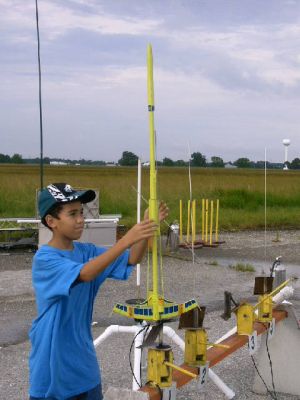
For the first and only flight of my model, I used a C6-5 motor. Launch date was June 16, 2007, at the Johnson Space Center during the Moon, Mars and Beyond Regional Meet hosted by the NASA/Houston Rocket Club. We had winds blowing ENE between 5-10 mph. The model, according to those who were present to witness this launch, was compared to an exotic Super roc flown in the NAR contest events (Super roc Altitude & Duration). The Alien Explorer looks very impressive sitting on the pad awaiting liftoff.
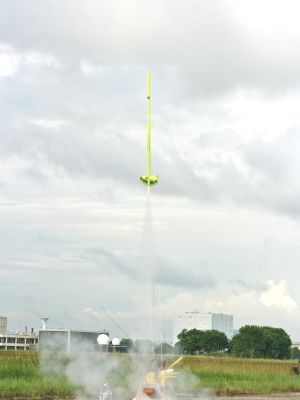
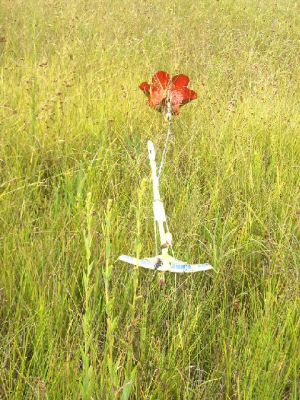
This launch at JSC was really spectacular. The C6-5 gave it a strong, solid push off the pad. Model flew very straight with no rolls or deviations. The five second delay of the engine gave the Alien Explorer plenty of time to coast to apogee. When the nose began arching down, the ejection charge forced the PDRocketry's 18" pre-assembled mylar parachute to open nicely. With a rather slow, safe drift about 400 feet downrange, the model landed in the grass with no damage whatsoever (a real surprise here, as I'd expected that at least some of the dowels would break off in some form).
PROs: Everything! A really great flyer and show stopper.
CONs: Can't think of anything!
My hats off to PDRocketry and Eric for making this model available again in the model rocketry world. For the price, the Alien Explorer is well worth it.
Recovery:
Shock cord uses the standard Estes tri-fold method, which works great for me as I use it about 95% of the time
anyway. As mentioned earlier, I added more length of elastic shock cord to that which came with the kit to make the
total length 1 1/2 times that of the model.
No real problems as far as the assembly is concerned. I guess you can say that even though you had to trace and cut the balsa fins yourself, PDRocketry "made it up" by including a pre-assembled mylar parachute with the kit and a snap swivel already attached!
Recovery speed was just about right for the one flight flown. There was no burns nor damage noted.
Flight Rating: 5 out of 5
Summary:
PROs: Great kit for those wanting to relive the earlier years of model rocketry, the quality of this model is superb.
CON's: None
Overall Rating: 5 out of 5
 |
 |