| Construction Rating: | starstarstarstarstar_border |
| Flight Rating: | starstarstarstarstar_border |
| Overall Rating: | starstarstarstarstar_border |
| Manufacturer: | PD Rocketry |
Brief:
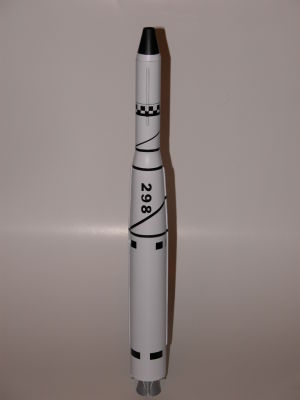
The Thor Agena B by PD Rocketry is another kit by the company that specializes in out-of-production Estes kits from
the '60s and '70s. There is apparently a resurgence of interest in these early kits from the hobby and I have to admit
to being one of these old rocketeers who has been bitten by the bug. I purchased this kit along with a Gemini-Titan and
a Goblin a couple of years ago and am finally getting around to building it. PD Rocketry kits are almost exact
duplicates of the original Estes kits and even appear to use the same instructions. I built one of these Estes Thor
kits in about 10th grade and was very interested in building it again after I learned that PD had one available. One of
the great things about these kits is they test your building skills since all the details have to be hand crafted from
launch lugs, paper, and balsa. The rocket itself is a scale model of a NASA workhorse launch vehicle based on the Thor
missile which ultimately became the Delta series of rockets. The Thor with the Agena B upper stage launched many of
NASA's scientific Discovery satellites. I am also a very big fan of accurate scale models.
Construction:
The rocket was ordered from PD themselves. It is packaged in a large hanging bag with a cardboard label across the
top. Upon opening the bag I found that many parts and the decals and smaller parts are bagged separately inside, a nice
touch to keep the parts from being lost. The parts consisted of:
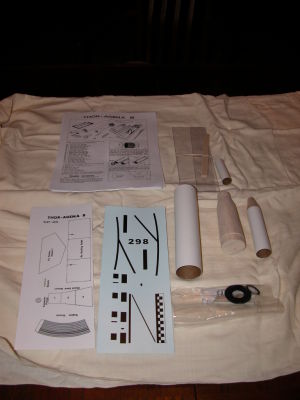
- First and second stage body tubes
- Balsa nose cone and balsa interstage adapter
- Assorted engine mount assembly parts
- Numerous laser cut fiber board adapters
- Balsa for making the external conduits
- Clear plastic sheeting for the tube wrap and fins
- Launch lugs for the turbine exhaust and rocket
- Decal sheet
- Wire for the structural standoff on the turbine exhaust
- Heavy paper template sheet with nozzle and other parts
- Shock cord and plastic parachute
Construction is typical for an Estes kit from the '60s. This means you can expect to cut, carve, and sand the detail parts from balsa and other materials.
I began by building the engine mount. For this kit, it is a little different as the engine tube will extend a couple of inches from the centering adapter so the simulated nozzle can be installed. This is fairly simply done by first cutting out the nozzle from the template and installing it on the engine tube using a centering ring. Once the mount is built up from the centering rings and stage coupler, the adapter is glued onto the engine tube above the nozzle. I did run into one problem at this time. I had already noted that the engine mount was rather tight inside the body tube during a fit check. I also found that the surface of the PD Rocketry stage couplers is rather rough. I sanded down the coupler and centering rings but was still getting a rather tight fit when sliding the engine mount into the tube. I ran a ring of Titebond glue around the inside of the body tube and started to slide the engine mount in. About 2/3rds of the way in it stuck hard. I immediately pushed a ruler in the other end and attempted to push the engine mount out. However, the engine mount went to pieces under the load and I ended up peeling the stage coupler out. I ended up with a destroyed engine mount. Fortunately I had parts in my bin to build another using an Estes stage coupler. I also had to cut and form a new nozzle but the replacement engine mount slipped easily into the tube.
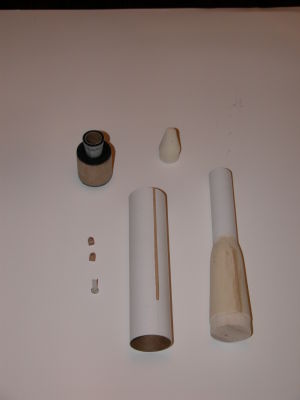 The next step was to build the detailed parts for the engine system. I followed the instructions and
built the two small vernier rocket assemblies from balsa and paper. I built the turbine exhaust from a launch lug and
heavy paper per the instructions as well. After "sealing" the vernier balsa pieces with hot stuff glue, I
glued them along with the turbine exhaust to the engine mount located per the instructions. Finally I bent my own piece
of music wire to simulate the turbine exhaust structural standoff instead of using the kit wire since the kit wire
seemed a bit large in diameter. I used hot stuff to glue the wire in place.
The next step was to build the detailed parts for the engine system. I followed the instructions and
built the two small vernier rocket assemblies from balsa and paper. I built the turbine exhaust from a launch lug and
heavy paper per the instructions as well. After "sealing" the vernier balsa pieces with hot stuff glue, I
glued them along with the turbine exhaust to the engine mount located per the instructions. Finally I bent my own piece
of music wire to simulate the turbine exhaust structural standoff instead of using the kit wire since the kit wire
seemed a bit large in diameter. I used hot stuff to glue the wire in place.
Next up was the process of gluing the balsa interstage adapter to the second stage engine tube. I then glued the nose cone into the top of the second stage. Here two other problems were noted. The balsa parts (I believe from Balsa Machining Service) were not of the best quality and fit. The interstage outer mold line was a bit small around the upper stage joint and I had to fill it with wood putty. The nose cone also fit very loosely in the tube and I glued it into place with epoxy so that I could center it while the epoxy was hardening and fill the gap around the shoulder. Wood glue would not have done this very well if I had used it here.
Next up was more of the detailing. I cut the included balsa sheet into 1/8th wide strips per the instructions. I then cut them to length and rounded the top edges and sides as instructed. These were then glued to the upper stage, interstage, and lower stage per the instructions to simulate the instrumentation tunnels on the rocket. I glued them in place after sealing the interstage. I also coated then with hot stuff to seal the surface. After that I made two small antennas for the lower stage from a sheet of composite material I had. The instructions were to make the antennas from balsa but this material worked much better. They were glued in place on the upper first stage per the instructions.
The final item was the clear plastic fin unit. This requires building also as my original kit did. I do remember that building that was not too pleasant an experience. It is difficult to get the thin plastic wrap built up around the body tube. I ultimately followed the instructions and after positioning two wraps of paper around the bottom of the tube and cutting the plastic sheet to fit with about 1/8" overlap as directed, I used the suggested clear dope and tape to glue the overlap into place. After letting this dry a couple of hours it appeared to work and the thin tube was formed. I then used the template and attached the fins I had cut from the thicker plastic sheet. I held them in place and put a small amount of medium thick cyanoacrylate (CA) glue at the joint. Before the glue hardened, I dragged it along the joint and then sprayed accelerator on the joint. This firmly attached the fin to the tube with a fairly invisible joint. The other fins were attached the same way.
Finishing:
I filled the balsa interstage and nose cone with Elmer's Carpenters Wood Filler diluted to paint consistency in
water. This was the first time I had tried this and it seemed to work quite well. After it had dried I sanded the balsa
parts smooth. I then sprayed the entire rocket with Rustoleum gray auto primer. I sanded down the rocket once it had
dried and did this a couple of times to get a nice smooth finish on the rocket. I followed this with semi-gloss white
Krylon paint. The upper two-thirds of the nose cone was masked and painted semi-flat Krylon black. I painted the
vernier nozzles, engine nozzle, and turbine exhaust with aluminum acrylic paint.
Once the painting was complete I applied the decals. There are line decals on the upper stage and interstage, a checkerboard pattern decal on the upper stage, and black block patterns on the lower stage. The decals had to be cut to their rough shape and it was somewhat tricky applying the long line decals and lining them up but I managed to do a reasonably good job of it. Here lies another complaint. The instructions that show where to apply the decals are not too good. It is difficult to determine where on the vehicle the line decals start and end so I guessed the best I could from the drawing. The drawing only shows one side view and the lines wrap around the panels. I also found a series of pictures on the web of the vehicle on Wikimedia.com. These helped a little in applying the decals.
Construction Rating: 4 out of 5

Flight:
I had this rocket completed other than the fins for almost two years before finally building up the clear plastic fin
unit. Because of this, I didn't fly it during that time frame. To finish up my review I took the rocket out to a local
sport facility today and with the assistance of my wife launched it on an A8-3. It flew perfectly straight but not too
high on the A8-3. This was just as well though as there was a bit more breeze than I liked and it could have landed in
the parking lot and gotten dinged if it had flown higher. It popped the chute perfectly and landed in the grass. One
item I did note was that the launch lug is attached to the fin unit and is very short. Because of this the rocket tends
to cock a bit on the rod and you should be careful to align it as vertically as possible to prevent the rocket from
locking itself on the pad at launch due to binding of the launch lug.
Recovery:
The included heavy, bright metallic red chute deployed perfectly and safely lowered the Thor onto the grass field I
was flying from.
Flight Rating: 4 out of 5
Summary:
I was relatively impressed with this kit, my first from PD. It definitely captured the building days of my youth and
emphasized the modelers building skills. Too many kits today are pre-built or demand little of the modeler. My only
complaint would be about the nose cone not fitting too well into the second stage tube. I personally enjoy building as
much as flying and like a kit that is challenging. It also is a nice looking scale model of the early versions of the
workhorse Delta rocket series based on the Thor missile. It looks good on display and in flight. My next build was
another PD kit, the Gemini-Titan, which is in construction as I write this. It is great to see these companies
re-releasing the early kits for us "born again" racketeers as well as new hobbyists.
Overall Rating: 4 out of 5
 |
 |