 Brief:
I have converted the Peck Polymers Jetex-powered Rocketboy rocket glider to an
Estes-powered boost glider. One of the tricks in designing boost gliders is
assuring good flying qualities both under rocket boost and while gliding after
ejection of the boost motor. Since the Rocketboy is also designed to be
launched by rubber band catapult as well as by the anaemic Jetex, and the motor
placement was at the CG, I decided this model was a good candidate for
conversion to Estes power for more fun.
Modifications:
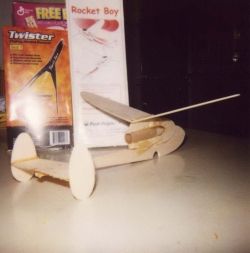
Materials needed: one Peck Polymers Rocketboy kit, one Custom Rockets Twister
kit, plus a sheet of 1/64" plywood to cut out fuselage doublers.
 Building sequence:
- 5-minute epoxy is used throughout, although sparingly--this is a glider!
- Glue the balsa nose cone onto the Twister body tube, and set aside. (You can use any 18mm tumble recovery rocket here, or make your own motor pod.)
- Trim the Rocketboy fuselage to relocate the horizontal stabilizer 5/16" lower on the aft fuselage, and the top of the motor cut-out 3/16" higher that shown on the plans, and exactly parallel to the original location. (You are doing this to prevent the rocket exhaust from incinerating the tails and stab.)
- Add a stick of hard 3/16" balsa to raise the wing mount area on top of the fuselage and fair in to the contours of the "cockpit".
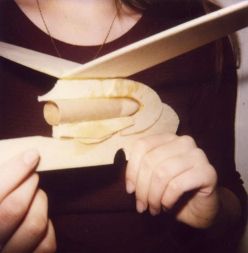
- Trace out the forward 1/3 of the modified Rocketboy fuselage onto the 1/64" ply (from the aft of the motor cut-out forward); make two. This stuff cuts with scissors. Glue in place on the fuselage
- Glue the stock kit balsa fuselage doublers on top of the 1/64" doublers
- Glue the Twister motor pod into the corresponding space in the Rocketboy fuselage, filling the gaps between the doublers with 3/16" balsa scrap.
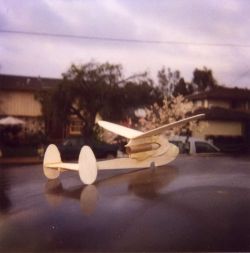
- Complete the assembly per the Rocketboy instructions. It is not necessary to "airfoil" the balsa wings, just smoothly round the wing leading edges with fine sandpaper. The flying surfaces and motor pod are all exactly parallel to one another, 0-0-0 degrees incidence relative to one another. Note placement of the Twister launch lug on the Rocketboy (see photo)--centered at 2/3 wing chord, the balance point.
- Balance motorless Rocketboy Custom for a nice flat glide when hand-launched briskly straight ahead. Expect to use two pennies or two nickels taped to the nose to achieve this (see photos). Trim for a gentle turn if you know how to do this (I don't bother). I fly mine unpainted.
 Construction:
A streamlined 18mm Estes motor mount was added to Rocketboy by grafting in the
body and balsa nose cone of a Custom Rockets Twister kit. Only a few other
minor modifications were required to create a Rocketboy Custom. I must say that
I chose to create this conversion in order to have a rocket boost glider that
required no "tricks" to transition from boost to glide; I have since
discovered the Edmonds TINEE and CiCi models, which do this superbly and are a
blast to fly. With a little more fiddling, Rocketboy Custom can probably fly
every bit as good as these models. Construction is slower and more
"classic" however, as are the funky, 1930's Lockheed looks of the
twin-tailed Rocketboy, which resembles Amelia Earhart's Electra or the obsolete
Hudson bombers my Dad flew in WWII. Looks cool gliding overhead.
The Rocketboy kit itself is excellent although I have never flown one as it was intended by the manufacturers. The fact that it is designed for rubber band catapult launch speaks to the fine balance of this well-known design under "boost" as well as glide--why I think it has such good potential for conversion to rocket boost.
 Flight:
Use a B6-2 or B6-0 for this model, with an A8-3 for the first powered flight.
Fit the motor loosely into the pod with just a bit of masking tape on the
outside to keep it from dropping out. When launching Rocketboy, be certain that
the ignition leads will not snag the rudders on blast-off, or your glider will
attain maximum spectator entertainment value and an altitude of three inches.
As with all aircraft, you should avoid take-off with a nasty cross wind. Climb
on a B6-2 is high and stable, with an arching and rolling moment. Do not fly
Rocketboy Custom on a C6 motor, or you will overspeed the airframe (the wing
mount wood fails, not the glue). Peck-Polymer kits are not that widely
distributed, so if you're considering building a Rocketboy Custom, you can
contact them at P.O. Box 710399, Santee, CA 92072, or visit
their website. Even though it is not
on their website, they still carry the Rocketboy. It's $16.49 direct from
Peck-Polymers. Enjoy.
Recovery:The glide is pretty good, although in my hands, I wouldn't
say the sink rate is contest quality. I haven't got 30 seconds out of it yet. I
noted a falling leaf stall tendency on the first flight, so I added another
penny to the nose.
Summary:
PROs:
- A different kind of fun-fly boost glider, unusual looks.
- Easy to build.
- No separate pod or "mechanism" to build--just insert motor and fly.
CONs:
- A little too heavy for boost rocket contest flying at present.
- Need to fuss and fiddle a lot to get it trimmed properly for good gliding. Buy an Edmonds CiCi if you don't like to do this.
Other:
Might be a good idea to paint the stab and tails with white primer-filler if
any scorching is noticed from the rocket motor. I had to fix this problem by
relocating the stab lower relative to the motor axis after I set fire to the
tail on the first flight
 |
 |