| Construction Rating: | starstarstar_borderstar_borderstar_border |
| Flight Rating: | starstarstarstarstar |
| Overall Rating: | starstarstarstar_borderstar_border |
| Manufacturer: | Physics of Flight  |
Brief:
model, 3fnc, parachute
Construction:
 The
kit comes with:
The
kit comes with:
- Body tube came in two sections, one about 5" long, the other 15" or so long
- 1 piece of tube coupler
- 3 cardstock "fins"
- 3 cardstock centering rings
- motor hook
- MMT (about 1.5" longer than an Estes D)
- approx 2 ft of round elastic shock cord
- plastic nose cone comes in two parts--an insert that glues inside the main cone. The insert has plastic cross-pieces which the shock cord attaches to
- Big chute (for a model) - 20", uses stickers to attach shroud lines
- decals
I think that's the lot.
I ignored the instructions since they were mostly in German, but a translated version of the "important bits" along with some photocopies from an Estes kit were included. This kit is very simple, being very much "3 fins and a nose cone". The instructions may be of help to someone who's never built a kit but that said, they're nowhere near Estes' kit instructions. They're pretty disorganized but give the idea. There was a fin alignment strip included that was helpful.
 The
only other thing to note about the instructions is that they're "one size
fits all", rather than kit-specific. These kits are made by Das Modell and
imported into the UK by Physics of Flight.
The
only other thing to note about the instructions is that they're "one size
fits all", rather than kit-specific. These kits are made by Das Modell and
imported into the UK by Physics of Flight.
The build is where the problems start...I took one look at the "fins" and decided not to use them. (I think they're supposed to be fins rather than templates as you get three of them and there is no balsa included.) Instead I used them as templates and cut the fins from 1/8" balsa sheet (from A11MR). I put the engine mount together, leaving the lower ring off until the MMT was installed in the BT. The motor mount uses a hook only, no engine block. I thought of adding one, and then discovered that the MMT is NOT Estes 'D' sized (24mm).
Being German, this rocket is designed to use German D7 motors, which are slightly larger diameter--large enough that a D12 rattles around like nobody's business and I had no suitable engine blocks. The MMT is fairly thick but the centering rings are pretty thin and only made of a card-like material--not thick kraft. I used Unibond Super PVA throughout with no problems. I used all three rings to be safe. I assembled the MMT and fins to the short section of body tube, which was easier than fighting with a big piece during construction. The fin alignment strip worked well, but I left the pencil lines on the tube (silly me). I used CA to attach the fins, and filleted twice with CA.
 The
body tubes are not very good quality, being more like poster tubes than rocket
tubes and have fairly large grooves. (I've been spoiled by A11MR/Totally
Tubular's stuff.) The tube coupler was smaller than the ID of either tube (not
good) so the two tubes are coupled as much by PVA as coupler. The coupler could
travel freely through the tubes, it was that much smaller.
The
body tubes are not very good quality, being more like poster tubes than rocket
tubes and have fairly large grooves. (I've been spoiled by A11MR/Totally
Tubular's stuff.) The tube coupler was smaller than the ID of either tube (not
good) so the two tubes are coupled as much by PVA as coupler. The coupler could
travel freely through the tubes, it was that much smaller.
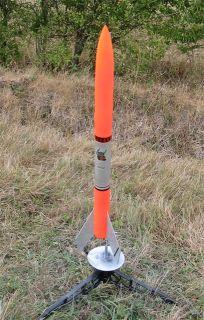
Anyhow, I got the two sections together straight, and it looked like a rocket, which is always a good sign :-)
The nose cone was a no-brainer, simply glue together the two parts. The chute, using plastic stickers, was quick to make (no knots to tie). I used an Estes-style shock cord mount, but used 100lb Kevlar® for the top and bottom sections (i.e. from BT to SC and SC to NC) with the kit's shock cord in the middle. Following a series of shock cord burn-throughs (not on this rocket) I think it would be a good idea to run Kevlar® to a metal clip or ring at each end, making replacing the elastic easy.
I cut the supplied plastic 3/16" launch lug in two, and mounted a 1/8" lug next to each section so it can be launched from a regular Estes pad. With that done, I had a rocket on my hands--if a slightly dodgy rocket at that!
Finishing:
I suppose a good finish could have been achieved given time and materials but I
didn't go all-out. I wanted it to look good on the pad but I wasn't overly
worried about close inspection. Time was also a factor (the next EARS launch
was looming). Another major factor was the quality of the BTs. I set to mask
the tube (to do it more or less as on the box--red with a white band in the
centre) and misplaced the tape slightly. On peeling the tape, a load of paper
came away and this was with super low-tack tape! Not good at all and loads of
unsightly fluff on the tube.
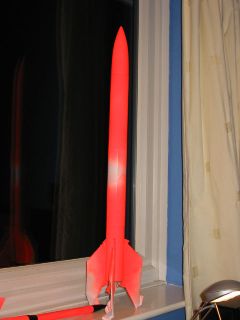 For the
nose cone, upper body, and lower body tubes I used Plastikote fluorescent
orange spray paint. It's sure bright but it has its drawbacks. Firstly, it
doesn't cover well so I should have primed the tubes (another tin of paint...)
and my pencil marks show through above the fins. Also it's very 'dusty' and
doesn't stay on like other plastikote paints. This may in part be the tube
because I got a good finish with it on good A11MR tube. To cut to the chase, I
sprayed a couple of coats on the tubes and it looked fine with the paint
covering up and removing a lot of the damage from the tape (the fluffies just
brushed off). I sprayed the mid-section and balsa fins (which I merely sanded,
not filled and primed) with PlastiKote silver spray paint. At pad distance, it
looks good (IMHO).
For the
nose cone, upper body, and lower body tubes I used Plastikote fluorescent
orange spray paint. It's sure bright but it has its drawbacks. Firstly, it
doesn't cover well so I should have primed the tubes (another tin of paint...)
and my pencil marks show through above the fins. Also it's very 'dusty' and
doesn't stay on like other plastikote paints. This may in part be the tube
because I got a good finish with it on good A11MR tube. To cut to the chase, I
sprayed a couple of coats on the tubes and it looked fine with the paint
covering up and removing a lot of the damage from the tape (the fluffies just
brushed off). I sprayed the mid-section and balsa fins (which I merely sanded,
not filled and primed) with PlastiKote silver spray paint. At pad distance, it
looks good (IMHO).
The decals seemed like waterslide, but turned out to be not-so-sticky self-adhesive. You get a few black and red bands, a little viking in a horned hat, and 'NORIS' and 'Wikinger' decals. I've just notices that the 'NORIS' is gone as is one of the strips I put on the fins. Not very sticky.
I can cope with the quality of the kit (in retrospect, having flown it), but I feel many people would be disappointed, so it only gets 2 1/2. If only the tube was better, and the fins, and the MMT (perhaps that can be forgiven) and the coupler....
Construction Rating: 2 out of 5
Flight:
 Physics of flight recommend a D12-5, though the rocket is supposed to use a
German D7 motor. The box listed altitudes for A-D motors, needless to say 'A'
wasn't very high!
Physics of flight recommend a D12-5, though the rocket is supposed to use a
German D7 motor. The box listed altitudes for A-D motors, needless to say 'A'
wasn't very high!
For the first flight I removed the nozzle from a spent D12, glued in a motor block and friction fitted a C6-3 (Estes) into the case. I then had to use lots of masking tape to get the D12 to fit snug in the MMT - seeing as there's no motor block and the hook is flimsy I didn't want to chance it!
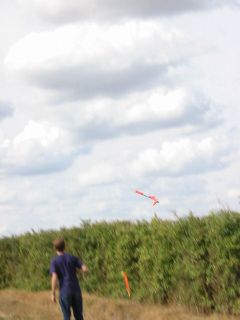
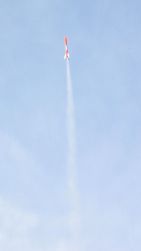
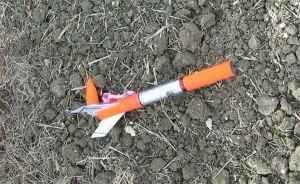
I used Estes wadding, rather than the weird "cotton wool" stuff that came with the kit. The rocket was 'padded up' on a standard Porta-Pad and looked pretty nice stood there. At launch the rocket left the pad straight and continued to fly straight all the way to apogee--the whole flight is captured as a series of still photos so I can see what went on. I estimate (based on sim too) the altitude as 400 feet or so--remember it's a fairly big rocket for a C6. At apogee the ejection charge fired and the parachute duly tangled itself around the back end of the rocket and failed to deploy.
However it came down fairly slow - the fins seemed to 'fly' the rocket, being quite large. The rocket hit the hedge next to the pad (6 feet away or so from the pad!) which slowed it enough that there was little damage. The paint on the fins got scratched and there's a few gouges in the balsa but nothing serious, just cosmetic.
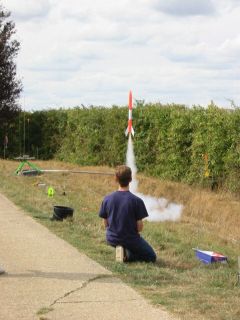
 The
next flight was much better. I decided to lob it on a D12-5, and packed the
chute differently so that only the shroud lines were wrapped around the chute.
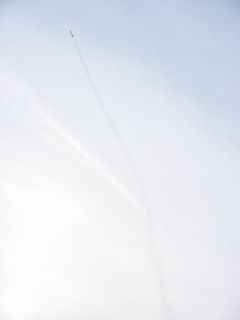
The boost was very impressive--straight and fast to about 700ft. The RSO
commented on the quality of the flight and this rocket certainly moves on a
D12. I seem to remember deployment at apogee and then a fair drift (the wind
had picked up a little). The chute looked odd during descent and I found it had
melted together in one place (I used the cotton wool stuff--not again!) but no
damage resulted from separating it. No damage was sustained to the rocket
either.
The
next flight was much better. I decided to lob it on a D12-5, and packed the
chute differently so that only the shroud lines were wrapped around the chute.
The boost was very impressive--straight and fast to about 700ft. The RSO
commented on the quality of the flight and this rocket certainly moves on a
D12. I seem to remember deployment at apogee and then a fair drift (the wind
had picked up a little). The chute looked odd during descent and I found it had
melted together in one place (I used the cotton wool stuff--not again!) but no
damage resulted from separating it. No damage was sustained to the rocket
either.
Third flight: This flight on a D12-5 followed 3 separations (including one ballistic recovery) in a row so I was announced as something suitably humorous on the PA for this flight. However it was perfect: straight, fast boost again following a slight weathercock. It was quite windy at this point compared to earlier and the rocket performed admirably, recovering undamaged. The parachute deployed properly this time, however I had more of a walk to recover it.
 All in
all a nice flier. It certainly would be interesting on E9s. Seems like a good
straightforward flier and easy to find with its retina-scorching paint!
All in
all a nice flier. It certainly would be interesting on E9s. Seems like a good
straightforward flier and easy to find with its retina-scorching paint!
Flight Rating: 5 out of 5
Summary:
PROs: Flies very nicely, seems to be fairly tough.
CONs: Poor instructions, poor quality tube, poor quality coupler, card fins, German size MMT, decals a little weak.
Overall Rating: 3 out of 5
 |
 |