Excelsior Rocketry Goonybird Iron Wombat (Plan)
Excelsior Rocketry - Goonybird Iron Wombat {Plan}
Contributed by Matthew Bond
| Construction Rating: | starstarstarstarstar_border |
| Flight Rating: | starstarstarstarstar |
| Overall Rating: | starstarstarstarstar |
| Manufacturer: | Excelsior Rocketry |
Brief:
The Iron Wombat is one of Excelsior Rocketry's "Goony Retro-Bash"
line of decal/plan sets. Fred Talasco at Excelsior has created a line of kit
bashes that are a throwback to the old Estes "Goonybirds". All of
Fred's designs are based on old Estes kits (in this case the Wolverine), or his
original ideas and use the Baby Bertha as the starting point.
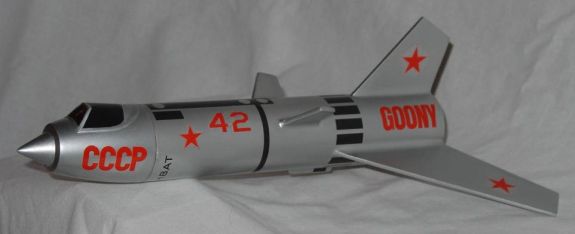
 The Iron Wombat is a slightly more challenging build than your standard 4FNC
because of the asymmetrical fin shapes and placements, an inlet style nose cone
that must be cut and pieced together, and a canopy that is shaped and formed
from a provided pattern sheet. Excelsior rates the Iron Wombat a skill level 3,
and while it is not the most challenging of Fred's Goony Birds, it requires a
bit of skill to finish properly.
The Iron Wombat is a slightly more challenging build than your standard 4FNC
because of the asymmetrical fin shapes and placements, an inlet style nose cone
that must be cut and pieced together, and a canopy that is shaped and formed
from a provided pattern sheet. Excelsior rates the Iron Wombat a skill level 3,
and while it is not the most challenging of Fred's Goony Birds, it requires a
bit of skill to finish properly.
Construction:
My Iron Wombat plans arrived from Excelsior in a sturdy priority mail envelope
with extra cardboard inserts to keep everything well protected. Included in the
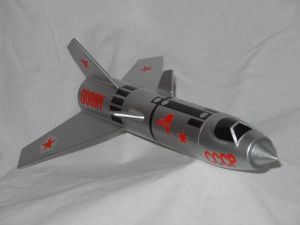
"plans" are the instructions with a nice color picture of the
finished rocket, the fin templates, tube marking wrap and canopy patterns
printed on a separate sheet of cardstock, and of course, the decal sheet, which
is the best part of the whole deal. The instructions and decals were packaged
in a sturdy plastic sheet protector as are all the decals that Excelsior ships.
The builder must supply the other half of the project which in this case
consists of one Estes Baby Bertha kit, some balsa sheet stock for cutting out
the new fins, and a NCB-60DW "Deuce's Wild" nose cone available from
FlisKits.
The provided instructions are actually a list of "exceptions" and are meant to be used in conjunction with the regular Baby Bertha instructions. The Iron Wombat is the fourth "Goony Bird" from Excelsior that I have built, so I had some idea of what to expect as I read through the plans. I was therefore surprised to find a couple of mistakes in the instructions. On every Goony Bird I have built, the instructions direct you to install the motor mount further forward, with the end of the engine hook even with the aft end of the body tube. The Iron Wombat plans did not mention this step at all. Additionally, the fin placement body wrap had one of the wing positions swapped with one of the canard positions, and finally the instructions direct you to place the canards with their leading edges 3" from the rear of the body tube, which would actually put them behind the leading edge of the wings. (They should be 3" from the front end of the body tube.) I fired of a couple of emails to Fred at Excelsior and he verified that the motor mount should be installed further forward, the fin marking guide was indeed incorrect, and the canard placement was incorrect. Now that I had all of the information I needed, I could get down to business.
The motor mount was assembled first and I upgraded the recovery system (as I do with all my rockets) by adding a length of Kevlar® cord which is tied around the engine mount, threaded through the forward centering ring, and glued in place. The motor mount was installed in the body tube, and as described above, pushed forward until the end of the engine hook is even with the end of the body tube. This puts the motor mount about 3/4" further forward than a stock Baby Bertha, and thereby moves the CG forward and provides better stability.
While the motor mount glue was drying, I traced and cut out the fins, which take the place of the standard Baby Bertha fins. There are 5 total fins in 3 different shapes on this rocket: a rudder, 2 wings, and 2 canards. The wings and canards were match sanded and in keeping with the stout/blunt theme of the rocket, I left all the fin edges squared off. The included tube marking wrap was used to set the fin location, and a length of aluminum angle stock was used to mark the fin lines. Along with the different fin shapes, the fin spacing is also non-standard. Unlike a standard 4FNC rocket, it matters which fins go where so some attention must be given to this process. I believe that with the necessary corrections the instructions will make this straightforward, and when all else fails, a quick look at the picture is worth a thousand words. My standard routine for attaching fins is to tack them on with Titebond wood glue, add a second wood glue fillet, and then a final fillet of Elmer's Wood Filler. The launch lug was attached in the same fashion per the standard instructions on the underside of the rocket, opposite the rudder.
The next step involved constructing the nose cone assembly. First, the balsa nose cone must be cut into two separate pieces. A 3/4" piece is cut from the tip and then another 1/4" is cut from the main part of the nose cone. The tip is then glued back on the main part of the nose cone creating a ramjet look. I mounted the nose cone in a scrap section of BT-60, using masking tape to get a very tight fit. I was then able to secure the assembly in a standard miter box to make the cuts. In hindsight I would recommend using a craft scale miter box and a saw with finer teeth since my standard setup produced very jagged cuts in the soft balsa. I was able to clean up both pieces with a bit of sanding and Elmer's Wood Filler. Once the two pieces were assembled, I sealed the nose cone with thinned down Wood Filler and sanded it smooth. The canopy was assembled from the provided pattern and there are actually two included on the sheet in case you mess one up. I assembled them both and picked the nicest one to glue on the nose cone.
Finishing:
The paint scheme for the Iron Wombat is a simple one color job, with Krylon
Aluminum being the recommended choice. The real impressive look for this rocket
comes from the decals. As with all of Excelsior's products, the color,
sharpness, and detail of the decal sheet is awesome. There is a lot of balsa to
be prepped on this rocket, and like the nose cone, the fins were coated with
thinned down Wood Filler and sanded smooth. Next came two coats of Rustoleum
Painter's Touch Sandable Primer, followed by two coats of Rustoleum Aluminum
spray enamel, working down to 400 grit sandpaper for the in between coat
sanding. For some reason, I have never had much luck with metallic paints, and
I have decided that there must be something different in the consistency which
causes my less than perfect results.
When you get decals from Excelsior they come with a full page of instructions for prepping, applying and finishing, and they recommend Microscale brand products (Decal-Set and Micro-Sol) for accomplishing the job. I haven't tried any of Microscale's products yet, having had good success with Testor's Gloss-Cote (#1216). First I gave the decal sheet 2 light coats of Gloss-Cote. Next the decals were cut out and applied with the standard warm water dip, slide into place, and blot dry routine. Excelsior's decals are a pleasure to use as they have just the right mix of thinness and tackiness. I did manage to tear one of the decals but only because I got in a hurry. After the decals had completely dried, I added a final spray of Gloss-Cote to the whole rocket. The finished product looks awesome and the Gloss-Cote seems to play nice with both the paint and the decals. I finished up the recovery system by attaching the elastic shock cord to the Kevlar® cord and then to the nose cone. Next I put drops of CA glue on all the knots. The 12" Estes parachute came pre-assembled, and I added a fishing swivel for easy attachment/removal and less tangling.
Construction Rating: 4 out of 5
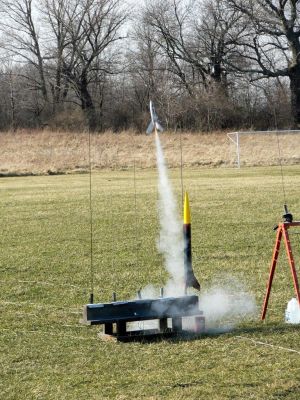
Flight:
My Iron Wombat has logged a total of 5 flights so far on a couple of cold and
blustery days in Ohio. Recommended motors are the standard A8-3, B6-4, and
C6-5. There isn't any published weight or CP for this kit, but my finished
Wombat weighed in at 1.5oz. Flight preparation is standard. With a BT-60 body
tube, I use a 4"x4" Nomex®
heat shield looped onto the Kevlar®
anchor cord. Even with the forward position of the engine mount, there is still
enough room for the heat shield and parachute to fit comfortably. As mentioned
earlier, the engine mount is located 3/4" forward in the body tube, but I
was still able to install and remove motors and igniters with no difficulty.
Motor retention is via the standard beefy Estes hook. The Iron Wombat has flown
once on a B6-4 and 4 times on C6-5s. The Iron Wombat is incredibly stable in
flight and will turn in arrow straight flight after arrow straight flight to
the delight of your local RSO/LCO. Even in winds approaching 15 knots, boosts
were straight up from the pad and only arc into the wind at the top of the
coast.
Recovery:
Straight boosts translate into perfect recoveries with the Wombat just stalling
out at apogee or tipping into the wind. All five flights have had good
deployments and the standard 12" Estes chute brought the Iron Wombat down
at a reasonable rate. All flights so far have recovered in tall grass and weeds
with zero damage. On the last 2 flights the Nomex®
heat shield did not eject from the body tube. The second time this happened it
turned out to be a blessing as the Kevlar®
shock cord was burned through just above the engine mount and it was only the
heat shield that kept the whole recovery system intact. There is something
appealing about a non-standard rocket boosting straight and true. While the
Iron Wombat may not win any altitude contests, it can certainly hold its own in
the "attitude" category. It's hard not to get cocky when you fly
perfect profiles every time off the pad.
Flight Rating: 5 out of 5
Summary:
Excelsior's line of "Retro Bash Kits" is a great throwback to the old
Estes "Goony Birds", either for those who thought they were cool then
or for people like me who think they are cool now. There is surely a
"Goony" for everyone, from simple 3FNC to much more challenging
projects, and of course the awesome decals make each one uniquely appealing.
PROs: The Iron Wombat is the favorite "Goony" in my fleet so far. The jet fighter look finished in goony style makes for a great combination and it flies beautifully. Everyone needs a Goony in their lineup. They are fun to build, fun to bring to the range, fun to fly, and fun to talk about!
CONs: The only downside to my Iron Wombat were the glitches in the instructions as outlined above, which will probably have been completely corrected by the time you read this review.
Overall Rating: 5 out of 5
 |
 |
Flights
|
|