| Construction Rating: | starstarstarstarstar |
| Flight Rating: | starstarstarstarstar |
| Overall Rating: | starstarstarstarstar |
Brief:
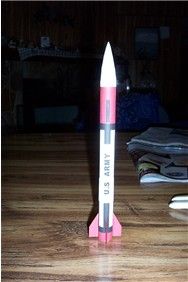
This is a FREE, all paper (cardstock) model of the Patriot missile, using a
streamer for recovery
Construction:
The entire rocket is constructed from a single sheet of cardstock. I used 67lb.
You have to supply your own shock cord, streamer material, and nose weight. The
rocket has 4 fins, and the instructions say it is a 1/22nd "fun"
scale model.
I used 30cm of 1/8" sewing elastic for the shock cord, flag tape for a
streamer (which is recommended on the High Flying Cards site), and modeling
clay for nose weight. Everything was obtained at Wal-Mart. I used only white
glue, scissors, and a hobby knife for the construction. There are 2 sets of
instructions; a highly detailed set of general instructions for building all of
the rockets, and then another set specifically for the rocket you want o build.
They are a bit tough to understand here and there, but I have built paper
models before. Since they are made of paper that I printed, I can make as many
of the rocket as I
 like and
it was no problem if I goofed up while assembling it. Everything fit as
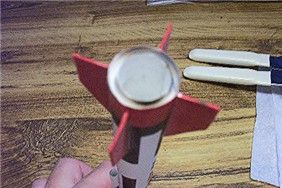
described, which was a surprise since it's all paper. The motor mount is fitted
by wrapping thin cardstock strips around the motor tube until it fit in the
body tube, so you have to be careful to check for fit. Too many wraps and you
have to pull a bit back off before the glue dries completely. The instructions
say wrapping the nose pieces backwards helps with the appearance but I built
mine normally. Doing the nose is rather tough though , as it is in 10 pieces
with the outer nose pieces being a bit large. The instructions mention to trim
as needed for a perfect fit. I was a bit skeptical of the construction, but
after 2 fillets on the fins and all the glue had completely dried, I was
impressed by how sturdy it actually was! The instructions give you a CG balance
point for the rocket and you just have to add weight to the nose until this
point is met.
like and
it was no problem if I goofed up while assembling it. Everything fit as
described, which was a surprise since it's all paper. The motor mount is fitted
by wrapping thin cardstock strips around the motor tube until it fit in the
body tube, so you have to be careful to check for fit. Too many wraps and you
have to pull a bit back off before the glue dries completely. The instructions
say wrapping the nose pieces backwards helps with the appearance but I built
mine normally. Doing the nose is rather tough though , as it is in 10 pieces
with the outer nose pieces being a bit large. The instructions mention to trim
as needed for a perfect fit. I was a bit skeptical of the construction, but
after 2 fillets on the fins and all the glue had completely dried, I was
impressed by how sturdy it actually was! The instructions give you a CG balance
point for the rocket and you just have to add weight to the nose until this
point is met.
Finishing:
It helps that the kit is pre-printed, although you have to be careful about
lining up the body tube. Unless you want to add a clear coat or touch up
something with a marker, there is no finishing. It's already done. This was
pretty cool! You do have to be careful about keeping your hands clean and how
you use the glue, so that you don't mar its looks. Clear drying is glue is
highly recommended.
Construction Rating: 5 out of 5
Flight:
The recommended motors only say 1/2A, A3, and A10, with no mention as to delay
time. The engines fit with the friction tape method. I used the Estes A10-3T
and 1 sheet of wadding for recovery. I didn't expect much as it was only a free
rocket, but I was surprised to see it fly not only straight but pretty high! I
almost lost site of it and couldn't see where the ejection happened.
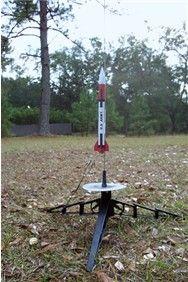
Recovery:
It came down a little fast but the paper held up perfectly and the only hints
of wear on the outside were a grass stain on the nose and a burn mark on the
rear. (The instructions recommend to put some epoxy on the aft end just because
of that, which I decided to skip.) I had not clear coated mine either.
Flight Rating: 5 out of 5
Summary:
I think this a really cool little rocket! It looks good and although not as
perfect as a rocket constructed of the more standard materials, it really looks
good and flies well! You can't beat the price--FREE! You can make as many as
you like so if you lose it or mess up in building, you just print out another
one and build it! (High Flying Cards Website is gone)
Overall Rating: 5 out of 5
 |
 |