| Construction Rating: | starstarstarstarstar |
| Flight Rating: | starstarstarstarstar_border |
| Overall Rating: | starstarstarstarstar |
| Manufacturer: | Shrox Industria  |
 Brief:
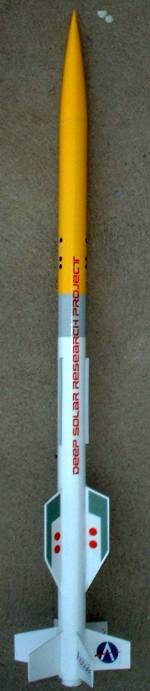
Designed as a "deep space explorer", this intriguing design features
9 total fins--6 on the end and 3 slightly forward. It can be down-sized to fly
on 24mm motors, but really lives up to the deep space exploration theme flying
on an F.
Construction:
- 29mm nose cone
- 29mm body tubing, 26", rugged enough to double as motor mount
- 3/32 basswood for fins
- Engine block
- Launch lug (1/8")
- Streamer (2x56 mylar)
- Recovery cord (I suggest 90-120 lb Kevlar® and 1/4" elastic)
- Decal file (can be downloaded from Apogees newsletter archive, #80)
Download the plan as a Rocksim file for free (RockSim is also available here on EMRR). It doesn't come with instructions, though the design is straightforward enough to build without them if you've got at least a skill level 2 amount of experience. You'll need to print out the fin pattern from the full version of Rocksim, as none is provided in the newsletter. Also, I highly recommed downloading the decals and printing them out on an inkjet (unless you know someone with a nice ALPS printer). The decals make the difference between a great-looking rocket and a "generic" rocket built from spare parts.
This was the first rocket I'd ever built with Six fins mounted around the diameter, which was a little challenging to achieve the proper alignment. I used the add-on software for Rocksim called "Fins Fun" which can read a Rocksim file and print out an alignment template/tube marking guide. It simplified this part of the build.
Construction was straightforward - install an engine block (I used a 24-29mm centering ring), cut out the fins, mount to the tube, glue on the launch lug, install the recovery device, and you're ready to paint.
Finishing:
I went with the Shrox scheme of yellow/white two-tone, after two coats of
primer. Allowing a couple of days to fully cure, I then applied the decals,
which I printed on my Canon Bubblejet using Avery clear label paper. The finish
isn't nearly as glossy and clear as water-slide, but at a cost of about $0.75
per page, it represents a decent alternative to most printers.
With the decals and glossy paint, this is a very nice looking rocket when complete.
Construction Rating: 5 out of 5
Flight:
Being a scratch build, I decided to start small with a D12-3 motor. It was a
windy afternoon (10-15mph), and the bird weathercocked slightly but still got
to an estimated 800 feet. The ejection was a tad early, and a D12-5 would be a
better fit. After a fine recovery, I put it back up on an Econojet F21-6, and
the flight was fantastic - much less weathercock, and well over 1200 feet.
Recovery:
For lower-power flights, a 12" or 18" chute might be better than a
streamer. After 4 flights, I broke one fin on impact. For F and above though,
streamer is the only way you'll ever get this back.
Flight Rating: 4 out of 5
Overall Rating: 5 out of 5
 |
 |
Flights
|
|