Shrox Industria Stonebreaker/AX (Plan)
Shrox Industria - Stonebreaker/AX
Contributed by Chan Stevens
| Manufacturer: | Shrox Industria  |

(Contributed - by Chan Stevens)
 Brief:
When the inevitable asteroid is tracking on a collision course with our planet,
this (hopefully) futuristic/fantasy missile is just the ticket. It's designed
to intercept and destroy the incoming rock. Single staged, this is a small step
up in complexity from your basic modroc, and a nice diversion from the more
common, everyday designs stocked in the hobby shops.
Construction:
- 24mm nose cone (plastic)
- BT-50 tubing, 11" long
- 18mm motor mount (BT-20 tube 2.75" + (2) 18/24 centering rings)
- 1/8" launch lug
- shock cord (30" of 110# Kevlar® recommended)
- 3/32 balsa or basswood fin stock (I used balsa)
- 24" parachute (see notes-streamer might be better idea)
- Decal sheet-download as jpeg file from e-zine archives
After downloading the Rocksim file and decal file, you're on your own to build this kit, as the free plan includes no instructions (RockSim is also available here on EMRR). Don't panic, though, as the design is not too difficult (I'd rate it a skill level 2.5). Start by gluing the centering rings on the ends of the motor tube, and while that's drying either print out fin templates from the full version of Rocksim or record the dimensions from the free version and draw your own templates. In addition to the 3 rear fins, there's a set of 3 guide fins mounted about an inch forward of the main fins. Cut the fins from balsa, and mark the BT-50 on 120-degree lines for 3 fins. By this time you should be able to glue the motor mount assembly into the BT-50. Follow up by tacking the fins with CA or wood glue, and apply fillets along the seams.
There's one "secret" in the Rocksim file that's not mentioned in the E-zine article or parts list--for stability, you'll need to add about 10 grams of clay nose weight. This is easy to overlook, and without it, you'd probably go unstable on anything more powerful than an A motor.
Once the fins are set, go ahead and install the recovery system (I immediately downgraded from the recommended 24" chute to a 12" chute).
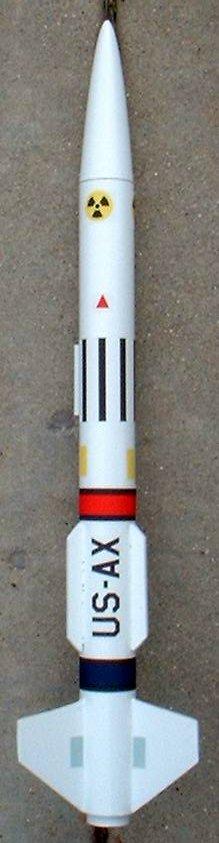
Finishing:
The rocket is very easy to paint, starting with two coats of primer and
following up with 2 finishing coats of glossy white. The colors come from the
decals, which I printed out using an inkjet printer on clear decal paper
available at office supply stores. The colorful decals make for a very nice
looking finished product.
Construction Rating: 4 out of 5
Flight:
There were no recommendations included in the Rocksim file (other than
out-of-production Apogee composite motors), so I tried a couple of simulations
and settled in on an A8-3 first flight, to follow with a C6-5. The A8-3 flew
straight, deployed just a hair early, but was otherwise fine. The rocket
drifted a long ways, though, under the 12" chute and 10-15 MPH winds. I
decided not to venture into C's that day, but have since switched to a 24"
streamer, and not suffered any damage, even from the lofty altitudes achieved
with a C. I can't imagine flying this with a 24" chute, unless you're into
rocketry for the aerobatics.
Recovery:
With the clay nose weight, and smaller chute or streamer, this is an excellent
flyer.
Flight Rating: 4 out of 5
Overall Rating: 4 out of 5
 |
 |