Brief:
The Pogo was an experimental tail-sitting VTOL aircraft from the 1950s. It actually flew but never made it into
production. I had a model of it as a little kid and always liked its unique look. I recently found they are once again
available. I got mine from
Historic Aviation but have since seen that my local hobby shop has them.
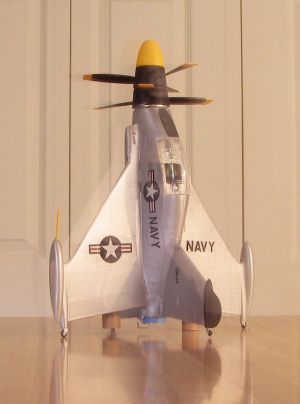
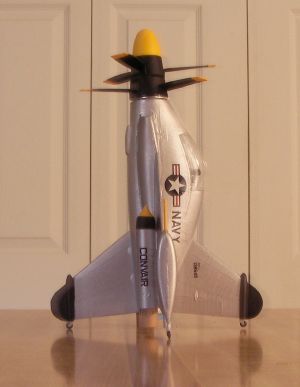
This airplane is an obvious subject for PMC since it is largely 4FNC. The main challenge is the model's weight (including the requisite added nose weight).
TRF's Micromeister has converted this kit so I had a good source of advice. His flies on C5s but is too heavy for a C6. I didn't want to design for an OOP engine so another member, uncle_vanya, suggested under-wing 13mm boosters. I liked this idea and originally thought I'd use three 13mm mounts. Although it seemed that three A10Ts would be enough, I eventually took Micro's advice and went for a central 18mm motor with the two 13mm outboards.
You can see a Pogo in flight on YouTube and there are more photos of this and other tail-sitters here.

Modifications:
The first basic mod was to grind the front and back of the body to accommodate the BT-50 parachute tube and the 18mm
motor mount. A Dremel grinder did the job nicely.
Knowing that I was going to have to add nose weight, I decided to replace the plastic propeller shaft, gears, and retainer rings. I used a 3/16" x 2.5" eye bolt as the shaft. The propeller hubs are spaced with small washers and held in place with nuts. The loop of the eye bolt is inside a piece of a used 24mm motor case and epoxied to a large metal washer. The case forms the nose's shoulder and the washer both aligns the eye bolt and keeps the nose from slipping into the tube. This design allows the propeller sections to spin freely on boost and all the weight is supported by the eye bolt. I locked the nuts with Loctite. For some added weight, I also screwed a twist-on lead fishing weight with its rubber grommet removed onto the shaft of the eye bolt.
The 13mm mounts consist of 13mm tubes, engine blocks cut from a spent casing, and the ramjet-style cones. Yeah, I know, ramjet boosters don't belong on a propeller-driven plane, but I like their looks nevertheless.
Construction:
Parts list:
- Lindberg 1:48 Pogo model
- BT-50
- Estes 18mm MMT (tube, engine block, clip, clip retainer)
- BT-5
- Two Semroc BNC-5BA ramjet-style cones
- Spent 13mm motor case
- 3/16" x 2 ½" eyebolt with nuts
- Mini washers
- 1" dia washer
- Spent 24mm motor case
- Twist-on fishing weight with rubber grommet removed
- Thin Kevlar® twine
- Two 12" plastic chutes
 The basic plastic model, excluding the access ladder, consists of 18 parts. The plastic
components were assembled with plastic model glue.
The basic plastic model, excluding the access ladder, consists of 18 parts. The plastic
components were assembled with plastic model glue.I used as long a piece of BT-50 as would fit. The Estes 18mm mount is epoxied to the side of the BT-50 and spaced so it's flush with the end of the Pogo's body. The retainer clip was offset to fit in the large space on the side of the Pogo's tail and was bent so it didn't extend below the wheels. What good is a tail-sitter if it can't sit on its tail? A 3' piece of Kevlar® twine is attached though the BT-50's wall and around the 18mm mount. I used SuperFil light epoxy filler to fill the gap between the two tubes and also to smooth the transition between the plastic body and the motor tube.
Adding the BT-50 meant the wing tabs had to be trimmed down. I did this with a Dremel outfitted with a thin diamond cut-off wheel. I used plastic cement on the plastic-plastic bonds and 5-minute epoxy where the tabs touch the BT-50.
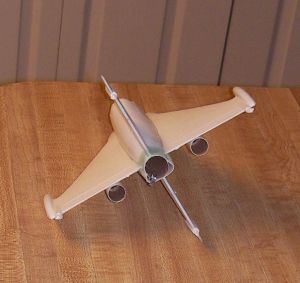
To attach the booster assemblies, I cut channels in the lower wing and attached them with epoxy.
I iteratively built a RockSim model, tweaking the expected weight and CG as I went. The body of the Pogo is modeled as a simple tube and the protruding cockpit section as a single thick fin. The propellers themselves are not accounted for. The model says the CP is right where the leading edge of the dorsal fin meets the body. I also didn't really model the side pods, but rather just converted the central 18mm mount to an in-line cluster.
Flight and Recovery:
The nose and body each come down separately on their own 12" plastic chute. Packing wadding and the recovery
components proved challenging. The nose section's chute went in first to help make sure the body's chute came out.
Given so little space to pressurize, I'm not sure this is a concern.
I loaded a C6-3 and two A10-PTs. The flight was a little wobbly and the two chutes snarled badly. Neither opened but the only damage was one decal and the wing-tip antenna. In other words, a successful flight!
Summary:
This is a perfect subject for a PMC in that it basically has four fins and a nose cone. The challenge is that there
isn't much room for the motor mount, chutes, and nose cone shoulder. I love the Pogo and was very happy the way the
outboard mounts look. A C6 + 2 x A10 combo worked well enough and a composite 18mm 'D' would rock!
 |
 |