| Published: | 2010-11-13 |
| Manufacturer: | Polecat Aerospace  |
![[Picture]](/images/archive/images/ratings/rating_skunk_spike.gif) (11/21/03) Polecat Aerospace (formerly Skunk Works Rocketry) was another company I just
learned about this year. I don't know how long they've been around, but as I've
talked to others they seem to have some following. Polecat sells BIG
rockets. Big rockets carry a big price, so some of their kits may be out of
reach for many fliers. They do, however, have one kit with "Level 1
Certification in mind". Spike.
(11/21/03) Polecat Aerospace (formerly Skunk Works Rocketry) was another company I just
learned about this year. I don't know how long they've been around, but as I've
talked to others they seem to have some following. Polecat sells BIG
rockets. Big rockets carry a big price, so some of their kits may be out of
reach for many fliers. They do, however, have one kit with "Level 1
Certification in mind". Spike.
 The 3" diameter, 36" tall Spike is
$89.95. Does that seem expensive for a rocket this size (not to mention that it
doesn't come with a parachute)? What drives the price of this rocket up? Polecat
says this, "All our kits come pre-fiberglassed for you. Just sand
and paint! All our kits include fiberglass nose cones that are durable and easy
to finish. Our kits use Baltic Birch fins and centering rings. They are easy to
glue, light weight, durable, and easy to finish. All our fins come machined for
minimal sanding." Me? I wanted to try a fiberglassed kit and I had no
desire to learn how to do it, so I purchased their Spike.
The 3" diameter, 36" tall Spike is
$89.95. Does that seem expensive for a rocket this size (not to mention that it
doesn't come with a parachute)? What drives the price of this rocket up? Polecat
says this, "All our kits come pre-fiberglassed for you. Just sand
and paint! All our kits include fiberglass nose cones that are durable and easy
to finish. Our kits use Baltic Birch fins and centering rings. They are easy to
glue, light weight, durable, and easy to finish. All our fins come machined for
minimal sanding." Me? I wanted to try a fiberglassed kit and I had no
desire to learn how to do it, so I purchased their Spike.
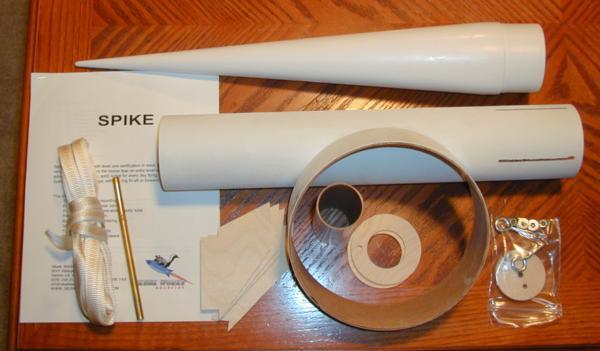
The rocket kit includes a 3" pre-fiberglassed, pre-slotted airframe that is 17" long. It uses a 6.5:1 conical fiberglass nose cone. It also includes four baltic birch fins and two centering rings, a 38mm motor mount, and a 7.5" pre-fiberglassed ring-fin that is 2" wide. There is a nose cone bulkhead and eye-screw hardware for attaching the 18 foot 5/8" wide tubular nylon shock cord to the nose cone base and the upper centering ring. Lastly it includes a 6" long brass 1/4" launch lug.
CONSTRUCTION:
The instructions are printed on 6 pages of 8½ x 11" paper. There are color photos throughout to assist in the assembly of the kit. There are pictures of the rocket being assemble in fin-up or fin-down configurations. The Spike is really a simple rocket to assemble, so for those with experience the instructions are really nothing more than a guide.
In building the kit, I had a number of observations that I'd like to make.
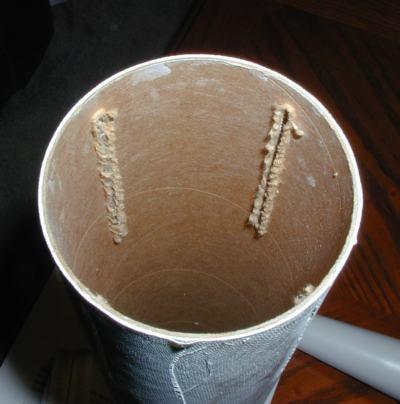 First, the slots that were pre-cut into the body tube
were not clean on the inside of the body tube. At first glance I figured that
would cause some fit problem with the centering rings, but, it didn't. The
centering rings were not a super-snug fit and slid into the body tube and
through the frayed edges without an issue.
First, the slots that were pre-cut into the body tube
were not clean on the inside of the body tube. At first glance I figured that
would cause some fit problem with the centering rings, but, it didn't. The
centering rings were not a super-snug fit and slid into the body tube and
through the frayed edges without an issue.
The next observation was the fiberglass nose cone. I really liked the feel, weight, and surface of the nose cone. On the inside, you could see the fiberglass fibers, but the outside was smooth. There were some mold seams, but nothing more than you would see on a plastic nose cone. You do have to glue the nose cone bulkhead into place. This is done after attaching the eye-screw to the bulkhead and tieing the tubular nylon shock cord to the eye-screw. This has to be done before because the bulkhead is glued about half way into the nose cone.
The fins are through-the-wall and to-the-motor-mount. They we cut accurately. I used polyurethane glue on the root edge to attach them to the motor mount. I used epoxy for all other areas.
Not having any experience with a fiberglasses body tube, I'm not sure if my next observation is normal or not. What I found is that the fiberglass on the body tube and tube ring was rough. It was as if the fiber-mesh was not completely filled with epoxy. I made a decision to "fill" this with Plasti-kote Sandable Primer/Filler. It is my favorite primer, but this rocket alone took about 1 1/2 cans to completely fill all the fiber-mesh. This was about 6 coats, sanding between each coat!
Seeing the mesh, I made the decision to get every thing primered (and smooth) before attaching the ring-fin. I felt this would make the sanding easier and believe that it did. After those many coats of primer, I sanded the outer edge of the fin and roughed up the inside edge of the ring-fin where it would be attached to the fins. It slide in place with no problem and was glued using epoxy.
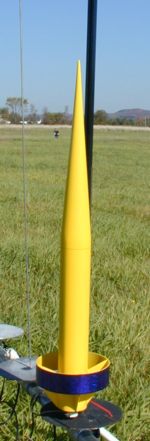
I then did about two more coats of primer to clean up this area and few other little problem spots. I finally used Krylon bright yellow paint to finish the rocket. I added a layer of Book Covers, etc. Prismatic Purple Book Cover on the ring-fin to finish it off.
I skipped the brass launch lug and added two Rail Buttons for this rocket.
Overall, for CONSTRUCTION I would rate this kit 3 points. The instructions are adequate to allow most builders to have a successful build. The rocket build is straightforward. The kit lacked decals and motor retention and a parachute. For most, self included, not having a parachute is fine since we seem to acquire a number of them over the years.
 FLIGHT/RECOVERY:
Polecat recommends the use of a G motor for the first flight. Then anything you want up to 300ns average thrust. They warn that anything higher than that may destroy the ring-fin.
Polecat recommends a 24" to 30" parachute. I used a B2 Rocketry Classic II 24" 'Chute. I also added a piece of Pratt Hobbies Heat Shield.
After adding a PML 38-29mm motor adapter, the rocket is ready to fly and weighs in at 2 lbs 3/4 ounce. I had to write Polecat to find out where the CG should be. They indicated with the fin-up design it should be at least 2" above the top of the ring-fin with motor. I had no issue with the two motors I used.
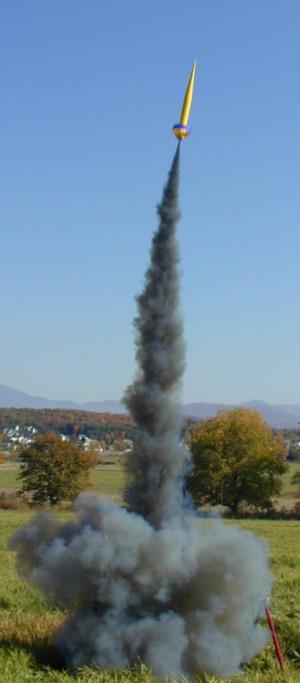
My first flight was on a G80-7. I didn't get to sim this prior to this flight, but based on experience with my BSD Diablo, the G80-7 seemed to be an okay match. The motor chuffed about 4-5 times before coming up to pressure, however, lift-off was nice on the rail. The rail was set straight up and down but after clearing it, the rocket stood a slight angle upward. It arced over and started down. The crowd and I all started muttering words as it gained speed. Finally, pop and jerk, it came under 'chute. The B2 held together with no damage. The rocket finished its descent and was recovered. I notice a small dent on the lower edge of the ring-fin, but nothing substantial.
I loaded it up again with a 29-180 G75-M (6). Based on the first flight, I probably should have been searching for a short delay. The rocket came off the pad with a bunch of black smoke and again took a slight angle. Weird. It arced over and again, I was fearful of a ballistic recovery. However, the ejection charge did fire and again the B2 'chute handled the recovery speed. The rocket looked so nice as it drifted off and out of the field until I heard "crash". I thought for sure it hit someone's car. Instead, I found that it hit someone's outdoor fire pit (made of brass). No damage to their fire pit. A broke tip on my nose cone and the adapter got pushed into the 38mm motor mount, cracking the bottom edge. And worse, my 29-180 motor kicked out somewhere!
So the rocket looks cool. The recovery system has handled stress well. And the "G" motors are do'able if you use shorter delays. The only thing that really bugs me is how it seems to take a slight angle coming off the pad. It may imply that I need a longer launch rod.
For FLIGHT/RECOVERY, I would rate this rocket 4 points. After adding your own parachute and heat shield, the rocket is ready to fly. It looks nice on the pad and in the air. Watch your motor sizing (I have since RockSIM'd it and it indicates the 7 second delay would be good). The ring-fin is subject to some damage, but the unique look is worth the risk.
I give the rocket an OVERALL rating of 4 points. To get some experience with fiberglassing (without having to fiberglass) and to have a unique looking rocket, the Spike is a good choice. You'll get comments at the launch because of that long nose cone and ring-fin. Don't make this your first mid-high powered rocket, but certainly consider it after building a few others.
 |
 |
Flights
|
|
|
|
D.W.K. (January 8, 2004)