| Construction Rating: | starstarstarstarstar_border |
| Flight Rating: | starstarstarstarstar_border |
| Overall Rating: | starstarstarstarstar_border |
| Manufacturer: | Pratt Hobbies  |
 Introduction:
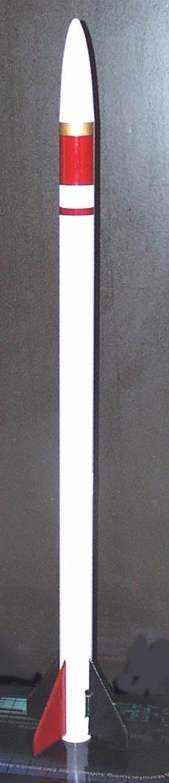
The Pratt Hobbies D region Tomahawk is a sport scale model of the NASA sounding rocket. It gets it's name from the D-Region of the ionosphere, which is about 75 to 95 km above the earth. This rocket is still in use by NASA to send instrument payloads into that region for scientific study. The finished rocket is just over 26 inches tall and has the distinction of handling 18mm, 24mm, and 29mm rocket motors through the use of the adapters provided with the kit.
Construction Rating: 4 out of 5
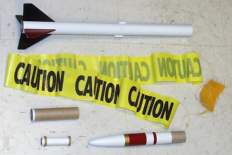
The kit arrived in the familiar clear plastic bag with no shipping damage to any of the parts. The body tube is considerably stiffer than your standard Estes tube, as it is designed to take the force of a "G" motor. There are various lengths and sizes of tubes for the body and motor mount adapters, Centering rings, a plastic pre-weighted nose cone, Kevar shock cord, Nomex® cloth heatshield, streamer material, a self adhesive decal, and fins laser cut from "Lite Ply" plywood. The fins are especially nice, being light, strong, and all cut exactly the same. This saves time in the finishing of the fins.
The instructions come on two sheets of yellow paper stapled together. There are few illustrations and they rely on the text to guide you through the construction of the kit. This is fine since this is not a beginners rocket kit. The instructions need to be read carefully, so as not to miss any of the steps, as there are sometimes several steps grouped together. The instructions are laid out in a logical order, and there is one template for fin alignment on the body tube.
The construction of the Tomahawk is fairly easy and straight-foward. There are no tools needed, only glue, tape and sandpaper. The kit is basically an 18" body tube with four fins, and a shorter upper body tube that attaches to the nose cone. At the junction of the two body tubes is where the rocket comes apart for recovery. They have a unique method for attaching the fins to the body tube that works extremely well. I was skeptical at first, but had to try it since it was in the instructions. They apply glue to the root of the fins, touch it to the body tube, and then remove it and set it aside. Once all of the fins are done this way, then another layer of glue is applied to the fin and the attachment to the body tube is remarkable quick and strong, so quick, you can do all four fins in a matter of minutes with white glue. The instructions give you the option of sanding a sharp edge on the fins. Do this as it improves the looks of the rocket and the Lite Ply hold the sharp edge sanded into it. The instructions call for mounting the nose cone on the nose cone shoulder, but that was already done in this kit. The nose cone and the shoulder are pre- assembled, weighted, and filled with expanding foam to keep the nose weight in place. Unfortunately the nose cone was not on straight when the kit arrived. One call to Pratt Hobbies and a replacement was in the mail, now that's great service. I then experimented with the crooked nose cone. I ran a sharp knife blade around the base of the nose cone and separated it from the shoulder. The two parts stayed together since the expanding foam was still intact. I then took the upper main body tube and the nose cone, ran liquid styrene plastic cement (the type that comes in a bottle with a brush) around the base of the nose cone. Before that set, I then glued the nose cone and shoulder into the upper main body tube and held it together until the glue set. This worked very well, as the nose cone was now glued to the shoulder as well as the upper body tube, and also aligned properly. The kit also includes two sizes of launch lugs, 1/8" and 3/16" for low power and mid power motors. I attached both to the rocket for future versatility. The motor mount adapters are simple to construct, and you have the option of leaving them loose or gluing them in place if you only intend to use one size motor. There are instructions for both methods with the kit. The rocket is very strong when completed, it has to be to survive the kick of a "G" motor.
The instructions on finishing the rocket are brief and to the point. The rocket is white, three fins are black and one red. The self adhesive decal is then applied to the top of the rocket and you are done. I did not like the color saturation of the decal, it looks like an Avery label that is fed through an ink jet printer, so I masked and painted the stripes on the top of the rocket as well. This takes a little longer, but the results are worth it. The final result is a sharp looking rocket that looks very close to pictures I have seen of the real thing.
Flight/Recovery Rating: 4 out of 5
 The recovery method for the Tomahawk is by
Streamer. The kit comes with a four foot long three inch wide section of yellow
plastic "CAUTION" tape, the type seen at construction sights. The
Kevlar® shock cord is also four feet long, and attached to the body tube coupler
in the nose cone section. The attachment to the lower section is by tying the
cord to a section of body tube approximately one inch square with a hole in it,
and then gluing that into the lower body tube. Be sure to bow the mount
outwards since one side will not touch the wall if you don't. On the cord is
threaded a piece of flameproof yellow Nomex® cloth. This is a nice feature that
eliminates the use of wadding, and the risk of fire as well.
The recovery method for the Tomahawk is by
Streamer. The kit comes with a four foot long three inch wide section of yellow
plastic "CAUTION" tape, the type seen at construction sights. The
Kevlar® shock cord is also four feet long, and attached to the body tube coupler
in the nose cone section. The attachment to the lower section is by tying the
cord to a section of body tube approximately one inch square with a hole in it,
and then gluing that into the lower body tube. Be sure to bow the mount
outwards since one side will not touch the wall if you don't. On the cord is
threaded a piece of flameproof yellow Nomex® cloth. This is a nice feature that
eliminates the use of wadding, and the risk of fire as well.
Be sure that you read the instructions on prepping the Tomahawk for flight. The adapters are tricky and the heatshield needs to fill the body tube and protect the bottom of the streamer. The motors that you can use sound like a laundry list of available motors on the market! The only ones missing are those from Apogee Components. The ones that Pratt has flown during testing are; 18mm: Estes A8-3, B6-4, C6-7, Aerotech RMS C6-7, D13-7, D24- 10T, and E27-4T, 24mm: Estes D12-7, Aerotech E15-7, F24-10, Aerotech RMS D15-7T, E18-7, E28-7 and F12-5J, 29mm: Estes/NCR Dark Star F52-7, Aerotech Econojet G35-7, Aerotech RMS F22-5J, F40-10, F52-11, G33-7J and G64-10. What a list! The stability of a higher power rocket is of concern, so Pratt has included the Center of pressure measurement for this rocket. If you are using the larger motors, you will want to verify stability before you launch. Heavier motors may require extra nose weight to move the center of gravity forward past the center of pressure. All motors are retained using friction fit.
Since I wanted to see how this model flies on the lower end of motors I tried an A8-3 first. There was a slight breeze and the Tomahawk weathercocked into the wind easily. The ejection charge fired halfway back to the ground, sending the motor mount out the rear and the streamer, thankfully, out the front as well. I would have hated to have this rocket become a lawn dart on the first flight. The altitude could not have been more than 100 feet. The next motor I tried was the venerable C6-5. This was better, as the rocket went to an altitude closer to 300 feet. Unfortunately it also weathercocked and was heading down when the ejection charge went off. Momentarily the rocket was tangled in the streamer and then it freed itself and dropped tail first. Unfortunately it landed in a parking lot and one of the fins took the brunt of the force. There was a 1/2" square section of the fin that shattered. I fixed the fin by gluing a piece of balsa to the fin and sanding it into shape. This will not be nearly as strong as the Lite Ply fin, but it looks better. By the way the pictures were taken after the repair.
A few observations on the small engine performance are in order. Since this is a nose heavy rocket, that weathercocks easily on small motors, launch the Tomahawk with the wind, not into the wind. This will allow the rocket to be closer to vertical when the ejection charge fires. Also the Tomahawk comes down rather fast, do not launch it over a parking lot or hard ground, as it will damage the fins on landing. Make sure that you carefully read the instructions on the motor mount adapters. I missed a step which caused me to try to friction fit one too many adapters, which was responsible for the motor mount being ejected on the first flight. Finally, the bigger motor the better. The "C" worked much better than the "A", and I am sure the rest of the alphabet will be even better. If you do decide to use the larger motors, make sure that you use plenty of tracking powder, and have the recovery crew standing by.
Overall Rating: 4 out of 5
Everything considered this is a rather unique rocket. The parts are of high quality, the selection of motors is vast, and the kit looks great when finished. I do not suggest the lower power motors, as they do not allow this rocket to really fly, but it would be a great demonstration rocket to show the relative powers of a large variety of motors. Considering the price ($12.95 last I looked), the quality far exceeds the cost. Add the ability of the Tomahawk to fly on any motor from 18mm to 29mm, you will be able to fly it under any circumstances, the excuse "I don't have the right motor" will not work on this rocket! The main detraction is that the instructions could be clearer, one extra sheet would make a world of difference, and the small motors are marginal in their performance. Other than those two nits, this is a great kit for the experienced builder that would like to "ease into" mid power rocketry.
Other Reviews
- Pratt Hobbies D-Region Tomahawk By Howard Bernstein
I purchased this kit because of the wide variety of motors it can handle (A-F, 18mm, 24mm and 29 mm), and because it had a streamer recovery. I fly from smaller fields and want my rockets to come down rather straight. The D-Region Tomahawk is a 7.2:1 scale model of a NASA sounding rocket (whatever that is). I like the way it looks. Construction I thought the ...
 |
 |
Flights
|
|