| Construction Rating: | starstarstarstarstar_border |
| Flight Rating: | starstarstarstarstar_border |
| Overall Rating: | starstarstarstarstar_border |
| Manufacturer: | Public Enemy  |
Brief:
Public Enemy Rockets has produced their Gladiator kit in two different sizes. The full size 4" version and the
"baby" 3" version. The 3" Gladiator flies on 29mm motors and Public Enemy claims will fly in the
F-H motor classes.
Construction:
With the Peter Graves line from Airplane!, "So, Joey, do you like gladiator movies?" ringing in my
ears, I ordered my Gladiator kit from Discount Rocketry. The kit shipped directly from Public Enemy and arrived with
all the components in good condition and accounted for. The parts included with the kit are:
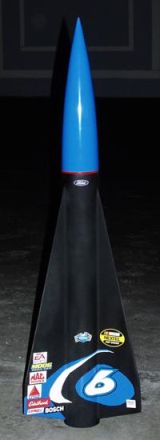
- 1 3" x 24" Public Enemy yellow body tube
- 1 29mm motor tube
- 1 RRW heavy duty nose cone
- 2 press board centering rings
- 3 HUGE 1/8" plywood fins
- 2 1/4" brass launch lugs
- 1 48" nylon shock cord
- 1 30" nylon parachute
- 1 "Gladiator" vinyl decal
As high power rockets go, the Gladiator is fairly straight forward. The build starts with gluing the centering rings to the motor mount. I opted to not glue on the rear ring initially. While I was waiting for the epoxy, I marked and cut the fin slots. After the epoxy had cured on the forward ring, I bonded the shock cord on the motor mount. When this too had set, I inserted the motor mount assembly into the airframe, being careful not to block the fin slots with either the rings or the shock cord. I had put tabs of masking tape on the rear ring prior to sliding the motor mount in to the tube so now I was able to pull the rear ring back out allowing access to the space between the rings and the root edge of the fins.
With this much fin, I wanted to make sure that they were stuck on very well. After epoxying the fins to the motor tube, I tacked them in place with gap filling super glue. The root tabs on the fins do not extend all the way to the front tip of the fin, so I took extra care to make sure these were tacked straight on the outside of the airframe. I applied heavy epoxy fillets between the fins and the motor tube as well as to the inside and outside joints of the fins through the body tube. After the filleting was complete, I glued the rear ring to which I had added T-nuts for motor retention back into the rear of the rocket. I then glued the launch lugs into the seam along the edge of one of the fins. Finally, I attached the shock cord to the nose cone and quick linked on the parachute.
Finishing:
I tapered the leading and trailing edges of the fins and sanded and filled the plywood and the tube spirals. I
sprayed down the whole model with a heavy coat of Kilz primer and sanded it down again.
Going with the "gladiator" theme, I decided to use Rustoleum Hammered Finish bronze with copper accents. I was quite pleased with the results of my careful masking and painting. I completed the look with red pin striping tape the and silver vinyl "gladiator" decals.
The final step of finishing the Gladiator was to make sure the CG matched the instructions. It took several ounces of shot in the nose cone to get the balance point to the manufacturer's recommendation. The total weight of the nose cone with ballast was 18 ounces on my model.
Construction Rating: 4 out of 5
Flight:
I was very excited to fly my new show piece! I decided to go for the gusto and not wimp out and fly a
"little" motor to start with.
I loaded up a Aerotech H165 Redline. I love this motor! Lots of "oomph" and that pretty red flame! I knew it would be a perfect fit for the Gladiator.
I built the motor and loaded it into the rocket, holding it in place with bolts and mirror clips. I dumped in several handfuls of dog barf wadding and inserted the nose cone.
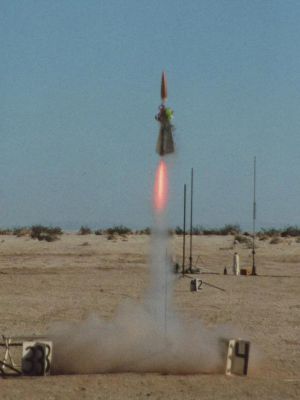
I loaded the rocket onto the pad and turned my flight card into the RSO and waited at the controller for the LCO to call my shot. When I came up in the queue, the LCO counted down my launch and I hit the button. The Redline flashed to life and the gladiator shot up the 6 foot rod. Right at the top of the rod, it seems that hot gas bypassed the delay element and ignited the ejection charge! The heavy nose cone flew free and whipped the rocket into several ground level loops, zippering the airframe about 3" and chipping the front edge of one of the fins! Unbelievably, this was the only damage! Not bad for thin ply and an unglassed cardboard tube!
Recovery:
I was quite pleased that the recovery system held up to the unexpectedly sudden ejection.
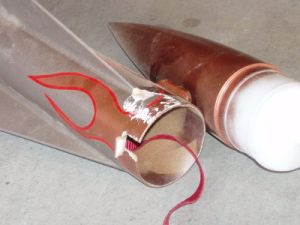
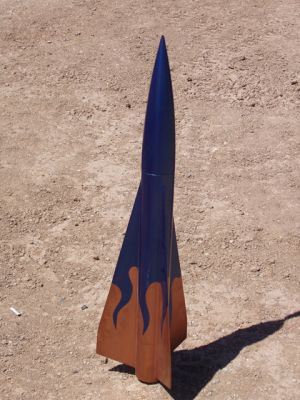
Using a section of body tube and fiberglass, I patched the zippered area and built up the fin tip with Bondo. The rocket got a fresh paint job. Copper with metallic blue flames with red pin striping.
The Gladiator's second flight was much longer that its first. I again loaded up a H165R. The rocket shot off the pad and arced over the top. Ejection was a couple of seconds after apogee. Upon recovery, I was horrified to see that my patch had ripped off the top of the tube!
Again, I repaired the airframe, deciding that this would be the last time. This time, I wrapped the fiberglass all the way around the tube. This time after the repair, I painted the Gladiator as an entry into the EMRR NasROC contest. I am pleased to report that several flight are now under the Gladiator's belt with not further flight damage!
Flight Rating: 4 out of 5
Summary:
The Gladiator is a distinctively styled design that goes beyond 3FNC by stretching the fins nearly the length of the
rocket. While the rocket by no means is "stubby", it has that appearance from the length of the fins!
I was initially concerned about the pressboard centering rings, but they have held up surprisingly well. The components of the kit are very good quality. I'm not sure that I would want to try and fly the kit on the smaller F motors that Public Enemy says can be used with all the nose weight that was required to match the recommended CG.
Overall Rating: 4 out of 5
 |
 |
Flights
|
|