| Construction Rating: | starstarstarstarstar |
| Flight Rating: | starstarstarstarstar |
| Overall Rating: | starstarstarstarstar |
| Manufacturer: | Qmodeling  |
Brief:
The Estes Rogue on steroids! Same great looks but little chance that you can fly this one from your local athletic
field. I won this for participating in an EMRR contest and started building it immediately. This is my third Rogue, the
first being a BT-55 upscale and the second a 1:1 clone.
Construction:
The parts list:
- Nose cone
- Nose cone plug
- Eye hook
- Body tube
- 4 laser cut fins
- Kevlar® shock cord
- Parachute heat shield
- Nylon parachute
- Launch lug
- Forward centering ring
- Engine mount tube
- 4 fin braces
- 4 engine mount rings
- Thrust ring
- Rear centering ring
- Engine hook
- Snap swivel
- Decal
- "33" stencil
I'd seen and heard of the incredibly impressive laser cut engine mount that is the heart of a Q-Modeling kit, and as a result, felt a bit intimidated when I opened the bag. That lasted about as long as it took to read the instructions. While it looks like an incredibly complicated puzzle, it really isn't quite that demonic if you take the time to identify the pieces and pay attention to how they fit together. That said, the finished mount is almost a modern art piece, and the way that they allow the fins to line up is inspired engineering indeed.
Finishing:
The amount of finishing required to ready the completed Rogue for painting was minimal. Tube spirals and wood grain
were nearly nonexistent, so both the body tube and fins were treated with a coat of Valspar primer and a quick hit of
thinned Elmer's Fill 'n' Finish. After sanding I re-primed the rocket using white primer then sprayed the fin can area
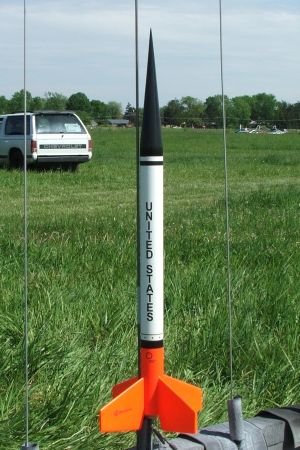
with several coats of my aged, no-name fluorescent orange. When this had dried I masked off the fin can and sprayed the
remaining body tube with Valspar gloss white and the nose with Valspar gloss black. Decals completed the look, and with
the exception of the almost invisible "33" decal, they look great. (My kit came with a mask to paint on the
"33", but I have yet to give it a try.)
Construction Rating: 5 out of 5
Flight:
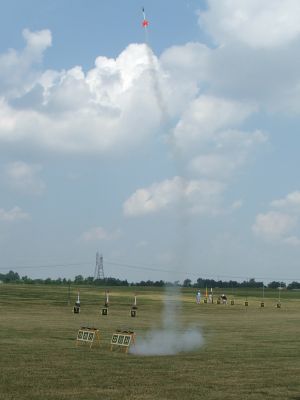
My first flight with the big Rogue was interesting in that for a moment it looked like it was going to be the last
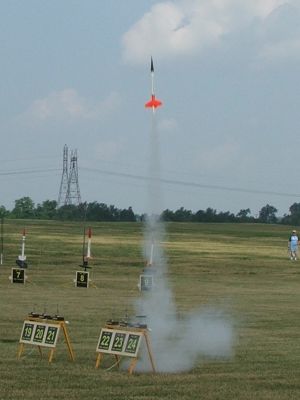
flight. The Estes E9 is a great motor for this rocket, and for the first flight I opted for an E9-8 because that was
all that I had in my range box. (The folks at QModeling recommend an E9-4.) The comparatively slow liftoff and long
burn of the E9 is perfect for this rocket and the extra four seconds allowed the rocket to take a nose down attitude at
ejection. Everything about the flight had been perfect up to that point but then things changed. There are two major
rocket killers in the VOA: the access road, to which I have lost several rockets, and the Rocket Eating Tree, to which
I have yet to lose a rocket. That looked like it was going to change because my Rogue was falling directly at the tree.
Short of a .50 caliber machine gun there was little I could do except watch the slow descent of the rocket as it
drifted to its death. Then a miracle occurred. It missed the tree. There was much rejoicing.
No one was more shocked than I was. At the last moment the wind stopped and allowed the Rogue to drop straight to the ground instead of following its previous path high into the branches of the tree. Clearly I had done something to make a rocket deity smile upon me. This happens so seldom that I decided to make a second flight.
Flight #2 was with another E9-8 and was a carbon copy of the first, except that the recovery flirted with the other great rocket killer, The Path of Eternal Peril. The Rogue landed within two feet of the path, and I decided that I had pushed my luck with the rocket deity enough for one day.
 I have since flown it on Estes E9-6's exclusively, with one flight being perfectly unremarkable except
for a long recovery walk, another being remarkable because the rocket shredded the chute and fell to earth without
damage, and the last because contact with an access road during recovery on Day #1 of NSL 2007 chipped a fin. Tough
bird, and I have yet to not be impressed by the performance.
I have since flown it on Estes E9-6's exclusively, with one flight being perfectly unremarkable except
for a long recovery walk, another being remarkable because the rocket shredded the chute and fell to earth without
damage, and the last because contact with an access road during recovery on Day #1 of NSL 2007 chipped a fin. Tough
bird, and I have yet to not be impressed by the performance.
Recovery:
The Rogue's recovery system seems to be bulletproof. I was initially concerned by the lack of an elastic shock cord
in the kit, but that fear disappeared after the first flight. Without any elastic there is little or no chance of the
nose cone rebounding into the fins or body tube. With the wide range of power in todays recovery charges, it's great to
be able to not worry about rebound damage with each flight. The Nomex®
chute protector is another nice touch and has done its job flawlessly.
Flight Rating: 5 out of 5
Summary:
PROs: I love the Rogue, have previously upscaled it myself, and never get tired of the look. All Kevlar®
shock cord. Killer motor mount. Nomex®
chute protector.
CONs: My "33" decal is all but invisible.
Overall Rating: 5 out of 5
Other Reviews
- Qmodeling Rogue By Chan Stevens
Brief: A great 2.2x upscale of the 1970's Estes classic that is capable of flying to nearly 1000 feet on 24mm motors. Construction: Parts were tightly packed in a plastic bag with a header card showing handwritten production number. Despite tight packing, there was no problem at all with component quality. Parts list includes: Cast resin nose cone BT-60 body tube 4 ...
 |
 |
Flights
|
|
|
|
M.A.G. (December 17, 2008)