| Construction Rating: | starstarstarstarstar_border |
| Flight Rating: | starstarstar_borderstar_borderstar_border |
| Overall Rating: | starstarstarstar_borderstar_border |
| Diameter: | 2.60 inches |
| Length: | 45.88 inches |
| Manufacturer: | Qmodeling  |
| Style: | Scale |
Brief:
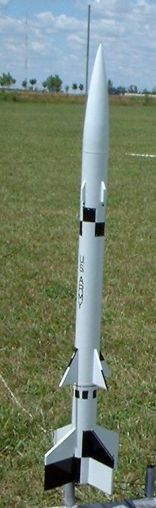
QModeling has aimed for bigger and better upscales, this time picking the Estes
classic Nike-X, offered from 1975-1984. This version is nearly a full 2:1
upscale of the original. Top quality components and instructions make this
about a skill level 3 on construction.
Construction:
Following the trend of some of the other niche players, the first 100 kits of
each model are numbered. Mine (and everyone else's) was delayed several weeks
due to a decal supplier problem, though the communication during the delay was
excellent and the horror stories were very amusing. When my kit (#10)
eventually arrived, everything was in great shape, and the basic parts list
includes:
- Resin cast nose cone
- BT-80 paper tubes/coupler
- Laser cut balsa fins
- 24mm foil-lined motor tube
- Motor mount assembly
- 30" Top-Flight ripstop nylon chute
- 9" x 9" Nomex® shield
- Water-slide decals (standard/black and white)
- "Bonus" decals (red/white/blue thanks to the supplier goof), not in standard kit
The directions were clear, well illustrated, and as good as it gets in this industry. I especially like that each section has estimated/target times for breaking the project up into smaller (weeknight) bites.
Construction begins with the very unusual QModeling motor mount. These are
not your father's tube/centering ring Estes-style assemblies but fairly
intricate assemblies made from laser-cut
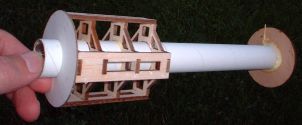 balsa frames.
Unfortunately, my kit arrived with their standard 3-fin version and BT-70
centering rings. This kit requires a 4-fin/BT-80 set. QModeling was very quick
to ship out a replacement and since I was among the first to build this, they
also checked to see if they had messed up the others. Nope, they just happened
to be one off in their stock of motor mount kits, and I just happened to have
received the bum one.
balsa frames.
Unfortunately, my kit arrived with their standard 3-fin version and BT-70
centering rings. This kit requires a 4-fin/BT-80 set. QModeling was very quick
to ship out a replacement and since I was among the first to build this, they
also checked to see if they had messed up the others. Nope, they just happened
to be one off in their stock of motor mount kits, and I just happened to have
received the bum one.
 There's one very
cool innovation about this that I have to point out, as it eliminates one of my
pet peeves. Too many of my rockets are either sans hook or have a retaining
hook that extends beyond the bottom of the tube, preventing the rocket from
standing on its own. QModeling has designed a sliding motor hook into this kit
that can be retracted to below the end of the tube for display but pulled back
out for flight. Very simple trick, works great, and I'd never seen one anywhere
else like this.
There's one very
cool innovation about this that I have to point out, as it eliminates one of my
pet peeves. Too many of my rockets are either sans hook or have a retaining
hook that extends beyond the bottom of the tube, preventing the rocket from
standing on its own. QModeling has designed a sliding motor hook into this kit
that can be retracted to below the end of the tube for display but pulled back
out for flight. Very simple trick, works great, and I'd never seen one anywhere
else like this.
They also consistently use Kevlar® mounted to the centering ring for recovery, which would be standard in most every rocket kit if companies paid attention to folks that build and fly rockets.
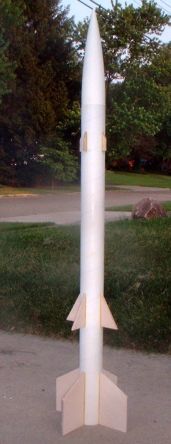
After completing the motor mount assembly and mounting it into to lower BT-80 tube, the lower fins are attached and bonded (through-the-wall). Mine fit great, with no sanding/jiggling necessary. The upper and lower tubes are then joined via coupler and yellow glue. At this point, I'd normally fill in the seam, but having read ahead in the instructions, I saw that it was covered by a decal stripe, so I left my seam a bit rough.
Next up is bonding the secondary fins, which brings up one "gotcha" in the instructions. The illustrations show bonding the fins with the aft end on the seam between tubes. Not thinking, I did exactly that, only to later discover that with the fins on the seam edge, there's not enough room for the decal to cover the seam. I would suggest mounting these fins about 1/8" forward of the seam.
The is a third set of fins or "thrusters" which are mounted towards the forward end of the upper tube.
The nose cone for this rocket is a superbly crafted resin-cast nose cone. It gets a disk bonded to the end for mounting a screw eye, and then you need to trim away the excess flashing on the bottom. I've been a bit uneasy tacking in the retaining disk with CA, but haven't had any problems yet.
Finishing:
I tend to fills grains and tube spirals as I go using Elmer's Fill 'n' Finish
diluted with a few drops of water and "painted" on with a brush. This
kit had a LOT of grain to fill and almost 4 feet tube to clean up, so the prep
work was pretty substantial.
Since my kit was one of the early ones with the extra red/white/blue color scheme decal sets, there were two different suggested paint schemes. I went the "lazy" route with the standard black and white, although I do think the red/white/blue would make for a very cool-looking rocket.
This paint scheme presents a fairly challenging masking project. The roll pattern is split through the middle of the secondary fins, so that half the fin is black and half white, and the pattern only goes to the middle of the gap between fins. Compounding the difficulty was the fact that I mounted the launch lug (as instructed) in the middle of the fin/tube joint, so I wound up having to mask around the launch lug, which was a huge pain. I strongly recommend mounting the launch lug either at the very bottom or very top of the secondary fins, leaving it off of the mask line.
The water-slide decals were excellent quality, though I had trouble working with them and they took a little practice to get used to them. First, they have to sit in water a long time (about a minute) before they came off. Second, they are made of a very thick, rubbery material, and have a very strong bite when coming into contact with the tube. Mine tended to stretch as I was applying them, so my checkerboard pattern looks like I'd been drinking heavily when finishing this rocket...resulting more in blobs than squares.
Construction Rating: 4 out of 5
Flight:
I had a very unfortunate flight experience, and QModeling has since issued a
product alert to their customers.
This kit, per spec, weighs in at 13.3 ounces, matching the weight of the one they built as a prototype. Mine weighed in closer to 14.2 ounces, as I tended to go a bit heavy on the fillets, and applied a total of 5 coats of paint (primer and topcoats). I was amazed to see a D motor even listed and skipped right over to the E9-4, the highest recommended motor on their kit. This is right at the edge of the maximum recommended weight for this motor, and I hadn't weighed mine in advance.
First flight was on a beautiful day, with light winds about 8mph. This kit definitely attracted the attention of some of the BARs in our club, and we had a big crowd watching the maiden voyage. The E9 lifted her slowly off the rod, at which point she took a funny skip sideways about 2 feet before climbing slow and straight. Just a slight roll and weathercocking a few degrees but nothing serious.
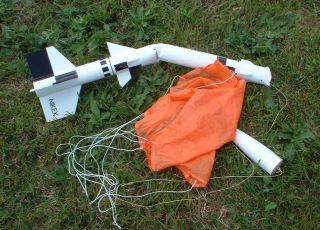
Apogee was around 300 feet, and even with a short delay the ejection didn't pop until at least 1-2 seconds after it turned over. At this point, it was starting to gain speed again until the big orange chute came out, however, it was having trouble unfurling. The chute managed to remain ahead of the rocket somehow and acted as a blanket for the BT-80 to crash into and prevented any grass stains from getting on the carcass. Even on the soft grass, this rocket actually bounced on impact and the crowd thought it was a marvelous flight.
Damage was pretty severe. Despite the appearances though, the repairs won't be too bad. I think I'm just looking at replacing a BT-80, repainting it, and applying a new set of decals, which QModeling graciously rushed out to me along with an offer of replacement tubing after the feedback.
Recovery:
On the recovery front, I really can't comment on the PROs or CONs, as I didn't
have a chance to test the recovery. I will say, though, that the chute/Nomex®/Kevlar®
provided with QModeling kits is the finest I've ever seen in a modroc.
Based on my flight experience, I would say that this rocket is marginal at best on black powder motors. Even on an E9, you'll need to make sure you're under 14 ounces and flying in little or no wind. I would strongly recommend composites, starting with an E30, F12, or F21. This is just way too much rocket to put on top of a baby E like the Estes E9.
Flight Rating: 2 out of 5
Summary:
I really like this rocket and desperately want to repair it for another flight.
As much as I rave about QModeling though, I have to rate this one as a near
miss with a combination of cursed luck affecting my kit and what is clearly a
risky motor recommendation that could (and in my case did) lead to a ruined
product and unpleasant experience.
Overall Rating: 3 out of 5
 |
 |
Flights
|
|
|
|
S.L. (January 6, 2007)