| Construction Rating: | starstarstarstarstar_border |
| Flight Rating: | starstarstarstarstar |
| Overall Rating: | starstarstarstarstar |
| Manufacturer: | Qmodeling  |
Brief:
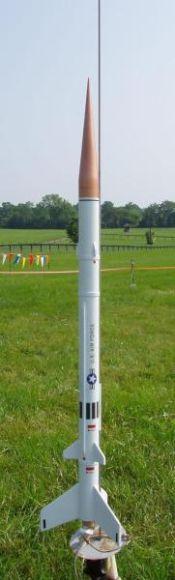
This is one of QModeling's Mega Retro Series (MRS) kits. It's a 1.68:1 upscale
of the classic Estes kit and flies on 24mm motors. It is a great looking kit
and the parts are exceptional quality.
Construction:
The kit came nicely packaged with most small components in their own bags (e.g.
all motor mount components bagged together). It appears that some of the
components have been changed since the previous review was posted. Product
improvement is a good thing. The major components per the provided checklist
include (apparent changes in bold):
- main body tube, BT-60 white glassine and pre-slotted for main fins
- foil lined BT-50 engine tube
- launch lug/standoff package
- laser cut balsa raceway
- nose cone, conical with a cylindrical base, thick molded plastic
- nose plug, lite-ply
- fin package (all fins are laser cut from 1/4" balsa):
- 3 primary fins
- 3 secondary fins
- 3 thrusters
- instructions, 23 pages of illustrated instructions including a parts re-order form
- decal set, waterslide
- 6 cardstock body wraps
- engine mount package:
- 4 balsa rings
- 6 balsa panels
- thrust ring
- long motor hook
- rear paper centering ring
- forward centering ring, lite ply
- parachute compartment ring, keeps chute at the forward end of the body tube
- parachute package:
The instructions provided with this kit are excellent. They are detailed, have clear drawings, provide warnings to keep you from messing up, tell you when to do the finishing, and provide 5 views so you can get the decals right.
You can access the full instructions online at the QModeling MRS-Stiletto page. So you don't have to go there mid-read, the following exploded view should show how this kit goes together.
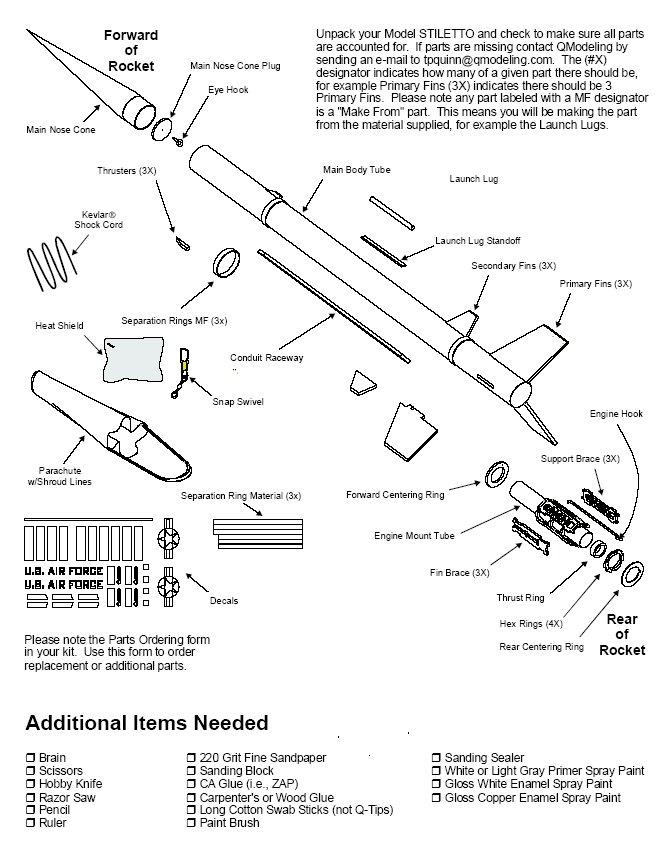
Click on image above to see larger version
(Image used with permission from QModeling)
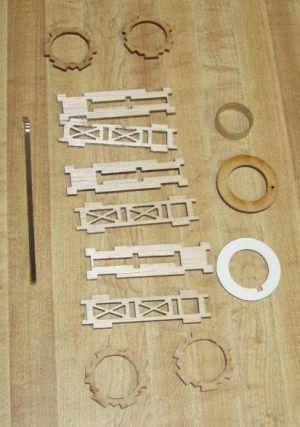
My experience with the motor mount was the same as the previous reviewer. All the interlocking pieces fit together nicely and I didn't run into any snags. The mount seems quite sturdy and almost begs for more motor when combined with the thick through the wall fins. I was contemplating modifying the engine hook to allow longer motors such as the Ellis F20, but I decided to build it stock as there are plenty of motor choices at this length.
 After the
mount is complete, the instructions say to install it in the tube. This
requires dry fitting the mount with the fins and tacking it into position. The
fins are removed until later in the build. Everything fits well and this
process is easy.
After the
mount is complete, the instructions say to install it in the tube. This
requires dry fitting the mount with the fins and tacking it into position. The
fins are removed until later in the build. Everything fits well and this
process is easy.
Next came the marking for the various components using the included guide. Installing all the outer components were straightforward. The separation rings are built up from two layers of cardstock strips. The quality of the wood in my kit was excellent and required little filling. Elmer's Fill ‘n' Finish was used to do this and was applied before assembly. I found it odd that the instructions didn't say to round the edges of the thick fins. I decided to just take the edge off. With them being so thick and perfectly square, the fins were easy to install.
The nose cone seems nice and sturdy. I found the seams very easy to sand down. It almost seemed like a gel coat material instead of plastic. I found the tip was not perfectly pointy, looking like it chipped off in the mold. I rounded it a bit and it looks fine now. The nose plug didn't fit easily but once in, it is good an snug. The instructions said to trim the end of the cone flush with the plug, but I opted to leave it and add an epoxy fillet.
 The
recovery system is top-notch, including Kevlar®
twine, Nomex®
pad, rip-stop nylon chute, and a swivel. The chute is removable and can be
transported to other rockets.
The
recovery system is top-notch, including Kevlar®
twine, Nomex®
pad, rip-stop nylon chute, and a swivel. The chute is removable and can be
transported to other rockets.
Finishing:
The instructions say to prime the model and to paint it gloss white. I used
Krylon paint. The nose cone and top of the body tube were then painted copper.
It just so happened I had Testor's copper paint from my
58mm
JATO. Luck? Fate? I don't know, but the rocket was painted the proper
color! As mentioned above, there are plenty of diagrams to position the decals.
I personally don't worry about being perfect in this regard but tried to be
close. The decals are easy to work with. A couple had a few imperfections,
which were fixed with a Sharpie pen.
Construction Rating: 4 out of 5
Flight:
Prep was easy with the provided chute pad. I didn't have a D12-3 so I went
right to the E9-4. The wind was dead calm and the boost was arrow straight. I
lost the rocket in the haze and missed where it ejected. I have no doubt that
this model could handle an F motor with no problem.
Recovery:
In the earlier review, it appeared the recovery components were oversized. It
appears they have now been sized for a better fit. There is also a ring to keep
the chute near the top of the rocket. In the calm conditions, the rocket landed
nicely about 50' from the pad.
Flight Rating: 5 out of 5
Summary:
I think this kit looks really cool and the trim helps in this regard. Once
again, I can't say enough about the materials in this kit. They were good
quality and fit like laser cut components should.
Overall Rating: 5 out of 5
Other Reviews
- Qmodeling Stiletto By Chan Stevens
Brief: If a rocket can be sexy, this one is it. A long, sleek upscale of the Estes kit, this is a beautiful single stage 24mm rocket that flies as well as it looks. Construction: I had purchased this kit through pre-order, which took several weeks but normal purchases will arrive quickly and carefully packaged in a Priority Mail tube. The kit is packed in a sealed plastic bag ...
 |
 |
Flights
|
|
|
|
M.E.R. (April 14, 2008)