Qualified Competition Rockets Micro Maxx Rotaroc Helicopter
Qualified Competition Rockets - Micro Maxx Rotaroc Helicopter
Contributed by Clive Davis
| Construction Rating: | starstarstar_borderstar_borderstar_border |
| Flight Rating: | starstarstarstarstar_border |
| Overall Rating: | starstarstarstar_borderstar_border |
| Manufacturer: | Qualified Competition Rockets  |
 Brief:
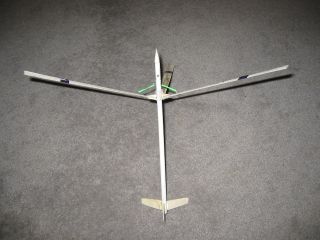
This is the MMX version of QCR's 1/4A Rotaroc helicopter. It features 3 balsa blades, 3 fins, a minimum diameter body tube, balsa nose cone, and the necessary gear for helicopter recovery: hinges, piano wire, and mini-rubber bands. I paid $7 for the kit. I think it is a good price considering the quality of parts one gets, despite my opinion that the instructions are not very good.
Construction:
The QCR rockets come in a plastic bag with an ID card stapled to the top. Inside the bag are body tube, balsa sheets for fins, blades, and rotor stops, nose cone, pre-formed piano wire, 3 nylon hinges, elastic string and sewing thread, at least 6 orthodontic rubber bands, and a monokote type tape. 4 pages of instructions are also included.

All the parts were present and in good condition. The first thing I did was read over the instructions to get a sense as to what to expect. If you have never built a QCR kit before, you may wish to read up on competition style construction. The instructions are made for the experienced modeler who needs just guidelines for instruction. I do not recommend this kit as your first helicopter kit. (I would instead recommend Apogee's Heli-roc for starters.) The QCR Rotaroc instructions are actually for their 13 mm version, and the people at QCR just added notes in pen to the 13 mm instructions. The first part of the instructions deals with the blades. The balsa is already pre-inked and needs just to be cut out. I was instructed to create an airfoil on one side only, and taper the trailing edge. The bottom of the blade remains unchanged. Then I was to create a diagonal cut from one end of the blade to the other, bend the blade 1/16", and re-glue the blade. There is an illustration for this. Just be careful sanding the blades. Since this is an MMX kit, it is very light. The balsa for the blades is not very thick and it can snap easily to sanding (as I found out, but thanks to my friend, Mr. CA, it was repairable). Further problems with the blade come later.
Next I cut out and shaped the fins according to instruction. No problem here. I then prepared the body tube by cutting vent holes at the pre-marked spot on the rocket. The instructions say to use a paper punch. This is problematic since the body tube is only 6 mm in diameter. I assume these instructions were for the 13 or 18 mm version. I used my X-acto knife and made holes where the pen marks were on the body tube.
Then I tacked on the hinges with CA glue to the area on the body tube that was already pre-marked with pen. Unfortunately, I got some CA into the joints of one of the hinges and had to remove it and replace it with one from my spare parts box. After the hinges are set, I tied the top part of the hinges with the sewing thread and soaked it with CA glue. Part of the problem with the hinges is that the nylon hinges, manufactured by Du-Bro, do not take kindly to CA and adhere to the body tube well. This part takes some patience and a steady hand. The best instructions of the kit come at this point when it indicated an optional technique of adding a small portion of plywood to the lower, moving part of the hinge. I did not have plywood, so I used really thin balsa. CA kept these on good and tight.
At this point I added the 3 fins to the body tube towards the bottom. The body tube is already marked with three lines 120 degrees apart for the fins. I changed the plans slightly by giving some room at the bottom for exposed body tube so that I could tape the motor on to the tube. The kit does not come with a motor mount, so I wanted some room to get access to the bottom of the rocket. [QCR is thinking competition even though at the time of this writing (March 2004) NAR does not have an official MMX class engine competition--although you can use it for 1/4 competition.]
Now I turned my attention back to the blades by adding the blade stop at the top of the hinge and the hook at the point already pre-marked on the blades. Unfortunately, the shape of the hooks on the blades did not correspond to the shape of the hooks in the instructions. I ended up changing the direction of the hooks so that it would better hold the rubber band (with the opening of the hook towards the bottom of the rocket). Another difficulty I had was when it came time to add the hook and stop to the blade. The instructions never indicate which is the top of the blade and which is the bottom. I assumed that the airfoil was the top and the flat surface the bottom, but it would have been nice to see this confirmed in the instructions. I also added the hooks on to the body tube above the hinges (this area was not marked), but I just guessed based on the size and strength of the rubber bands.
The blades then glued on easily to the hinges. I measured the approximate angle of the blades--they should extend up about 1.5" from the center to tip in order to get the most effective rotation possible. This took a little bit of sanding on one stop and an addition of glue and a small piece of balsa on another stop on another blade to get the optimum angles. It was at this point that I realized the blades when glued on to the hinges (at the pre-determined marks) go beneath the length of the body tube. I thought it should work, no matter what and wasn't going to stress out about it now.
I glued on the nose cone and then created a two small holes an inch or two above the motor for the string to go through. For those of you who have never flown a rotaroc, the idea is that the rubber bands hook on to the blades which are attached to hinges vertically aligned with the rocket. Hooks above the hinges support the other side of the rubber band, pulling up the blades so that the rocket can "helicopter" to the ground in a nice, stable spinning motion. To prepare the rocket, one folds all blades down along side the body tube, puts string through the body tube ABOVE the motor mount and then around the blades and ties the string off. The idea is that once the ejection charge goes off, it burns through the string, releasing the blades and engaging the helicopter recovery.
Finishing:
As I had stated earlier, QCR produces kits for the competitor, so finishing is never really necessary for altitude and duration models. The instructions I believe need to be re-written to deal with some of the discrepancies of blade shape, blade angle and attachment location, as well as producing nicer plans without hand writing all over them. Also, the shape of the nose cone is not the same shape as indicated in the instructions. It does say sand the nose cone, but it does not indicate whether or not to sand it into a parabolic shape, especially since my nose cone had a rather conical shape to it.
The only other thing I did differently is that I used a longer length of monokote tape to wrap around the blades. On my Apogee version, I noticed how the sewing thread would often cut into the blades when they were tied down. I decided to add the tape around the blades to give them more protection from the string. So far, this idea seems to have works.
If you have built helicopter kits before, I suggest getting two kits from QCR. The first kit can be used to work through all the details and the second kit can be the real McCoy.
Construction Rating: 2 out of 5
Flight:
The only motors recommended are the MMX II motors. Prepping is standard for rotarocs... fold blades down, tie down with string, insert motor. I used masking tape to friction fit the motor, and I made the motor stick out a good 1/2 inch so that the exhaust would not burn the bottom of the blades. This did not seem to affect the overall flight performance. Considering that the MMX rotaroc is quite long for an MMX rocket (over 9 inches), it did fly well to 40 or 50 feet.
Recovery:
Unfortunately, one of the blades did not employ and the rocket twirly-tumbled back to the ground. After inspection, I realized that one of the blades had been glued to the fins due to an on-the-site quick repair from a snapped fin. From some of my field tests, this rocket recovers nicely with a quick spin. I would love to be able to fly it against other QCR rotarocs to see how well it would do in a duration test. I just wonder if the rocket would go higher if it weren't so long. I think that the larger rocket gives one longer blades, but I don't know enough about this technology to know if a shorter rocket with higher altitude but smaller blades would perform better.
Flight Rating: 4 out of 5
Summary:
The PROs are obvious: a rotaroc for MMX.... cool! Also, the parts included in my kit were of good to above average in quality.
The CONs are mainly the instructions. This kit would work well for the experienced helicopter builder, but did not work so well for me. I have only build one other helicopter design, the Apogee Heli-roc. I think that QCR could benefit from re-working their instructions. One must also be very careful with CA glue and hinges. With all the moving parts and delicate shaping of the kit, this really is a skill level 4 rocket in my estimation.
Overall Rating: 3 out of 5
 |
 |
Flights
|
|