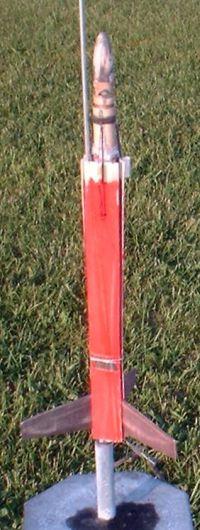
Qualified Competition Rockets Ultimate I (helicopter)
Qualified Competition Rockets - Ultimate I (helicopter)
Contributed by Chan Stevens
| Construction Rating: | starstarstarstar_borderstar_border |
| Flight Rating: | starstarstarstarstar_border |
| Overall Rating: | starstarstarstarstar_border |
| Manufacturer: | Qualified Competition Rockets  |
Brief:
A definitely competition worthy helicopter recovery model. On small motors it
can also be sport flown on a small field.
Construction:
Parts were reasonably good quality and included:
- BT-5 body tube
- Balsa nose cone
- Balsa fin stock
- Balsa blade stock
- Mylar tape
- 3 Klett-style hinges
- Balsa rotor stops
- TT-5 rotor tube
- 2 centering rings
- Assorted metal clips, details
In general, I find QCR instructions to be at best challenging and in many cases containing dimensional or procedural errors. This kit is no exception. Still, for the experienced builder, you can muddle your way through them reasonably well and will be rewarded with a fairly high performance product when done.
For the most part, the kit comes with "generic" instructions written for all size kits in the line and a kit-specific instruction sheet that lists the appropriate dimensions and special notes for this kit. This is somewhat confusing but again, something that you get used to after building a few of Ken's kits.
Construction starts with cutting and airfoiling the rotor blades. One is pre-marked on the balsa stock and the others are cut from this "template". The lines aren't always straight, so be sure to use a ruler when actually making the cuts.
There are several "optional" alternative methods along the way and I chose the first of these on the blades by making a slight cut into the blade from one corner to a point about 1/3 of the way up. You can then sort of bend the blade down a bit and glue again, offering a nice dihedral. One warning though: do this after sanding in the airfoil.
 Fins are cut from
stock in a similar manner with two different patterns provided. A basic airfoil
is all that's needed on these. External blade 'copters tend to be high drag and
perfect fins won't make much of a difference.
Fins are cut from
stock in a similar manner with two different patterns provided. A basic airfoil
is all that's needed on these. External blade 'copters tend to be high drag and
perfect fins won't make much of a difference.
The tube is premarked for fin placement, however, I am more comfortable marking them myself and tend to draw straighter lines. I tacked the fins on with CA and applied very slight fillets of white glue as the fillets are covered by blades and therefore provide no aerodynamic benefit.
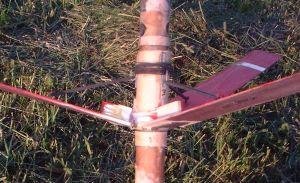
The spinning hub assembly is the trickiest part of the project, but also the part that offers the best performance kick. The general idea is that metal clips are attached to a tube that slips over the main body tube and hinges and blades are tacked to this tube. When the blades deploy, the hub spins and the main body stays put. This is higher performance than a typical fixed blade design (like the Rota-Roc) because there is no drag caused by fins spinning as the body rotates.
I have built a few of these before and learned a few tricks along the way to get better results. First, the metal clips are supposed to go through the rotor tube for better strength. That's a bad idea as they tend to scrape on the body tube and defeat the purpose of spinning hub. I tacked mine to the outside of the rotor tube and reinforce them by winding some thread around the tube and coating with CA. Another trick I apply is peel off a layer of paper from either the body tube or the inside of the rotor tube so that there's a nice, loose fit. Then I coat both surfaces with CA and sand back down with 400 grit paper before applying graphite powder to the rotor tube so that it's as low friction as possible.
There are a couple of caution points in the rotor hub construction that novices tend to trip over. First, when tacking on the hinges, don't get even a drop of CA anywhere near the hinge joint. If you do, throw it out and get a replacement hinge. The best way to protect that joint is to dip it in a little Vaseline and smear the joint around the pin. The CA won't penetrate that. Second, when wrapping the reinforcing thread around the hinges and CA'ing it, be careful not to wrap too tightly or you'll wind up pinching the tube and it won't spin well.
Once the hub is built and blades attached, the hub slips over the body tube and is held in place between two centering rings. A balsa "stop" is tacked onto each blade at this point to hold the blades to the proper dihedral angle.
I won't get into the details of all the little clips but I will summarize by saying the blades have a hook and the hub has 3 hooks and rubber bands that connect them. Like a Rota-roc, there's a burn string that holds the blades in place during ascent. when it is burned through, the blades pop up.
Finishing:
Since this is a competition model, you're not really supposed to
"finish" it. Paint is absolutely a terrible idea as it will add
weight and potentially gum up the hinges. Still, the model has to be visible to
be tracked and has to be seen in a field for ease of recovery. I applied red
dope to the tops of the blades and black dope to the fins and bottom of the
blades. Black is easier to track in the sky and the red is easier to spot when
it's on the ground.
Construction Rating: 3 out of 5
Flight:
The first of these models I built was for a contest just prior to NARAM46 and
it sailed away on an A10-3T with no stability problems, but I think the A10
might be pushing the strength of the kit.
My second of these models flew at NARAM46 on A3s both times. Neither had any stability problem.
My third of these models flew at a local contest in October 2004 and disintegrated during boost. Not shredded. It disintegrated. It literally turned into a cloud of dust and I have no idea what happened to it.
I have since built a fourth, flown it at least 4-5 times on 1/2A3-2Ts and A3-4Ts with no problems.
Recovery:
Model #1 deployed perfectly, maintained a right ride up orientation, and caught
a thermal for a duration over 3.5 minutes before it was lost.
Model #2 was jinxed by burn string failures at NARAM. On its first flight, the string burned but snagged the blades and didn't actually deploy so it tumbled to the ground for a DQ. Using the same string for the second flight (I'm a slow learner), it burned through and deployed but one of the 3 blades broke loose for another DQ.
Model #3 as noted, was destroyed.
Model #4 has had no flight or deployment problems through at least 4 flights. On 1/2A3-2Ts in dead air, 40-60 second flights are the norm. Its top time so far is 170 seconds on an A3.
Flight Rating: 4 out of 5
Summary:
Spinning hub models in general are very difficult to build and deploy
effectively, but they can be well worth the effort. This kit offers all the
right materials and basic design to get started on this type of model although
you will probably struggle along the learning curve until you get used to the
instructions and learn to tweak the design for better performance. Airfoiling
the rotors in particular is definitely a skill that takes lots of practice.
Overall Rating: 4 out of 5
 |
 |
Flights
|
|